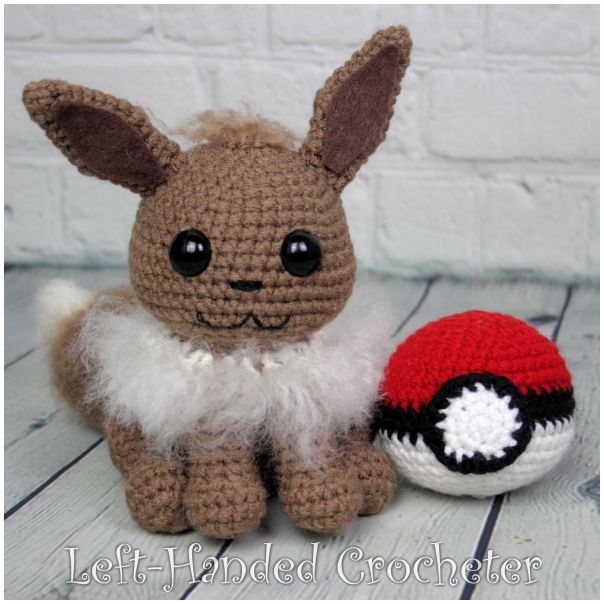
Gotta catch ‘em all! Whip up a crocheted Eevee, and it’s sure to be a hit. Made with worsted weight yarn, this finished doll measures approximately 7 inches tall, with the ears.
Abbreviations:
ch: chain
sc: single crochet
sl st: slip stitch
inc: increase (2 single crochets in one loop)
dec: decrease (pull yarn through loop, pull yarn through second loop, yarn over and pull through all loops)
Materials needed:
Any worsted weight yarn. I used Red Heart Super Saver in café latte and aran.
G (4mm) crochet hook
Poly-fil
Yarn needle
16mm safety eyes
Black embroidery thread
Stitch markers
Dark brown felt
Wire pet brush (optional)
This pattern is worked “in-the-round”, and stitches are worked through both loops unless otherwise noted.
Head:
With café latte, ch 3. Sl st to first ch to create circle. (Instead, you can perform the “magic circle” if you’d like.)
Row 1: ch 1, 10 sc inside of circle. (10 stitches)
Row 2: *Inc in first stitch, sc in next stitch, repeat from * around. (15 stitches)
Row 3: *Inc in first stitch, sc in next 2 stitches, repeat from * around. (20 stitches)
Row 4: *Inc in first stitch, sc in next 3 stitches, repeat from * around. (25 stitches)
Row 5: *Inc in first stitch, sc in next 4 stitches, repeat from * around. (30 stitches)
Row 6: *Inc in first stitch, sc in next 5 stitches, repeat from * around. (35 stitches)
Row 7: *Inc in first stitch, sc in next 6 stitches, repeat from * around. (40 stitches)
Rows 8-10: Sc in each stitch around. (40 stitches)
**For the following row, you’ll place stitch markers to create guidelines for where to place the facial features.**
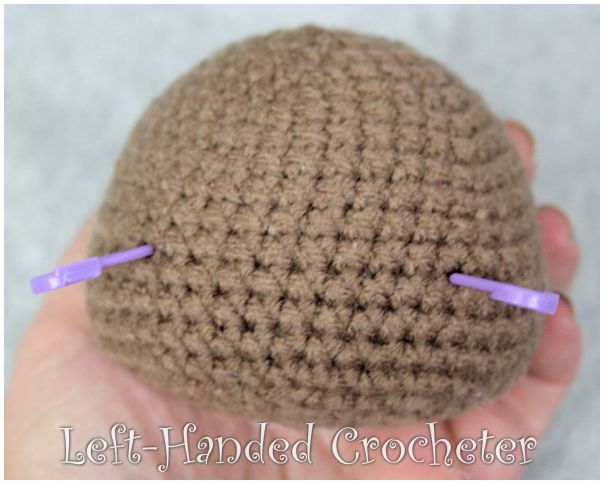
Row 11: Sc in first 10 stitches, inc in next 5 stitches (place stitch marker in last inc), sc in next 10 stitches, inc in next 5 stitches (place stitch marker in first inc), sc in last 10 stitches. (50 stitches)
Rows 12-15: Sc in each stitch around. (50 stitches)
Row 16: *Dec in first 2 stitches, sc in next 3 stitches, repeat from * around. (40 stitches)
Row 17: *Dec in first 2 stitches, sc in next 2 stitches, repeat from * around. (30 stitches)
Row 18: *Dec in first 2 stitches, sc in next stitch, repeat from * around. (20 stitches)
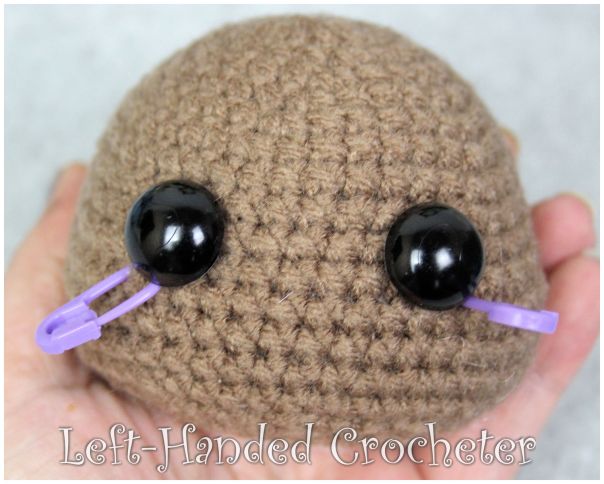
Tie off. Stuff tight with poly-fil. Using your stitch markers to guide you, place the eyes between rows 10 and 11 with 7 stitches between them.
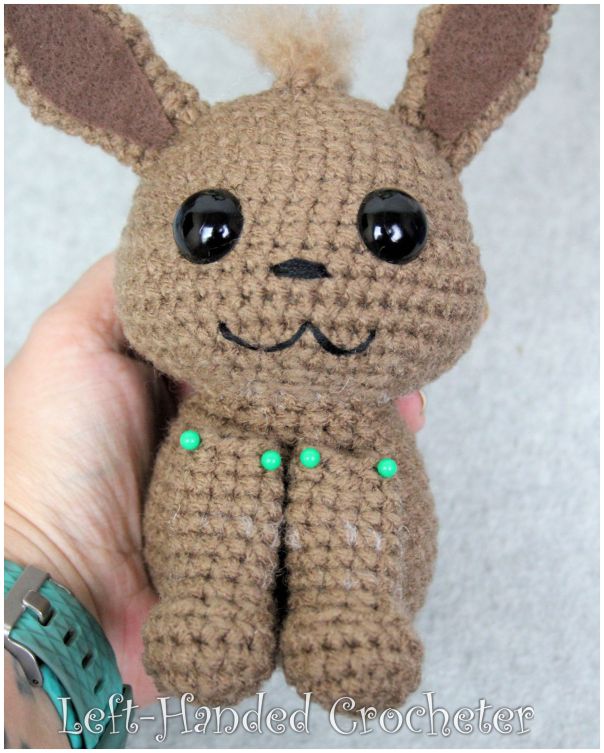
Sew a nose and mouth on with embroidery thread.
Ears:
With café latte, ch 3. Sl st to first ch to create circle. (Instead, you can perform the “magic circle” if you’d like.)
Row 1: ch 1, 4 sc inside of circle. (4 stitches)
Row 2: *Inc in first stitch, sc in next stitch, repeat from * around. (6 stitches)
Row 3: Sc in each stitch around. (6 stitches)
Row 4: *Inc in first stitch, sc in next 2 stitches, repeat from * around. (8 stitches)
Row 5: Sc in each stitch around. (8 stitches)
Row 6: *Inc in first stitch, sc in next 3 stitches, repeat from * around. (10 stitches)
Row 7: Sc in each stitch around. (10 stitches)
Row 8: *Inc in first stitch, sc in next stitch, repeat from * around. (15 stitches)
Row 9: Sc in each stitch around. (15 stitches)
Row 10: *Dec in first 2 stitches, sc in next stitch, repeat from * around. (10 stitches)
Row 11: Sc in each stitch around. (10 stitches)
Row 12: *Dec in first 2 stitches, sc in next 3 stitches, repeat from * around. (8 stitches)
Row 13: Sc in each stitch around. (8 stitches)
Tie off. Make two. Positon and sew onto top of head. Cut dark brown felt and either hot glue or sew onto front of ears.
Body:
With café latte, ch 3. Sl st to first ch to create circle. (Instead, you can perform the “magic circle” if you’d like.)
Row 1: ch 1, 10 sc inside of circle. (10 stitches)
Row 2: *Inc in first stitch, sc in next stitch, repeat from * around. (15 stitches)
Row 3: *Inc in first stitch, sc in next 2 stitches, repeat from * around. (20 stitches)
Row 4: *Inc in first stitch, sc in next 3 stitches, repeat from * around. (25 stitches)
Row 5: *Inc in first stitch, sc in next 4 stitches, repeat from * around. (30 stitches)
Row 6: *Inc in first stitch, sc in next 5 stitches, repeat from * around. (35 stitches)
Row 7: *Inc in first stitch, sc in next 6 stitches, repeat from * around. (40 stitches)
Row 8: *Dec in first 2 stitches, sc in next 6 stitches, repeat from * around. (35 stitches)
Row 9: Sc in each stitch around. (35 stitches)
Row 10: *Dec in first 2 stitches, sc in next 5 stitches, repeat from * around. (30 stitches)
Rows 11-12: Sc in each stitch around. (30 stitches)
Row 13: *Dec in first 2 stitches, sc in next 4 stitches, repeat from * around. (25 stitches)
Rows 14-15: Sc in each stitch around. (25 stitches)
Row 16: *Dec in first 2 stitches, sc in next 3 stitches, repeat from * around. (20 stitches)
Tie off. Stuff body tight with poly-fil. Position and sew head onto body.
Arms:
With café latte, ch 3. Sl st to first ch to create circle. (Instead, you can perform the “magic circle” if you’d like.)
Row 1: ch 1, 10 sc inside of circle. (10 stitches)
Row 2: *Inc in first stitch, sc in next stitch, repeat from * around. (15 stitches)
Rows 3-4: Sc in each stitch around. (15 stitches)
Row 5: Sc in first 2 stitches, work 5 dec’s across the next 10 stitches, sc in last 3 stitches. (10 stitches)
Stuff foot tight with poly-fil.
Rows 6-11: Sc in each stitch around. (10 stitches)
Row 12: *Dec in first 2 stitches, sc in next 3 stitches, repeat from * around. (8 stitches)
Tie off. Stuff tight with poly-fil, leaving top 4-5 rows unstuffed. Make two. Position and sew onto front of body.
Legs:
With café latte, ch 3. Sl st to first ch to create circle. (Instead, you can perform the “magic circle” if you’d like.)
Row 1: ch 1, 10 sc inside of circle. (10 stitches)
Row 2: *Inc in first stitch, sc in next stitch, repeat from * around. (15 stitches)
Row 3: *Inc in first stitch, sc in next 2 stitches, repeat from * around. (20 stitches)
Rows 4-6: Sc in each stitch around. (20 stitches)
Tie off. Position onto sides of body. Sew on, stopping before you do the last few stitches to stuff some poly-fil inside.


Feet:
With café latte, ch 3. Sl st to first ch to create circle. (Instead, you can perform the “magic circle” if you’d like.)
Row 1: ch 1, 10 sc inside of circle. (10 stitches)
Row 2: *Inc in first stitch, sc in next stitch, repeat from * around. (15 stitches)
Rows 3-4: Sc in each stitch around. (15 stitches)
Row 5: Sc in first 2 stitches, work 5 dec’s across the next 10 stitches, sc in last 3 stitches. (10 stitches)
Row 6: Sc in each stitch around. (10 stitches)
Tie off. Stuff tight with poly-fil. Position onto legs, making sure it stands before sewing them on.
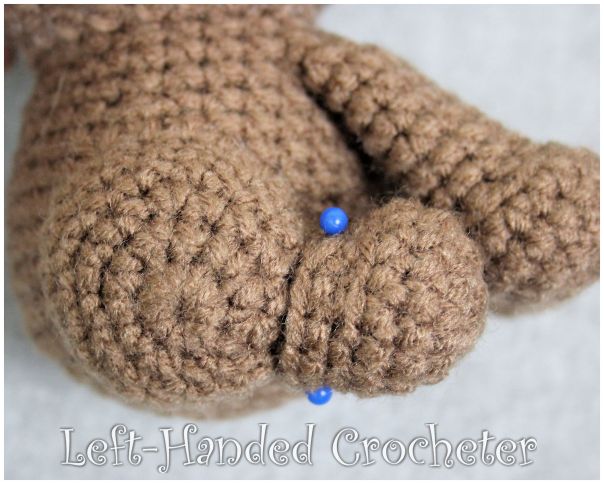
Tail:
With aran, ch 3. Sl st to first ch to create circle. (Instead, you can perform the “magic circle” if you’d like.)
Row 1: ch 1, 4 sc inside of circle. (4 stitches)
Row 2: *Inc in first stitch, sc in next stitch, repeat from * around. (6 stitches)
Row 3: *Inc in first stitch, sc in next 2 stitches, repeat from * around. (8 stitches)
Row 4: *Inc in first stitch, sc in next 3 stitches, repeat from * around. (10 stitches)
Row 5: *Inc in first stitch, sc in next 4 stitches, repeat from * around. (12 stitches)
Row 6: *Inc in first stitch, sc in next 5 stitches, repeat from * around. (14 stitches)
Row 7: Inc in first stitch, sc in next 13 stitches. (15 stitches)
Switch to café latte.
Row 8: *Inc in first stitch, sc in next 2 stitches, repeat from * around. (20 stitches)
Row 9: *Inc in first stitch, sc in next 3 stitches, repeat from * around. (25 stitches)
Row 10: *Inc in first stitch, sc in next 4 stitches, repeat from * around. (30 stitches)
Rows 11-18: Sc in each stitch around. (30 stitches)
Row 19: *Dec in first 2 stitches, sc in next 4 stitches, repeat from * around. (25 stitches)
Row 20: *Dec in first 2 stitches, sc in next 3 stitches, repeat from * around. (20 stitches)
Row 21: *Dec in first 2 stitches, sc in next 2 stitches, repeat from * around. (15 stitches)
Stuff tight with poly-fil.
Row 22: *Dec in first 2 stitches, sc in next stitch, repeat from * around. (10 stitches)
Rows 23-24: Sc in each stitch around. (10 stitches)
Tie off. Leave last 3 rows unstuffed. Position and sew onto back of body. Brush out tail with a wire pet brush to make it fuzzy. Attach aran yarn around neck.
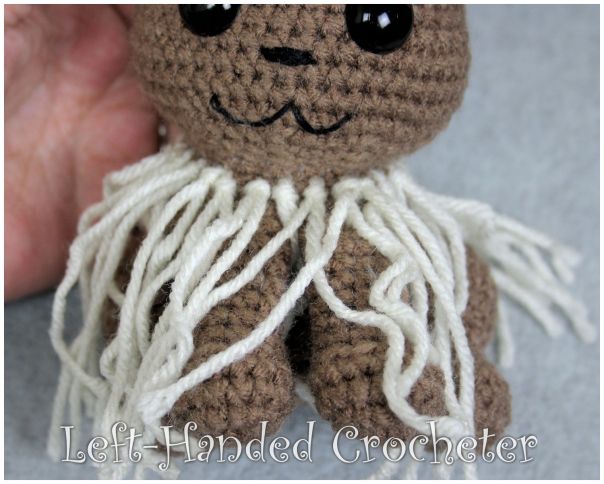
Pull each strand apart, or brush it out with a wire pet brush. Trim “fur” to desired length.


I hope you enjoy this pattern! You’re welcome to sell items that you make using my patterns, as long as you don’t post the pattern anywhere else, and link back to my page if you’d like to. If there are any mistakes, or something is unclear, please feel free to message me on Facebook.

