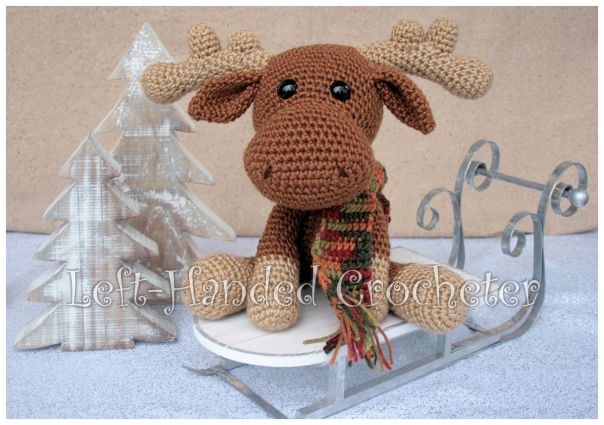
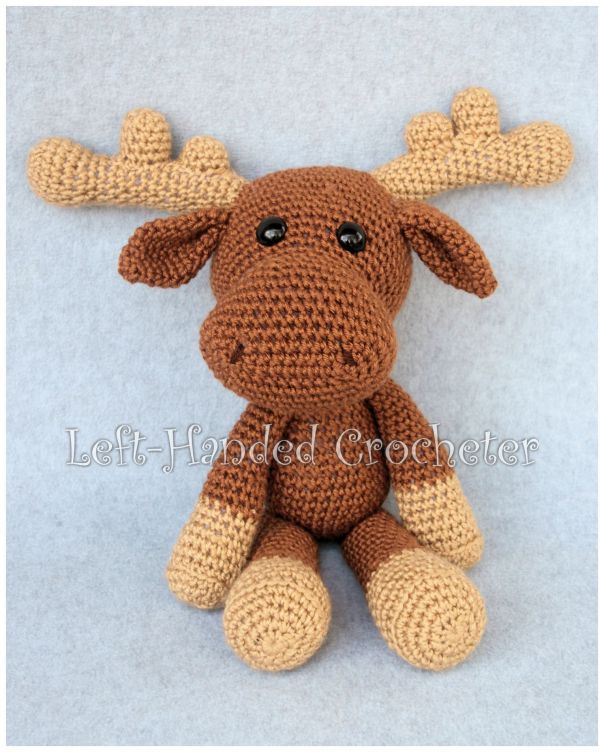
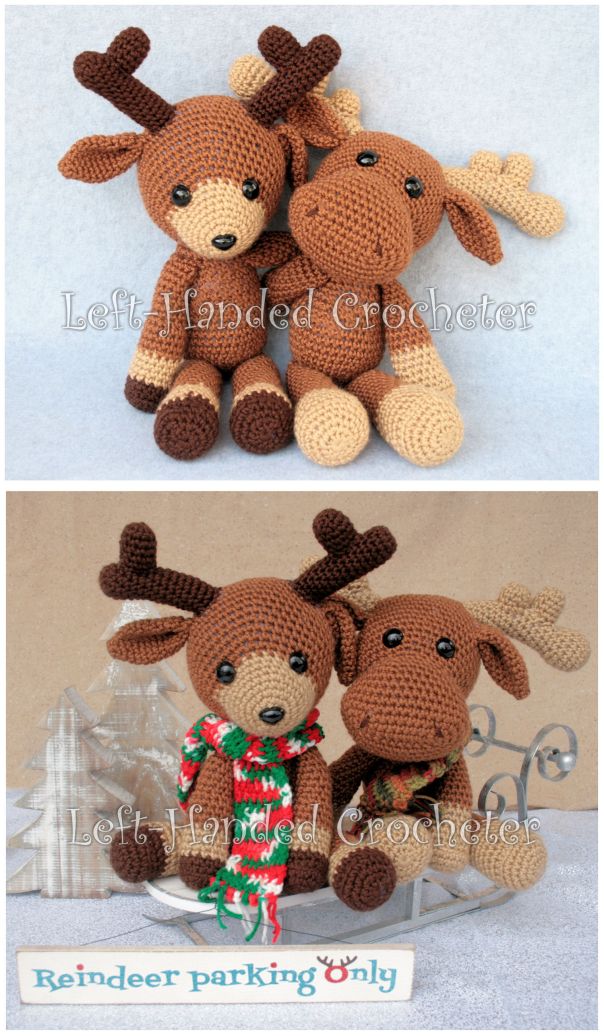
I made Marty the Moose to go with Randall the Reindeer, because I thought he needed a friend. While I think of reindeer as being a Christmas animal, a moose makes me think more of autumn for some reason. In any case, Marty the Moose would make a great stuffy to put on a shelf with your holiday decorations, but he’s also soft and cuddly for little ones to hug.
If you want a pattern that you can save on your computer and easily print, this pattern is available in my Ravelry shop for only $2.00. I love printing patterns and saving them in a binder to keep track of the ones I’ve done and the ones I still plan to do.
Abbreviations:
ch: chain
sc: single crochet
sl st: slip stitch
inc: increase (2 single crochets in one loop)
dec: decrease (pull yarn through loop, pull yarn through second loop, yarn over and pull through all loops)
Materials needed (with affiliate links):
Red Heart Soft yarn in wheat and toast.
Red Heart fall for scarf
This pattern is worked “in-the-round”, and stitches are worked through both loops unless otherwise noted.
Head
With toast, ch. 11
Row 1: This is worked around the chain you just made. Sc in 2nd chain from hook and in each across, working 3 sc’s into the last ch. Turn and work in the other loop of the chain and sc across, working 2 sc’s in last ch. St st to 1st sc, ch. 1. (22 total stitches)
*NOTE* Photos are from a different pattern, but they show how the process works.


Row 2: 2 sc in first st, sc in next 8 st, work 2 sc’s in each of the next 3 st, sc in next 8, work 2 sc’s in each of the next 2. St sl to 1st sc, ch. 1. (28 total stitches)

Row 3: 2 sc in first st, sc in next 11 st, work 2 sc’s in each of the next 3 st, sc in next 11, work 2 sc’s in each of the next 2. St sl to 1st sc, ch. 1. (34 total stitches)

Row 4: 2 sc in first st, sc in next 14 st, work 2 sc’s in each of the next 3 st, sc in next 14, work 2 sc’s in each of the next 2. St sl to 1st sc, ch. 1. (40 total stitches)

Rows 5-8: Sc in each stitch around. (40 stitches)
Row 9: *Dec in first 2 stitches, sc in next 6 stitches, repeat from * around. (35 stitches)
Row 10: *Dec in first 2 stitches, sc in next 5 stitches, repeat from * around. (30 stitches)
Row 11: *Dec in first 2 stitches, sc in next 4 stitches, repeat from * around. (25 stitches)
Row 12: Sc in each stitch around. (25 stitches)
Row 13: *Inc in first stitch, sc in next 4 stitches, repeat from * around. (30 stitches)
Row 14: *Inc in first stitch, sc in next 5 stitches, repeat from * around. (35 stitches)
Row 15: *Inc in first stitch, sc in next 6 stitches, repeat from * around. (40 stitches)
Row 16: Sc in each stitch around. (40 stitches)
Row 17: *Inc in first stitch, sc in next 7 stitches, repeat from * around. (45 stitches)
Row 18: Sc in each stitch around. (45 stitches)
Row 19: *Inc in first stitch, sc in next 8 stitches, repeat from * around. (50 stitches)
Rows 20-25: Sc in each stitch around. (50 stitches)
Row 26: *Dec in first 2 stitches, sc in next 8 stitches, repeat from * around. (45 stitches)
Row 27: *Dec in first 2 stitches, sc in next 7 stitches, repeat from * around. (40 stitches)
Row 28: *Dec in first 2 stitches, sc in next 6 stitches, repeat from * around. (35 stitches)
Row 29: *Dec in first 2 stitches, sc in next 5 stitches, repeat from * around. (30 stitches)
Row 30: *Dec in first 2 stitches, sc in next 4 stitches, repeat from * around. (25 stitches)
At this point, stuff the head, insert the nose and eyes. Continue stuffing as you go.
Row 31: *Dec in first 2 stitches, sc in next 3 stitches, repeat from * around. (20 stitches)
Row 32: *Dec in first 2 stitches, sc in next 2 stitches, repeat from * around. (15 stitches)
Row 33: *Dec in first 2 stitches, sc in next stitch, repeat from * around. (10 stitches)
Row 34: Dec around. (5 stitches)
Sew end shut. Tie off.
Body:
With toast yarn, ch 3. Sl st to first ch to create circle. (Instead, you can perform the “magic circle” if you’d like.)
Row 1: ch 1, 10 sc inside of circle. (10 stitches)
Row 2: *Inc in first stitch, sc in next stitch, repeat from * around. (15 stitches)
Row 3: *Inc in first stitch, sc in next 2 stitches, repeat from * around. (20 stitches)
Row 4: *Inc in first stitch, sc in next 3 stitches, repeat from * around. (25 stitches)
Row 5: *Inc in first stitch, sc in next 4 stitches, repeat from * around. (30 stitches)
Row 6: *Inc in first stitch, sc in next 5 stitches, repeat from * around. (35 stitches)
Row 7: *Inc in first stitch, sc in next 6 stitches, repeat from * around. (40 stitches)
Row 8: *Dec in first 2 stitches, sc in next 6 stitches, repeat from * around. (35 stitches)
Rows 9-11: Sc in each stitch around. (35 stitches)
Row 12: *Dec in first 2 stitches, sc in next 5 stitches, repeat from * around. (30 stitches)
Rows 13-14: Sc in each stitch around. (30 stitches)
Row 15: *Dec in first 2 stitches, sc in next 4 stitches, repeat from * around. (25 stitches)
Rows 16-17: Sc in each stitch around. (25 stitches)
Row 18: *Dec in first 2 stitches, sc in next 3 stitches, repeat from * around. (20 stitches)
Rows 19-20: Sc in each stitch around. (20 stitches)
Tie off. Stuff with poly-fil.
Arms:
With wheat, ch 3. Sl st to first ch to create circle. (Instead, you can perform the “magic circle” if you’d like.)
Row 1: ch 1, 10 sc inside of circle. (10 stitches)
Row 2: *Inc in first stitch, sc in next stitch, repeat from * around. (15 stitches)
Row 3: *Inc in first stitch, sc in next 2 stitches, repeat from * around. (20 stitches)
Row 4: *Inc in first stitch, sc in next 3 stitches, repeat from * around. (25 stitches)
Row 5: In front loops only, *dec in first 2 stitches, sc in next 3 stitches, repeat from * around. (20 stitches)
Rows 6-7: Sc in each stitch around. (20 stitches)
Row 8: *Dec in first 2 stitches, sc in next 2 stitches, repeat from * around. (15 stitches)
Rows 9-10: Sc in each stitch around. (15 stitches) Switch to toast.
Rows 11-13: Sc in each stitch around. (15 stitches)
Row 14: *Dec in first 2 stitches, sc in next stitch, repeat from * around. (10 stitches)
Rows 15-22: Sc in each stitch around. (10 stitches)
Tie off. Stuff with poly-fil, leaving top few rows unstuffed.
Legs:
With wheat, ch 3. Sl st to first ch to create circle. (Instead, you can perform the “magic circle” if you’d like.)
Row 1: ch 1, 10 sc inside of circle. (10 stitches)
Row 2: *Inc in first stitch, sc in next stitch, repeat from * around. (15 stitches)
Row 3: *Inc in first stitch, sc in next 2 stitches , repeat from * around. (20 stitches)
Row 4: *Inc in first stitch, sc in next 3 stitches , repeat from * around. (25 stitches)
Row 5: *Inc in first stitch, sc in next 4 stitches , repeat from * around. (30 stitches)
Row 6: In front loops only, *dec in first 2 stitches, sc in next 4 stitches, repeat from * around. (25 stitches)
Rows 7-8: Sc in each stitch around. (25 stitches)
Row 9: *Dec in first 2 stitches, sc in next 3 stitches, repeat from * around. (20 stitches)
Rows 10-11: Sc in each stitch around. (20 stitches) Switch to toast.
Row 12: Sc in each stitch around. (20 stitches)
Row 13: *Dec in first 2 stitches, sc in next 2 stitches, repeat from * around. (15 stitches)
Rows 14-24: Sc in each stitch around. (15 stitches)
Row 25: *Dec in first 2 stitches, sc in next stitch, repeat from * around. (10 stitches)
Rows 26-27: Sc in each stitch around. (10 stitches)
Tie off. Stuff a little more than halfway with poly-fil.
Ears
With toast, ch 3. Sl st to first ch to create circle. (Instead, you can perform the “magic circle” if you’d like.)
Row 1: ch 1, 5 sc inside of circle. (5 stitches)
Row 2: Sc in each stitch around. (5 stitches)
Row 3: Inc in each stitch around. (10 stitches)
Row 4: Sc in each stitch around. (10 stitches)
Row 5: *Inc in first stitch, sc in next stitch, repeat from * around. (15 stitches)
Rows 6-13: Sc in each stitch around. (15 stitches)
Tie off. Make 2. Lay flat and fold in half to sew on.
Antlers
With wheat, ch 3. Sl st to first ch to create circle. (Instead, you can perform the “magic circle” if you’d like.)
Row 1: ch 1, 10 sc inside of circle. (10 stitches)
Row 2: *Inc in first stitch, sc in next stitch, repeat from * around. (15 stitches)
Rows 3-6: Sc in each stitch around. (15 stitches)
Row 7: *Dec in first 2 stitches, sc in next stitch, repeat from * around. (10 stitches)
Rows 8-22: Sc in each stitch around. (10 stitches)
Tie off. Make 2. Stuff with poly-fil.
Big Stump for Antlers
With wheat, ch 3. Sl st to first ch to create circle. (Instead, you can perform the “magic circle” if you’d like.)
Row 1: ch 1, 10 sc inside of circle. (10 stitches)
Rows 2-6: Sc in each stitch around. (10 stitches)
Tie off. Make 2. Stuff with poly-fil. Position and sew onto antler.
Small Stump for Antlers
With wheat, ch 3. Sl st to first ch to create circle. (Instead, you can perform the “magic circle” if you’d like.)
Row 1: ch 1, 10 sc inside of circle. (10 stitches)
Rows 2-4: Sc in each stitch around. (10 stitches)
Tie off. Make 2. Stuff with poly-fil. Position and sew onto antler.
Tail
With toast, ch 3. Sl st to first ch to create circle. (Instead, you can perform the “magic circle” if you’d like.)
Row 1: ch 1, 5 sc inside of circle. (5 stitches)
Row 2: Sc in each stitch around. (5 stitches)
Row 3: Inc in each stitch around. (10 stitches)
Rows 4-5: Sc in each stitch around. (10 stitches)
Tie off. Lay flat.
Scarf
With fall yarn, ch. 9.
Row 1: Hdc in 2nd ch from hook and in each ch across, ch 1, turn. (8 stitches)
Rows 2-60: Hdc in each stitch across, ch 1, turn. (8 stitches)
Tie off after last round. Add fringe to ends.
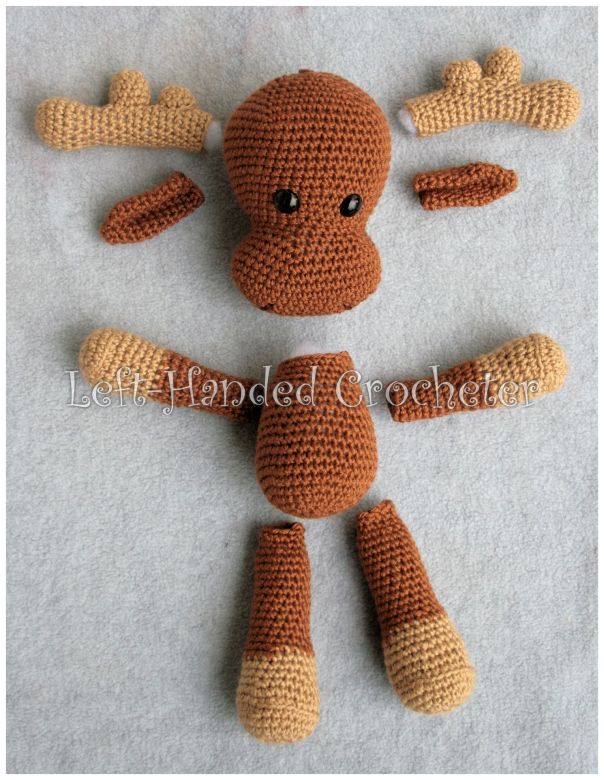
Sew all of your pieces on.
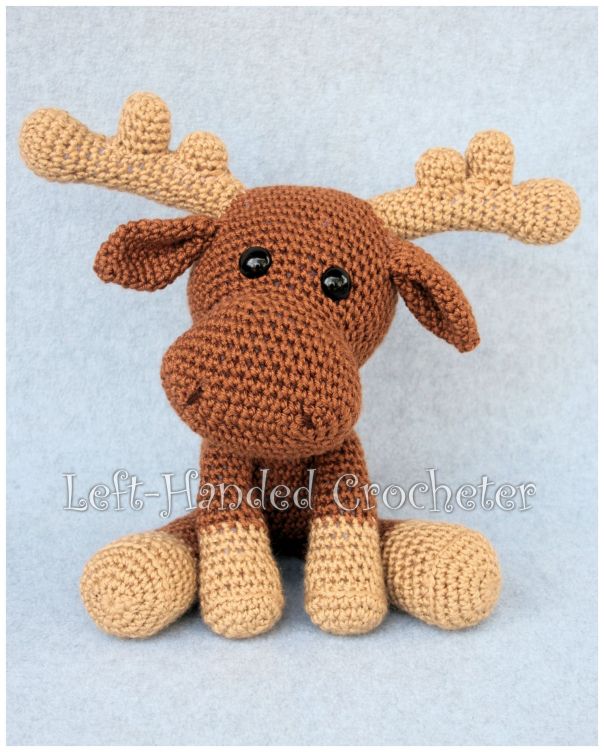
As you can see, he looks really cute without the scarf, so it’s not necessary. But he also looks awful cute with it.


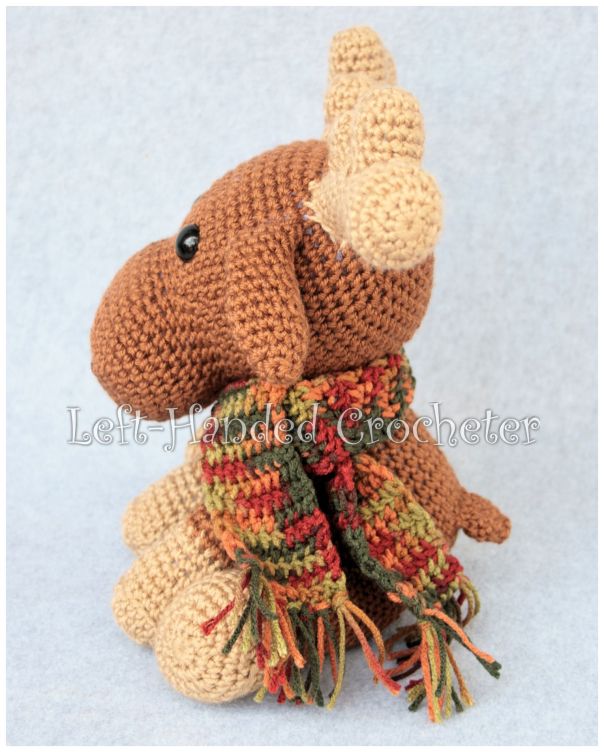
Just a note here. I used Red Heart Soft for Marty because I wanted him to be soft and cuddly. As you can see, Red Heart Soft has quite a bit of stretch to it so it may leave gaps in your work. You can minimize this by using a smaller hook and making sure your stitches are really tight. Or you could make him using a different yarn if you’d like.
Be sure to go check out the pattern for Randall the Reindeer too.
If you would like to help support me so I can keep posting free patterns, or you’d like an ad-free pdf of this pattern that you can save and print, you can purchase it on Ravelry for a small fee.
I hope you enjoy this pattern! You’re welcome to sell items that you make using my patterns, as long as you don’t post the pattern anywhere else, and link back to my page if you’d like to. If there are any mistakes, or something is unclear, please feel free to leave me a comment and let me know. Or message me on Facebook. If you create any moose of your own, be sure to post a photo on my Facebook page so I can see. I love seeing all of the things people are creating, and I’d love to see the different variations that people make of these.


He’s just precious!
Loved making him. And love how he turned out. Thank you for the pattern.
I’m having a lot of fun making him. Just a quick correction. Row 4 on arms should be inc then sc 3 in a row to get 25, it says 2
Thank you for letting me know this. It’s fixed now. Funny, I’ve had a lot of people make this one and nobody else ever noticed the number there was wrong. lol