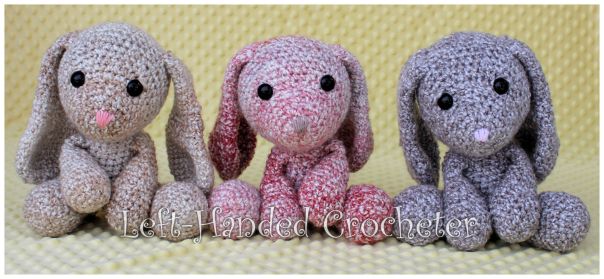


This floppy, cuddly bunny would be perfect for inside of an Easter basket. The finished size is approximately 14 inches tall.
If you want a pattern that you can save on your computer and easily print, this pattern is available in my Ravelry shop for only $2.00. I love printing patterns and saving them in a binder to keep track of the ones I’ve done and the ones I still plan to do.
Abbreviations:
ch: chain
sc: single crochet
sl st: slip stitch
inc: increase (2 single crochets in one loop)
dec: decrease (pull yarn through loop, pull yarn through second loop, yarn over and pull through all loops)
Materials needed (with affiliate links):
Lion Brand Homespun yarn (I used approximately 1.5 skeins for each bunny, but I tend to crochet very tight. 2 skeins should be plenty to make yourself a bunny.)
Embroidery thread
This pattern is worked “in-the-round”, and stitches are worked through both loops unless otherwise noted.
Head:
Ch 3. Sl st to first ch to create circle. (Instead, you can perform the “magic circle” if you’d like.)
Row 1: ch 1, 5 sc inside of circle. (5 stitches)
Row 2: Inc in each stitch around. (10 stitches)
Row 3: *Inc in first stitch, sc in next stitch, repeat from * around. (15 stitches)
Row 4: *Inc in first stitch, sc in next 2 stitches, repeat from * around. (20 stitches)
Row 5: Sc in each stitch around. (20 stitches)
Row 6: *Inc in first stitch, sc in next 3 stitches, repeat from * around. (25 stitches)
Rows 7-8: Sc in each stitch around. (25 stitches)
Row 9: Sc in first 10 stitches, inc in next 5 stitches, sc in next 10 stitches. (30 stitches) Insert a stitch marker after the last increase to show where to insert the eyes later.
Row 10: *Inc in first stitch, sc in next 5 stitches, repeat from * around. (35 stitches)
Row 11: *Inc in first stitch, sc in next 6 stitches, repeat from * around. (40 stitches)
Row 12: Sc in each stitch around. (40 stitches)
Row 13: *Inc in first stitch, sc in next 7 stitches, repeat from * around. (45 stitches)
Rows 14-18: Sc in each stitch around. (45 stitches)
Row 19: *Dec in first 2 stitches, sc in next 7 stitches, repeat from * around. (40 stitches)
Row 20: *Dec in first 2 stitches, sc in next 6 stitches, repeat from * around. (35 stitches)
Row 21: Sc in each stitch around. (35 stitches)
Stop at this point and stuff with poly-fil. Insert safety eyes between rows 8 and 9 with 9 stitches in between. Sew nose on with embroidery thread or yarn.
Row 22: *Dec in first 2 stitches, sc in next 5 stitches, repeat from * around. (30 stitches)
Row 23: *Dec in first 2 stitches, sc in next 4 stitches, repeat from * around. (25 stitches)
Row 24: Sc in each stitch around. (25 stitches)
Row 25: *Dec in first 2 stitches, sc in next 3 stitches, repeat from * around. (20 stitches)
Row 26: *Dec in first 2 stitches, sc in next 2 stitches, repeat from * around. (15 stitches)
Row 27: *Dec in first 2 stitches, sc in next stitch, repeat from * around. (10 stitches)
Row 28: Dec around. (5 stitches)
Sew end shut. Tie off.
Ears:
Ch 3. Sl st to first ch to create circle. (Instead, you can perform the “magic circle” if you’d like.)
Row 1: ch 1, 5 sc inside of circle. (5 stitches)
Row 2: Inc in each stitch around. (10 stitches)
Row 3: *Inc in first stitch, sc in next stitch, repeat from * around. (15 stitches)
Row 4: *Inc in first stitch, sc in next 2 stitches, repeat from * around. (20 stitches)
Row 5: *Inc in first stitch, sc in next 3 stitches, repeat from * around. (25 stitches)
Row 6: *Inc in first stitch, sc in next 4 stitches, repeat from * around. (30 stitches)
Rows 7-11: Sc in each stitch around. (30 stitches)
Row 12: *Dec in first 2 stitches, sc in next 4 stitches, repeat from * around. (25 stitches)
Rows 13-14: Sc in each stitch around. (25 stitches)
Row 15: *Dec in first 2 stitches, sc in next 3 stitches, repeat from * around. (20 stitches)
Rows 16-18: Sc in each stitch around. (20 stitches)
Row 19: *Dec in first 2 stitches, sc in next 2 stitches, repeat from * around. (15 stitches)
Rows 20-29: Sc in each stitch around. (15 stitches)
Tie off. Do not stuff. Lay flat and sew to head.
Body:
Ch 3. Sl st to first ch to create circle. (Instead, you can perform the “magic circle” if you’d like.)
Row 1: ch 1, 5 sc inside of circle. (5 stitches)
Row 2: Inc in each stitch around. (10 stitches)
Row 3: *Inc in first stitch, sc in next stitch, repeat from * around. (15 stitches)
Row 4: *Inc in first stitch, sc in next 2 stitches, repeat from * around. (20 stitches)
Row 5: *Inc in first stitch, sc in next 3 stitches, repeat from * around. (25 stitches)
Row 6: *Inc in first stitch, sc in next 4 stitches, repeat from * around. (30 stitches)
Row 7: *Inc in first stitch, sc in next 5 stitches, repeat from * around. (35 stitches)
Row 8: *Inc in first stitch, sc in next 6 stitches, repeat from * around. (40 stitches)
Row 9: *Dec in first 2 stitches, sc in next 6 stitches, repeat from * around. (35 stitches)
Row 10: Sc in each stitch around. (35 stitches)
Row 11: *Dec in first 2 stitches, sc in next 5 stitches, repeat from * around. (30 stitches)
Rows 12-13: Sc in each stitch around. (30 stitches)
Row 14: *Dec in first 2 stitches, sc in next 4 stitches, repeat from * around. (25 stitches)
Rows 15-16: Sc in each stitch around. (25 stitches)
Row 17: *Dec in first 2 stitches, sc in next 3 stitches, repeat from * around. (20 stitches)
Row 18: Sc in each stitch around. (20 stitches)
Tie off. Stuff with poly-fil. Sew onto head.
Legs:
Ch 3. Sl st to first ch to create circle. (Instead, you can perform the “magic circle” if you’d like.)
Row 1: ch 1, 5 sc inside of circle. (5 stitches)
Row 2: Inc in each stitch around. (10 stitches)
Row 3: *Inc in first stitch, sc in next stitch, repeat from * around. (15 stitches)
Row 4: *Inc in first stitch, sc in next 2 stitches, repeat from * around. (20 stitches)
Row 5: *Inc in first stitch, sc in next 3 stitches, repeat from * around. (25 stitches)
Rows 6-10: Sc in each stitch around. (25 stitches)
Row 11: *Dec in first 2 stitches, sc in next 3 stitches, repeat from * around. (20 stitches)
Rows 12-13: Sc in each stitch around. (20 stitches)
Row 14: *Dec in first 2 stitches, sc in next 2 stitches, repeat from * around. (15 stitches)
Rows 15-24: Sc in each stitch around. (15 stitches)
Tie off. Stuff halfway with poly-fil. Sew onto bottom of body.
Arms:
Ch 3. Sl st to first ch to create circle. (Instead, you can perform the “magic circle” if you’d like.)
Row 1: ch 1, 5 sc inside of circle. (5 stitches)
Row 2: Inc in each stitch around. (10 stitches)
Row 3: *Inc in first stitch, sc in next stitch, repeat from * around. (15 stitches)
Row 4: *Inc in first stitch, sc in next 2 stitches, repeat from * around. (20 stitches)
Rows 5-8: Sc in each stitch around. (20 stitches)
Row 9: *Dec in first 2 stitches, sc in next 2 stitches, repeat from * around. (15 stitches)
Rows 10-13: Sc in each stitch around. (15 stitches)
Row 14: *Dec in first 2 stitches, sc in next stitch, repeat from * around. (10 stitches)
Rows 15-18: Sc in each stitch around. (10 stitches)
Tie off. Stuff halfway with poly-fil. Sew onto sides of body.
Tail:
Ch 3. Sl st to first ch to create circle. (Instead, you can perform the “magic circle” if you’d like.)
Row 1: ch 1, 5 sc inside of circle. (5 stitches)
Row 2: Inc in each stitch around. (10 stitches)
Row 3: Sc in each stitch around. (10 stitches)
Tie off. Sew onto butt.


This pattern can also be made with other types of yarn. Using a worsted weight yarn will make it smaller, like this one.


For the worsted weight bunny I used Vanna’s Choice yarn in oatmeal, an H (5mm) crochet hook and 15mm safety eyes. You can also make them using fluffy yarn.
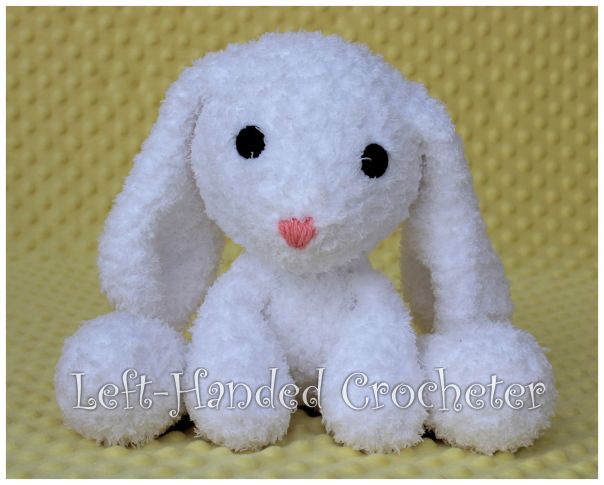
For this bunny I used Bernat Pipsqueak yarn in white, an H (5mm) crochet hook and 18mm safety eyes. He ended up a little bit bigger than the ones I made using the Homespun yarn.
I hope you enjoy this pattern! You’re welcome to sell items that you make using my patterns, as long as you don’t post the pattern anywhere else, and link back to my page if you’d like to. If there are any mistakes, or something is unclear, please feel free to leave me a comment and let me know. Or message me on Facebook. If you create any bunnies of your own, be sure to post a photo on my Facebook page so I can see. I love seeing all of the things people are creating, and I’d love to see the different variations that people make of these.


Cute ❤
Adorable! I will have to save this for later. 😊
So sweet! These would be so cute in their Easter Basket! So reminiscent of the velveteen rabbit too!