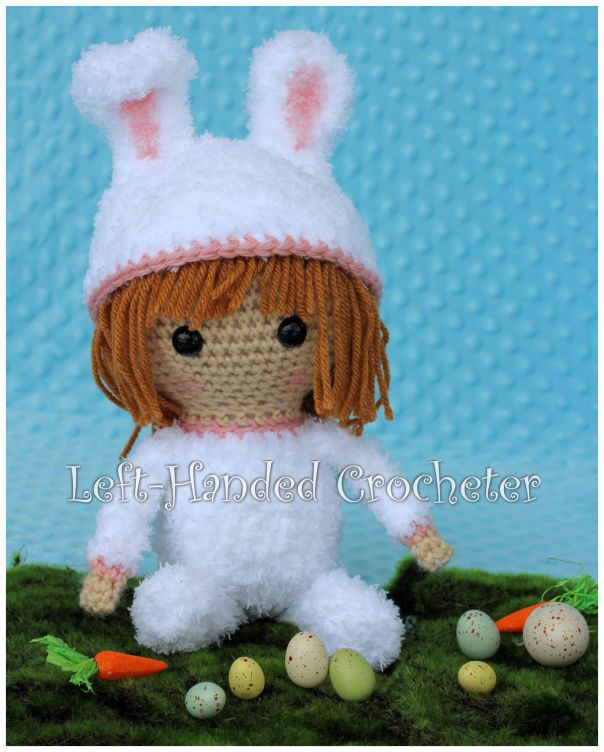
Trixie is all dressed up and she’s hopping your way to help you find some eggs. This finished doll stands approximately 14 inches tall, perfect size for cuddling. She’s made with Bernat Pipsqueak yarn, but you could make her with all worsted weight yarn if you prefer.
If you want a pattern that you can save on your computer and easily print, this pattern is available in my Ravelry shop for only $2.00. I love printing patterns and saving them in a binder to keep track of the ones I’ve done and the ones I still plan to do.
Abbreviations:
ch: chain
sc: single crochet
sl st: slip stitch
dc: double crochet
hdc: half double crochet
trc: triple crochet
inc: increase (2 single crochets in one loop)
dec: decrease (pull yarn through loop, pull yarn through second loop, yarn over and pull through all loops)
Materials needed (with affiliate links):
Lion Brand Vanna’s Choice yarn in beige and pink. Bernat Pipsqueak yarn in white. (You can substitute the Pipsqueak yarn for Vanna’s Choice white if you don’t want to work with the fuzzy yarn.)
Pipe Cleaners (optional)
This pattern is worked “in-the-round”, and stitches are worked through both loops unless otherwise noted.
Head:
With beige, ch 3. Sl st to first ch to create circle. (Instead, you can perform the “magic circle” if you’d like.)
Row 1: ch 1, 10 sc inside of circle. (10 stitches)
Row 2: *Inc in first stitch, sc in next stitch, repeat from * around. (15 stitches)
Row 3: *Inc in first stitch, sc in next 2 stitches, repeat from * around. (20 stitches)
Row 4: *Inc in first stitch, sc in next 3 stitches, repeat from * around. (25 stitches)
Row 5: *Inc in first stitch, sc in next 4 stitches, repeat from * around. (30 stitches)
Row 6: *Inc in first stitch, sc in next 5 stitches, repeat from * around. (35 stitches)
Row 7: *Inc in first stitch, sc in next 6 stitches, repeat from * around. (40 stitches)
Row 8: *Inc in first stitch, sc in next 7 stitches, repeat from * around. (45 stitches)
Row 9: *Inc in first stitch, sc in next 8 stitches, repeat from * around. (50 stitches)
Rows 10-15: Sc in each stitch around. (50 stitches)
Row 16: *Dec in first 2 stitches, sc in next 8 stitches, repeat from * around. (45 stitches)
Row 17: *Dec in first 2 stitches, sc in next 7 stitches, repeat from * around. (40 stitches)
Row 18: *Dec in first 2 stitches, sc in next 6 stitches, repeat from * around. (35 stitches)
Row 19: *Dec in first 2 stitches, sc in next 5 stitches, repeat from * around. (30 stitches)
Row 20: *Dec in first 2 stitches, sc in next 4 stitches, repeat from * around. (25 stitches)
Row 21: *Dec in first 2 stitches, sc in next 3 stitches, repeat from * around. (20 stitches)
Tie off. Stuff with poly-fil.
Hat:
With Pipsqueak white, ch 3. Sl st to first ch to create circle. (Instead, you can perform the “magic circle” if you’d like.)
Row 1: ch 1, 10 sc inside of circle. (10 stitches)
Row 2: *Inc in first stitch, sc in next stitch, repeat from * around. (15 stitches)
Row 3: *Inc in first stitch, sc in next 2 stitches, repeat from * around. (20 stitches)
Row 4: *Inc in first stitch, sc in next 3 stitches, repeat from * around. (25 stitches)
Row 5: *Inc in first stitch, sc in next 4 stitches, repeat from * around. (30 stitches)
Row 6: *Inc in first stitch, sc in next 5 stitches, repeat from * around. (35 stitches)
Row 7: *Inc in first stitch, sc in next 6 stitches, repeat from * around. (40 stitches)
Row 8: *Inc in first stitch, sc in next 7 stitches, repeat from * around. (45 stitches)
Row 9: *Inc in first stitch, sc in next 8 stitches, repeat from * around. (50 stitches)
Rows 10-16: Sc in each stitch around. (50 stitches)
Switch to pink yarn.
Row 17: Sc in each stitch around. (50 stitches)
Tie off.
Ears:
With Pipsqueak white, ch 3. Sl st to first ch to create circle. (Instead, you can perform the “magic circle” if you’d like.)
Row 1: ch 1, 5 sc inside of circle. (5 stitches)
Row 2: Inc in each stitch around. (10 stitches)
Row 3: *Inc in first stitch, sc in next stitch, repeat from * around. (15 stitches)
Rows 4-6: Sc in each stitch around. (15 stitches)
Row 7: *Dec in first 2 stitches, sc in next stitch, repeat from * around. (10 stitches)
Rows 8-12: Sc in each stitch around. (10 stitches)
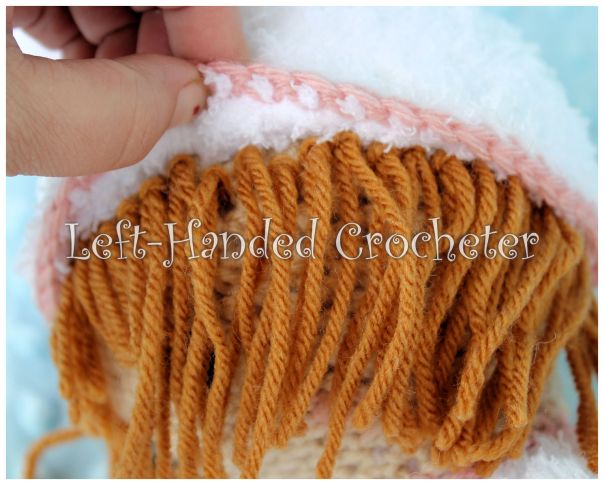
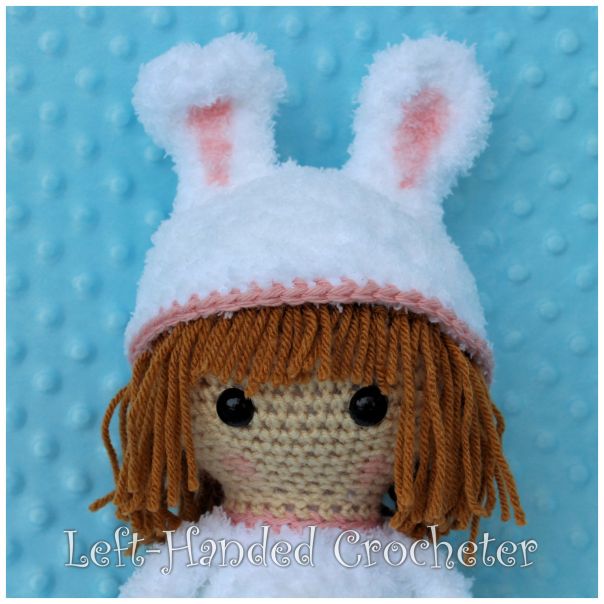
Tie off. Make two. Lay flat and sew onto hat. I applied blush to the middle of each ear to make it pink, then I used a piece of yarn to tie one ear down to make it bent.

Pull hat onto head and get it where you want it. Figure out the placement of her eyes, but don’t put the backs on yet. Sew hat onto head, then attach hair underneath hat so that it falls over the loops.
Once you have the hat and hair on, make sure the eye placement is where you want it, and attach the backs. You can sew on a nose and/or mouth if you want to, but I always choose to leave those off because it makes her expression more neutral. You can also use a bit of blush on her cheeks to give her face some color.
Body:
With Pipsqueak white, ch 3. Sl st to first ch to create circle. (Instead, you can perform the “magic circle” if you’d like.)
Row 1: ch 1, 10 sc inside of circle. (10 stitches)
Row 2: *Inc in first stitch, sc in next stitch, repeat from * around. (15 stitches)
Row 3: *Inc in first stitch, sc in next 2 stitches, repeat from * around. (20 stitches)
Row 4: *Inc in first stitch, sc in next 3 stitches, repeat from * around. (25 stitches)
Row 5: *Inc in first stitch, sc in next 4 stitches, repeat from * around. (30 stitches)
Row 6: *Inc in first stitch, sc in next 5 stitches, repeat from * around. (35 stitches)
Row 7: *Dec in first 2 stitches, sc in next 5 stitches, repeat from * around. (30 stitches)
Rows 8-11: Sc in each stitch around. (30 stitches)
Row 12: *Dec in first 2 stitches, sc in next 4 stitches, repeat from * around. (25 stitches)
Rows 13-14: Sc in each stitch around. (25 stitches)
Row 15: *Dec in first 2 stitches, sc in next 3 stitches, repeat from * around. (20 stitches)
Switch to pink.
Row 16: Sc in each stitch around. (20 stitches)
Switch to beige.
Row 17: Sc in each stitch around. (20 stitches)
Tie off. Stuff with poly-fil. Sew head onto body. Stop before you close the opening and put more poly-fil in to secure her neck.
Make a pom-pom with the Pipsqueak white and attach to her butt.

Arms:
With beige, ch 3. Sl st to first ch to create circle. (Instead, you can perform the “magic circle” if you’d like.)
Row 1: ch 1, 6 sc inside of circle. (6 stitches)
Rows 2-3: Sc in each stitch around. (6 stitches)
Switch to pink.
Row 4: Sc in each stitch around. (6 stitches)
Switch to Pipsqueak white.
Rows 5-14: Sc in each stitch around. (6 stitches)
Tie off. Make two. Do not stuff. You can insert pipe cleaners in the arms if you want them to be poseable. Sew onto body.
Legs:
With Pipsqueak white, ch 3. Sl st to first ch to create circle. (Instead, you can perform the “magic circle” if you’d like.)
Row 1: ch 1, 10 sc inside of circle. (10 stitches)
Rows 2-13: Sc in each stitch around. (10 stitches)
Tie off. Make two. Stuff with poly-fil. Sew onto body.
And there you have your finished doll. The Pipsqueak yarn is a pain to work with because you can’t see your stitches, but on the plus side it also hides any mistakes you might make. And she’s just so soft and cuddly with the Pipsqueak yarn.


I hope you enjoy this pattern! You’re welcome to sell items that you make using my patterns, as long as you don’t post the pattern anywhere else, and link back to my page if you’d like to. If there are any mistakes, or something is unclear, please feel free to leave me a comment and let me know. Or message me on Facebook. If you create any dolls of your own, be sure to post a photo on my Facebook page so I can see. I love seeing all of the things people are creating, and I’d love to see the different variations that people make of these.


Aw, so cute!