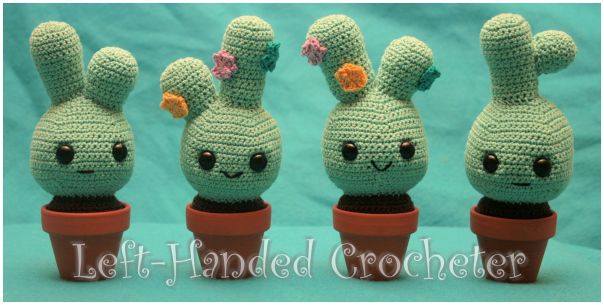
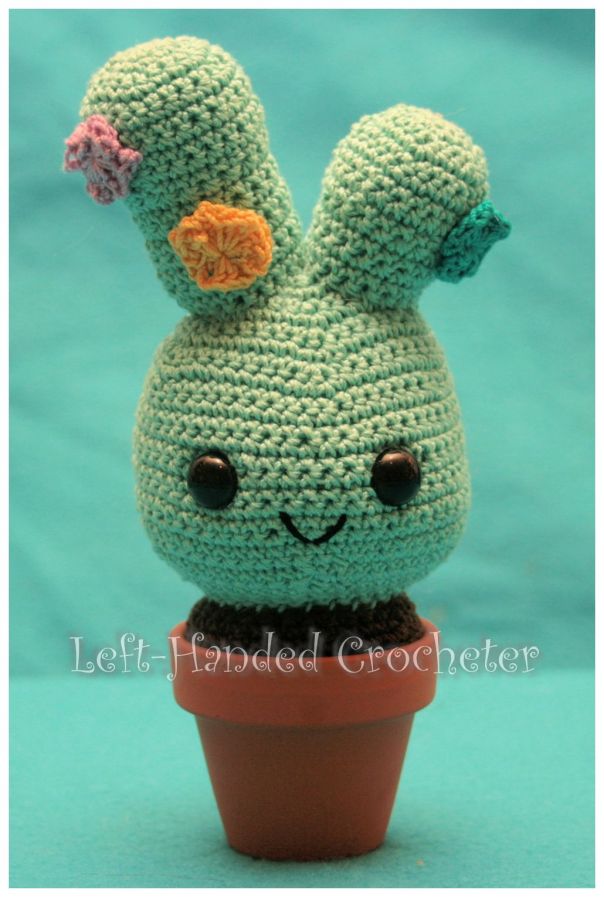
A couple of years ago, I made some cute cacti and put them in pots on a shelf in my bedroom. I made those ones with Red Heart yarn, and they were pretty big, but I wrote down the pattern as I made them. A couple of weeks ago, I picked up a bunch of Aunt Lydia’s crochet thread and started making some mini projects. I’ve never really crocheted with thread before, so it took me awhile to get my stitches as tight as I wanted them. I worked up a couple of my patterns using this thread, but the mini cactus is definitely my favorite. It looks adorable sitting on my shelf, but they also make great pin cushions.
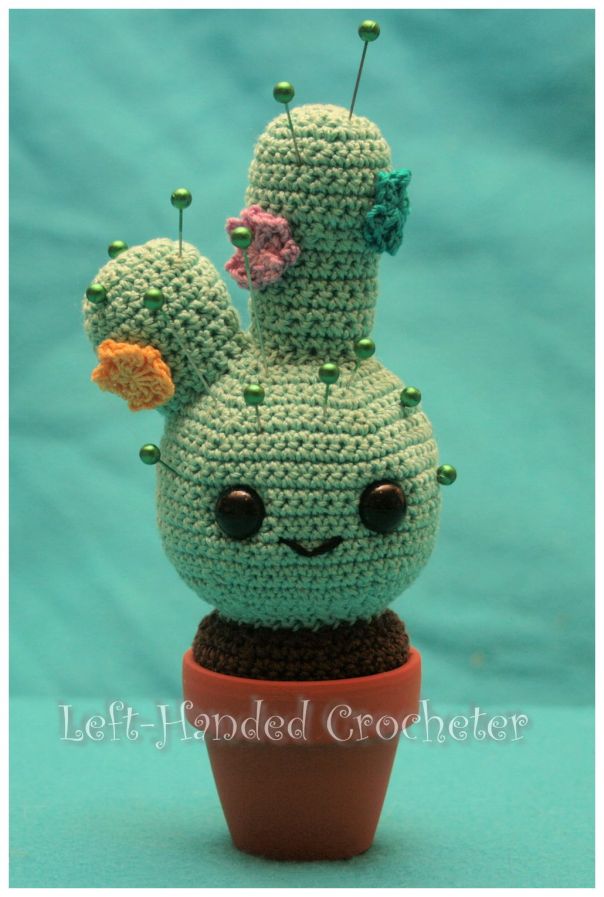
There are 2 different styles you can do, but the best thing about them is that they’re each unique.


If you want a pattern that you can save on your computer and easily print, this pattern is available in my Ravelry shop for only $2.00. I love printing patterns and saving them in a binder to keep track of the ones I’ve done and the ones I still plan to do.
Abbreviations:
ch: chain
sc: single crochet
sl st: slip stitch
inc: increase (2 single crochets in one loop)
dec: decrease (pull yarn through loop, pull yarn through second loop, yarn over and pull through all loops)
Materials needed (with affiliate links):
Aunt Lydia’s crochet thread size 10. You can choose the colors you want to use. I used aqua because I wanted them to be darker, but the mint green would also be cute. I used a brown for the dirt, then used a few other colors to do some quick flowers for some of them.
This pattern is worked “in-the-round”, and stitches are worked through both loops unless otherwise noted. At the end of each row, I slip stitch then chain 1 and turn it, working the next row in the opposite direction. If you’d like, you can skip turning it and continue working in the same direction throughout the pattern.
Head:
ch 3. Sl st to first ch to create circle. (Instead, you can perform the “magic circle” if you’d like.)
Row 1: ch 1, 10 sc inside of circle. Sl st to first sc, ch 1, turn.
Row 2: *Inc in first stitch, sc in next stitch , repeat from * around. Sl st to first sc, ch 1, turn.
Row 3: *Inc in first stitch, sc in next 2 stitches, repeat from * around. Sl st to first sc, ch 1, turn.
Row 4: *Inc in first stitch, sc in next 3 stitches, repeat from * around. Sl st to first sc, ch 1, turn.
Row 5: *Inc in first stitch, sc in next 4 stitches, repeat from * around. Sl st to first sc, ch 1, turn.
Row 6: *Inc in first stitch, sc in next 5 stitches, repeat from * around. Sl st to first sc, ch 1, turn.
Row 7: *Inc in first stitch, sc in next 6 stitches, repeat from * around. Sl st to first sc, ch 1, turn.
Row 8: *Inc in first stitch, sc in next 7 stitches, repeat from * around. Sl st to first sc, ch 1, turn.
Row 9: *Inc in first stitch, sc in next 8 stitches, repeat from * around. Sl st to first sc, ch 1, turn.
Row 10: *Inc in first stitch, sc in next 9 stitches, repeat from * around. Sl st to first sc, ch 1, turn.
Rows 11-21: Sc in each stitch around. Sl st to first sc, ch 1, turn.
Row 22: *Dec in first 2 stitches, sc in next 9 stitches, repeat from * around. Sl st to first sc, ch 1, turn.
Row 23: *Dec in first 2 stitches, sc in next 8 stitches, repeat from * around. Sl st to first sc, ch 1, turn.
Row 24: *Dec in first 2 stitches, sc in next 7 stitches, repeat from * around. Sl st to first sc, ch 1, turn.
Row 25: *Dec in first 2 stitches, sc in next 6 stitches, repeat from * around. Sl st to first sc, ch 1, turn.
Row 26: *Dec in first 2 stitches, sc in next 5 stitches, repeat from * around. Sl st to first sc, ch 1, turn.
Row 27: *Dec in first 2 stitches, sc in next 4 stitches, repeat from * around. Sl st to first sc, tie off.
Long Stem:
ch 3. Sl st to first ch to create circle. (Instead, you can perform the “magic circle” if you’d like.)
Row 1: ch 1, 10 sc inside of circle. Sl st to first sc, ch 1, turn.
Row 2: *Inc in first stitch, sc in next stitch , repeat from * around. Sl st to first sc, ch 1, turn.
Row 3: *Inc in first stitch, sc in next 2 stitches, repeat from * around. Sl st to first sc, ch 1, turn.
Row 4: *Inc in first stitch, sc in next 3 stitches, repeat from * around. Sl st to first sc, ch 1, turn.
Rows 5-10: Sc in each stitch around. Sl st to first sc, ch 1, turn.
Row 11: *Dec in first 2 stitches, sc in next 3 stitches, repeat from * around. Sl st to first sc, tie off.
Rows 12-19: Sc in each stitch around. Sl st to first sc, ch 1, turn. Tie off after row 19.
Short Stem:
ch 3. Sl st to first ch to create circle. (Instead, you can perform the “magic circle” if you’d like.)
Row 1: ch 1, 10 sc inside of circle. Sl st to first sc, ch 1, turn.
Row 2: *Inc in first stitch, sc in next stitch , repeat from * around. Sl st to first sc, ch 1, turn.
Row 3: *Inc in first stitch, sc in next 2 stitches, repeat from * around. Sl st to first sc, ch 1, turn.
Row 4: *Inc in first stitch, sc in next 3 stitches, repeat from * around. Sl st to first sc, ch 1, turn.
Rows 5-8: Sc in each stitch around. Sl st to first sc, ch 1, turn.
Row 9: *Dec in first 2 stitches, sc in next 3 stitches, repeat from * around. Sl st to first sc, tie off.
Rows 10-13: Sc in each stitch around. Sl st to first sc, ch 1, turn. Tie off after row 13.
Round Stem:
ch 3. Sl st to first ch to create circle. (Instead, you can perform the “magic circle” if you’d like.)
Row 1: ch 1, 10 sc inside of circle. Sl st to first sc, ch 1, turn.
Row 2: *Inc in first stitch, sc in next stitch , repeat from * around. Sl st to first sc, ch 1, turn.
Row 3: *Inc in first stitch, sc in next 2 stitches, repeat from * around. Sl st to first sc, ch 1, turn.
Rows 4-8: Sc in each stitch around. Sl st to first sc, ch 1, turn.
Row 9: *Dec in first 2 stitches, sc in next 2 stitches, repeat from * around. Sl st to first sc, tie off.
Row 10: Sc in each stitch around. Sl st to first sc, tie off.
Dirt:
ch 3. Sl st to first ch to create circle. (Instead, you can perform the “magic circle” if you’d like.)
Row 1: ch 1, 10 sc inside of circle. Sl st to first sc, ch 1, turn.
Row 2: *Inc in first stitch, sc in next stitch , repeat from * around. Sl st to first sc, ch 1, turn.
Row 3: *Inc in first stitch, sc in next 2 stitches, repeat from * around. Sl st to first sc, ch 1, turn.
Row 4: *Inc in first stitch, sc in next 3 stitches, repeat from * around. Sl st to first sc, ch 1, turn.
Row 5: *Inc in first stitch, sc in next 4 stitches, repeat from * around. Sl st to first sc, ch 1, turn.
Rows 6-8: Sc in each stitch around. Sl st to first sc, ch 1, turn.
Row 9: *Inc in first stitch, sc in next 5 stitches, repeat from * around. Sl st to first sc, ch 1, turn.
Row 10: Sc in each stitch around. Sl st to first sc, ch 1, turn.
Row 11: *Inc in first stitch, sc in next 6 stitches, repeat from * around. Sl st to first sc, ch 1, turn.
Rows 12-17: Sc in each stitch around. Sl st to first sc, ch 1, turn.
Row 18: *Dec in first 2 stitches, sc in next 3 stitches, repeat from * around. Sl st to first sc, ch 1, turn.
Row 19: *Dec in first 2 stitches, sc in next 2 stitches, repeat from * around. Sl st to first sc, tie off.
Stuff head with poly-fil. Stuff stems, position and sew onto the top of the head. Attach safety eyes and sew mouth on. Stuff dirt, making sure you don’t stuff it so full that it won’t fit in the pot. Sew head to dirt.


You can make little flowers to sew onto them if you’d like. There are a lot of different free flower patterns on the internet, so try a couple of them to find ones that you like.
Here are the ones I made with Red Heart yarn and put in bigger pots:
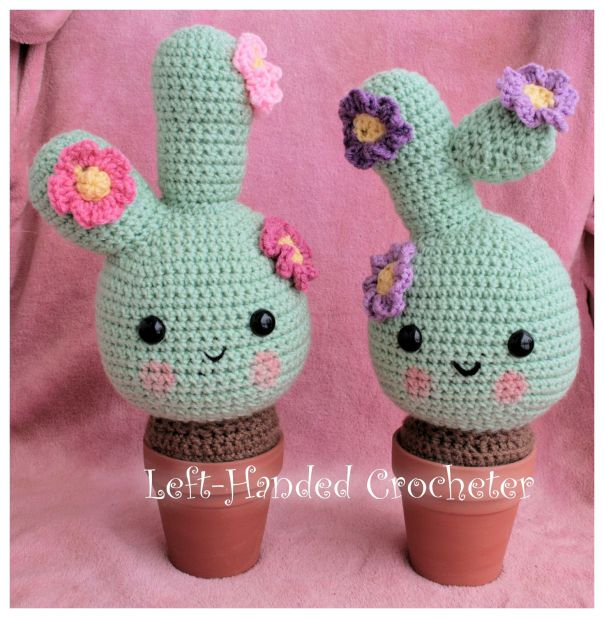
I used blush and applied it to the cheeks of my bigger ones. You can do that on your mini ones if you’d like too. I was planning to put blush on my minis, but I haven’t gotten around to it yet. I also plan to make some other flowers for my bare ones, but I think I’ll look for a different flower pattern for them.
I hope you enjoy my cactus pattern! If there are any mistakes in this pattern, or something is unclear, please feel free to leave me a comment and let me know. Or message me on Facebook. If you create any cacti of your own, be sure to post a photo on my Facebook page so I can see. I love seeing all of the things people are creating, and I’d love to see the different variations that people make of these.
As always, you are welcome to create items from my patterns and sell them, as long as you don’t post the actual pattern anywhere. And if you want to post a link to the pattern, or give me credit, that’s perfectly fine with me. 🙂


These are to cute i have a friend that would love making these thank you for sharing