Monthly Archives: April 2017

April Favorite Finds

My main goal in starting this website was to be able to spend my free time creating patterns, which I love to do, and to be able to share them with people for free. But I always had plans to eventually make some kind of money off of this website, even if it was just enough to justify giving patterns away for free. Eventually, I’ll have ads displayed on here, but for now I set up an affiliate account on Amazon. What that means for me is, if you click on any of my affiliate links and order the product, I’ll get a small percentage of what you spend. It’s a win/win for both me and the people who utilize the patterns I post.

It also led to this: At the end of every month, I’m going to do a post that is completely about affiliate products. I see so many cool things on Amazon all the time, so this is a great way for me to share some of those finds with other crocheters, but also a way for me to possibly make some money.

So here are my favorite finds for April:

61hqr71cClL._SL1200_

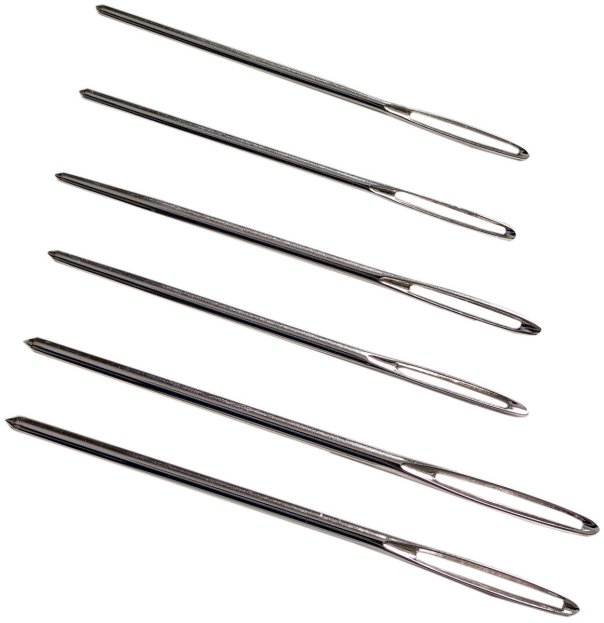
A lot of people use plastic yarn needles, but I’ve personally broken quite a few of those. I prefer metal ones, and these yarn needles are only $2.96 for the set of 6 when you purchase $25 of other products. It’s a great deal, and the different sizes are nice for working with different sizes of yarn.

61DfEHLp4iL._SL1200_

This is also one of Amazon’s add-on items, which means you have to spend $25, but it’s only $4.19. I have one of these, and I love it. It’s magnetic, so the metal needles all stay in place. I never lose my needles now.

712WRCH70NL._SL1500_

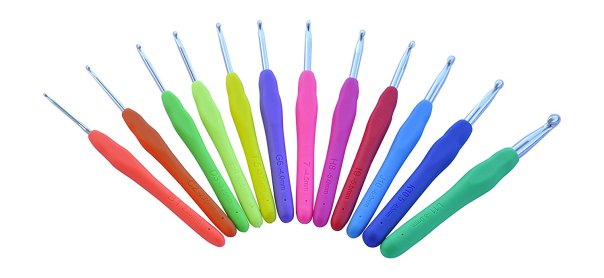
Do your hands hurt when you crochet? These ergonomic crochet hooks will help alleviate that pain, and the set of 12 hooks is only $19.99. I see a lot of sets like this, but I like that this set has both the letter and the size on the handles.

Yarn bowls are wonderful for keeping your ball of yarn in one place while you work. I’ve seen a lot of really neat ones, but I love this one because you can decorate it yourself. You can paint it to look however you want, and even add embellishments to it. It’s only $24.99 and this ceramic bowl comes ready to paint.

91CtcVlgkDL._SL1500_

This is another neat thing I found for keeping your yarn in place while you work. This yarn dispenser has a rubberized bottom to hold it in place, and the yarn twirls while you work. It also has a 4-inch gauge ruler on the base, a stitch marker holder, and a slot to hold a pattern. Plus, it’s only $14.99.

81Zgwvi2i7L._SL1500_

Awhile back, I bought some alphabet foam floor mats for my grandson, thinking I would also use them sometimes for blocking things that I’ve crocheted. Now that I found these blocking mats, though, I think I’ll be purchasing them instead. They’re thicker than most blocking mats, so they’ll hold a project in place better, and the grid on them will help to get your project lined up straight so it’s blocked evenly. For $34.99, it comes with 9 interlocking boards, plus 30 t-pins and a reusable storage bag.

61dq6hgrYUL._SL1000_

I’ve been crocheting since I was a teenager, but up until recently I had never used stitch markers before. When I needed to mark a row before, I would cut a piece of loose thread and loop it through. While you can certainly do that to mark places in your project, it’s sooooo much easier using stitch markers. They can be easily put in and taken out without much interruption, and I love the bright colors. I had a small set of 10 stitch markers that I’ve been using, but I just purchased this set of 104 stitch markers, and I love the container that keeps the colors separated. For only $6.99, it also comes with a set of 3 locking stitch holders.

61d4OUT586L._SL1100_

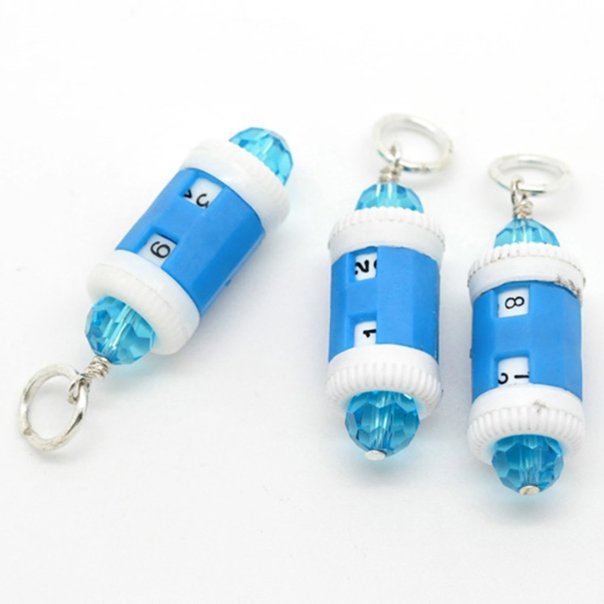
I thought these stitch markers were really cool for bigger projects, where you need to keep track of the number of rows. This set of 4 counter stitch markers is only $7.98.

81jqEjKz4tL._SL1500_

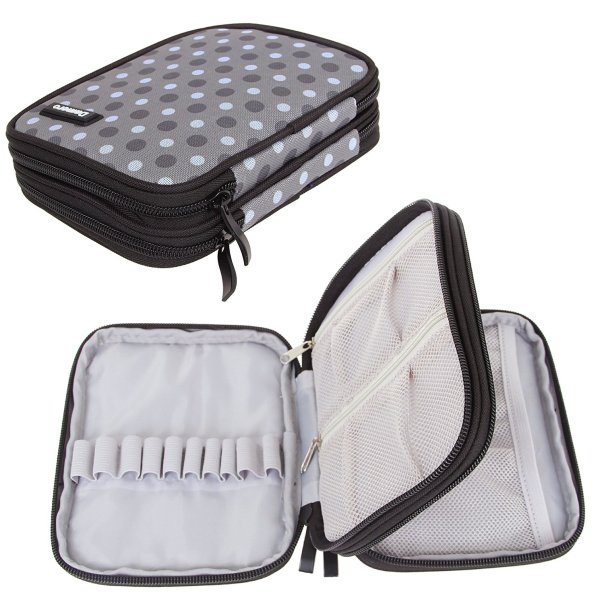
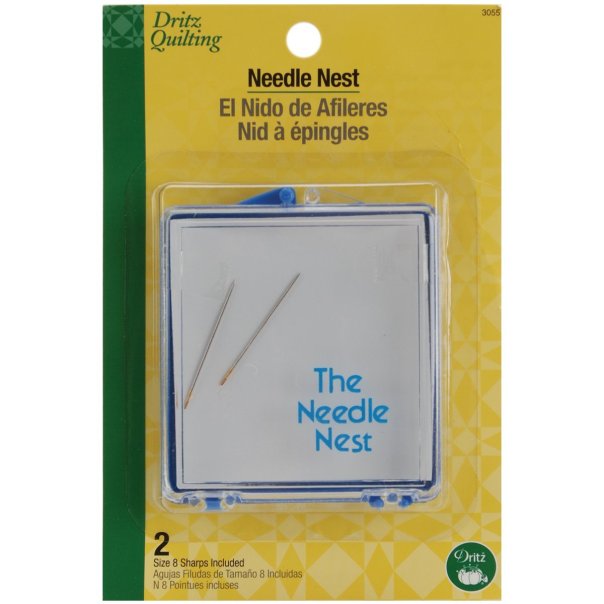
I purchased this crochet hook organizer back in March, and I absolutely love it. It has room for every hook size that I would need, plus room for a lot of other accessories, like my needle nest, stitch markers, measuring tape, embroidery thread, etc. It’s only $11.99 on Amazon, and I love anything with polka-dots.

81RhDFOrKxL._SL1500_

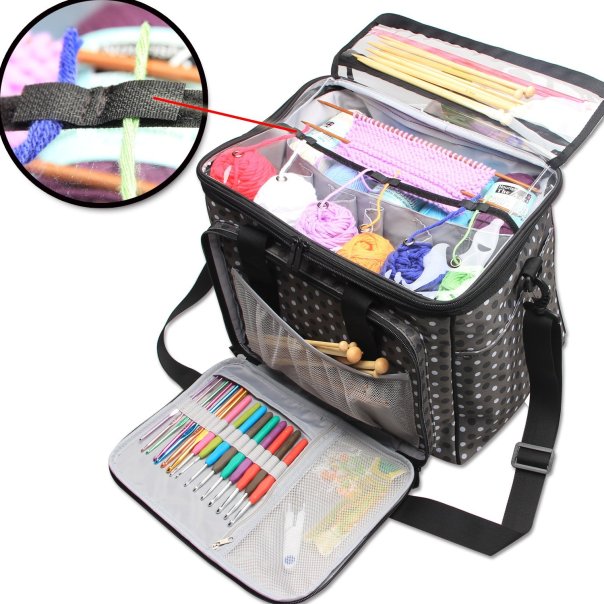
I’m the most excited about this bag. I ordered it on Friday, and it was delivered today. I have a lot of bags that I use for crochet projects, but this one is definitely my favorite. Inside there’s room for 6 skeins of yarn, with holes on the top to pull the yarn through so I can keep it closed while I work, plus there’s extra space to store my project in there when I’m not working on it. I love that it also has room for hooks and accessories, and I especially love that the polka-dots match the pattern on the case that I have, which fits great in the side pocket. For $39.99, this bag is perfect if you tend to crochet in different places throughout your house, or if you want to take your project with you to the park or beach this summer.

510f9ULvV7L

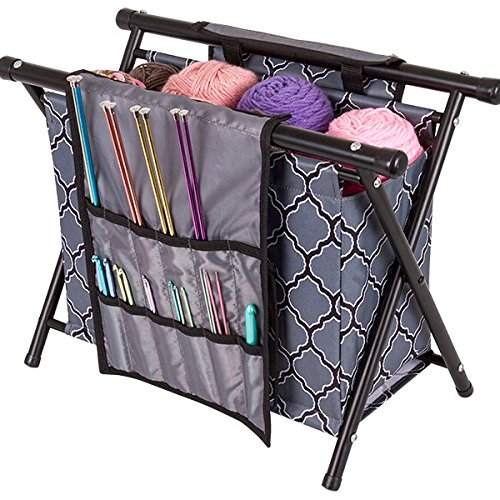
If you have a favorite chair that you usually sit in to crochet, then this storage caddy would be perfect nestled up next to it. For $29.99, it includes a pouch that can hold crochet hooks or knitting needles. The pouch can be rolled up to take with you, or it can be snapped onto the caddy for easy accessibility. And the whole thing folds flat to store it when you’re not using it.

Those are my favorite things that I found in April. Do you have some favorite products that you’ve ordered from Amazon? Drop me a message on my Facebook page and tell me about them. I love hearing about new products, and I might use them in my next favorite finds post. And if you saw anything you like on here, by sure to use my links to order them, and help me keep posting my patterns for free.

Happy crocheting!!

Gunther, Part 2

IMG_0203

If you haven’t made Gunther yet, click on his name there and you’ll find the pattern for him. This post has the patterns for his accessories, although I didn’t get pictures while I was making them, so hopefully nobody will have problems following the patterns.

I was going to split this up into 2 or 3 posts, and post them throughout this week, but it’s been pretty hectic around here. I decided it would be easier to just sit here this evening and type up each of the patterns at once. If you like Gunther, and his awesome accessories, go check out Camp Happy Heart Fibre Arts on Facebook. She’s the one who came up with him and knitted him. This is my crocheted version.

Unicorn Hat

Hat2

Abbreviations:

ch: chain

sc: single crochet

inc: increase (2 single crochets in one loop)

dec: decrease (pull yarn through loop, pull yarn through second loop, yarn over and pull through all loops)

Materials needed (with affiliate links):

J (5.75mm) crochet hook

H (5mm) crochet hook

F (3.75mm) crochet hook

Lion’s Brand Vanna yarn in white. Caron Simply Soft in multiple colors for the rainbow, and yellow for the horn.

Yarn needle

This pattern is worked “in-the-round”, and stitches are worked through both loops unless otherwise noted. 

Hat

With white and using J crochet hook, ch 3. Sl st to first ch to create circle. (Instead, you can perform the “magic circle” if you’d like.)

Row 1: ch 1, 10 sc inside of circle. (10 stitches)

Row 2: *Inc in first stitch, sc in next stitch , repeat from * around. (15 stitches)

Row 3: *Inc in first stitch, sc in next 2 stitches, repeat from * around. (20 stitches)

Row 4: *Inc in first stitch, sc in next 3 stitches, repeat from * around. (25 stitches)

Row 5: *Inc in first stitch, sc in next 4 stitches, repeat from * around. (30 stitches)

Row 6: *Inc in first stitch, sc in next 5 stitches, repeat from * around. (35 stitches)

Row 7: *Inc in first stitch, sc in next 6 stitches, repeat from * around. (40 stitches)

Row 8: *Inc in first stitch, sc in next 7 stitches, repeat from * around. (45 stitches)

Rows 9-12: Sc in each stitch around. (45 stitches)

Row 13: Sc in next 32 stitches, leaving last 13 stitches unworked. Ch 1, turn. (32 stitches)

Rows 14-20: Sc across, ch 1, turn. (32 stitches)

Row 21: Sc across, ch 15, sl st to first sc.

Row 22: Sc in each stitch around, working 15 sc’s into ch 15 space. (47 stitches)

Row 23: Continuing working in the round, sc in each stitch around. (47 stitches)

Tie off.

Ears

With white and using H crochet hook, ch. 7

Rows 1-3: Sc in second ch from hook and in each stitch across, ch 1, turn. (6 stitches)

Row 4: Dec in first 2 stitches, sc in next 2 stitches, dec in last 2 stitches, ch 1, turn. (4 stitches)

Row 5: Sc in each stitch across, ch 1, turn. (4 stitches)

Row 6: Dec in first 2 stitches, dec in last 2 stitches, ch 1, turn. (2 stitches)

Row 7: Sc in each stitch across, ch 1, turn. (2 stitches)

Row 8: Dec. (1 stitch)

Tie off.

Make two of these, but with the second one, don’t tie off. Hold both pieces together and crochet around them, being sure to keep the shape of the ear. When you get back to the beginning, sl st into first sc and tie off.

Make two ears. Using yarn and your yarn needle, position and sew ears onto hat.

Horn

Using yellow (Simply Soft) yarn and F crochet hook, ch 10. Sl st to first ch to create a loop.

Rows 1-5: Sc in each stitch around. (10 stitches)

Row 6: *Dec in first 2 stitches, sc in each of the next 2 stitches. Repeat from * around, dec in last 2 stitches. (7 stitches)

Row 7: Sc in each stitch around. (7 stitches)

Row 8: *Dec in first 2 stitches, sc in next stitch. Repeat from * around, sc in each of last 2 stitches. (5 stitches)

Row 9: Sc in each stitch around. (5 stitches)

Row 10: Dec in first 2 stitches, sc in next stitch, dec in last 2 stitches. (3 stitches). Sl st to first stitch, tie off.

Stuff horn and sew onto center of hat. Using the other colors of Simply Soft, attach yarn to hat. You can decide on the length that you’d like. After I had the main attached, I went through and pulled each piece apart to make it a bit more wild.

Hat1

Leg Warmers

LegWarmers1

Materials needed (with affiliate links):

F (3.75mm) crochet hook

Caron Simply Soft yarn in rainbow colors. You can choose the colors that you want here. I used 6 different colors that I happened to have here already because I used them for an octopus that I made.

Using purple and your F hook, ch. 20. Sl st to first ch to form a loop.

Row 1: Sc in second chain from hook and in each ch around. (20 stitches)

Rows 2-12: Sc in each stitch around. (20 stitches) Tie off.

I did 2 rows of each color.

Roller Skates

Skates1

Materials needed (with affiliate links):

H (5mm) crochet hook

F (3.75mm) crochet hook

Caron Simply Soft yarn in black, white and grey.

Black embroidery thread

Yarn needle

Poly-fil

Skate

Using black yarn and H hook, ch 3. Sl st to first ch to create circle. (Instead, you can perform the “magic circle” if you’d like.)

Row 1: ch 1, 10 sc inside of circle. (10 stitches)

Row 2: *Inc in first stitch, sc in next stitch , repeat from * around. (15 stitches)

Row 3: *Inc in first stitch, sc in next 2 stitches, repeat from * around. (20 stitches)

Row 4: *Inc in first stitch, sc in next 3 stitches, repeat from * around. (25 stitches)

Row 5: *Inc in first stitch, sc in next 4 stitches, repeat from * around. (30 stitches)

Row 6: Switch to white. *Dec in first 2 stitches, sc in next 4 stitches, repeat from * around. (25 stitches)

Row 7: Sc in each stitch around. (25 stitches)

Row 8: 7 sc, dec, dec, dec, dec, dec, 8 sc. (20 stitches)

Row 9: 5 sc, dec, dec, dec, dec, dec, 5 sc. (15 stitches)

Rows 10-13: Sc in each stitch around. (15 stitches) Tie off.

Wheels

Using grey yarn and F hook, ch 3. Sl st to first ch to create circle. (Instead, you can perform the “magic circle” if you’d like.)

Row 1: ch 1, 8 sc inside of circle. (8 stitches)

Rows 2-6: Sc in each stitch around. (8 stitches)

Row 7: Stuff with poly-fil. Dec around. (4 stitches) You can tie off, or, if it’s not closed all the way, drop a sl st into the middle to close.

Make 4 wheels. Wrap yarn around the middle of each wheel. Sew wheels onto the bottom of the skates. I used hot glue and glued mine on. Using yarn needle and embroidery thread, “lace” each skate and tie a bow at the top.

Skates2

Shoulder Bag

Bag2

Materials needed (with affiliate links):

F (3.75mm) crochet hook

Caron Simply Soft yarn. I used ocean, but you can make it any color you want.

Yarn needle

Star button (This is optional. You don’t have to put a button on it, or you could use a different button if you want to.)

Bag

Ch 13

Row 1: Sc in second ch from hook and in each ch across, ch 1, turn. (12 stitches)

Rows 2-24: Sc in each stitch across, ch 1, turn. (12 stitches) At the end of row 24, tie off. Fold in half and sew sides together. I attached a loop and sc’ed the sides together and across the bottom.

Handle

Ch 66

Row 1: Sc in second ch from hook and in each ch across, ch 1, turn. (65 stitches)

Row 2: Sc in each stitch across. Tie off. Using yarn needle, sew straps inside of bag. Attach button to the front of the bag.

Bag1

For the monster inside of his bag, I used a 1.5mm crochet hook, Aunt Lydia’s crochet thread10mm safety eyes, and the pattern for my Yeti. I wanted him to stick out of the bag, and he was a bit short, so I put some poly-fil in there with him. You can crochet a monster for inside of the bag, or crochet something completely different if you’d like.

IMG_0206

I hope you enjoy these patterns! I had a lot of interruptions while writing these out, with thunderstorms and 7 other people in my house, so if there are any mistakes, or something is unclear, please feel free to leave me a comment and let me know. Or message me on Facebook. If you create any monsters of your own, be sure to post a photo on my Facebook page so I can see. I love seeing all of the things people are creating, and I’d love to see the different variations that people make of these. And don’t forget to check out Camp Happy Heart Fibre Arts on Facebook to see all of the other wonderful creations she’s made.


Gunther 2.0

IMG_0199

This is Gunther. He likes unicorns and rainbows, and he would love the chance to spread love into your household. I can’t take credit for Gunther. He is totally the creation of Camp Happy Heart Fibre Arts. She knits some amazing monsters, and this is one of her creations. I loved him so much, so with her permission I’ve written up a crocheted pattern of him to share with all of you. If you’re a knitter, go check out Camp Happy Heart Fibre Arts on Facebook. She has a lot of wonderful monsters that she makes and sells, but she’s also working on a knitted pattern of this guy, so be sure to check back.

Meanwhile, here’s Gunther. After I made him, my daughter named him Gunther, and I have a whole series of these guys that I’m working on now. This post will give you the pattern to make the basic monster, but the accessories will be in other posts, so keep an eye out for them. *Update: You can find the patterns for his accessories here.

IMG_0203

One of my favorite things to do is to look at a picture of something and try to figure out how to make it myself. This one was the most fun because it was a knitted monster, and I was figuring out how to crochet him and keep him as close to the original as possible. I’m not sure what kind of yarn she used, but I knew I wanted something thin and soft. I also knew I wanted to use yarn that would be easy for everybody to find in their local craft store. In the end, I decided baby yarn (size 3) would be best for the actual monsters because it gives you a tighter stitch so you don’t notice the stitches as much, and it’s super soft.

*side note* This is actually Gunther 2.0, because I originally made him differently, more like my yeti pattern. After I had that Gunther done, I wasn’t happy with him, so I started over from scratch. Gunther 2.0 was perfect.

Abbreviations:

ch: chain

sc: single crochet

inc: increase (2 single crochets in one loop)

dec: decrease (pull yarn through loop, pull yarn through second loop, yarn over and pull through all loops)

Materials needed (with affiliate links):

F (3.75mm) crochet hook

Baby yarn, or any size 3 yarn. For Gunther, I used Bernat baby sport in light lilac. I’m also making some using Loops and Threads Snuggly Wuggly yarn from Michaels.

15mm safety eyes

Black embroidery thread

Yarn needle

Poly-fil

Heart button (This is optional, of course. I found these heart buttons at Walmart, and they were very similar to the one on the original monster, so I picked them up for Gunther.)

This pattern is worked “in-the-round”, and stitches are worked through both loops unless otherwise noted. 

Body:

ch 3. Sl st to first ch to create circle. (Instead, you can perform the “magic circle” if you’d like.)

Row 1: ch 1, 10 sc inside of circle. (10 stitches)

Row 2: *Inc in first stitch, sc in next stitch , repeat from * around. (15 stitches)

Row 3: *Inc in first stitch, sc in next 2 stitches, repeat from * around. (20 stitches)

Row 4: *Inc in first stitch, sc in next 3 stitches, repeat from * around. (25 stitches)

Row 5: *Inc in first stitch, sc in next 4 stitches, repeat from * around. (30 stitches)

Row 6: *Inc in first stitch, sc in next 5 stitches, repeat from * around. (35 stitches)

Row 7: *Inc in first stitch, sc in next 6 stitches, repeat from * around. (40 stitches)

Row 8: *Inc in first stitch, sc in next 7 stitches, repeat from * around. (45 stitches)

Row 9: *Inc in first stitch, sc in next 8 stitches, repeat from * around. (50 stitches)

Row 10: *Inc in first stitch, sc in next 9 stitches, repeat from * around. (55 stitches)

Row 11: *Inc in first stitch, sc in next 10 stitches, repeat from * around. (60 stitches)

Row 12: *Inc in first stitch, sc in next 11 stitches, repeat from * around. (65 stitches)

Rows 13-63: Sc in each stitch around. (65 stitches)

Tie off, leaving open at the bottom.

Insert safety eyes between rows 18 and 19, with 12 sc’s in between eyes. (I like to put the poly-fil in before I insert the eyes so I can decide which side looks best for the front.) Stuff with poly-fil, and sew closed across the bottom. Using embroidery thread, sew on mouth.

Arms:

ch 3. Sl st to first ch to create circle. (Instead, you can perform the “magic circle” if you’d like.)

Row 1: ch 1, 10 sc inside of circle. (10 stitches)

Row 2: *Inc in first stitch, sc in next stitch , repeat from * around. (15 stitches)

Row 3: *Inc in first stitch, sc in next 2 stitches, repeat from * around. (20 stitches)

Row 4: *Inc in first stitch, sc in next 3 stitches, repeat from * around. (25 stitches)

Rows 5-9: Sc in each stitch around. (25 stitches)

Row 10: *Dec in first 2 stitches, sc in next 3 stitches, repeat from * around. (20 stitches)

Rows 11-14: Sc in each stitch around. (20 stitches)

Row 15: *Dec in first 2 stitches, sc in next 2 stitches, repeat from * around. (15 stitches)

Rows 16-30: Sc in each stitch around. (15 stitches)

Tie off. Stuff with poly-fil to row 20, leaving the rest of the arm empty and flattened. You can make the arms shorter or longer by adding or subtracting rows, and you can change how full you stuff them as well.

Legs:

ch 3. Sl st to first ch to create circle. (Instead, you can perform the “magic circle” if you’d like.)

Row 1: ch 1, 10 sc inside of circle. (10 stitches)

Row 2: *Inc in first stitch, sc in next stitch , repeat from * around. (15 stitches)

Row 3: *Inc in first stitch, sc in next 2 stitches, repeat from * around. (20 stitches)

Row 4: *Inc in first stitch, sc in next 3 stitches, repeat from * around. (25 stitches)

Row 5: *Inc in first stitch, sc in next 4 stitches, repeat from * around. (30 stitches)

Row 6: *Dec in first 2 stitches, sc in next 4 stitches, repeat from * around. (25 stitches)

Row 7: Sc in each stitch around. (25 stitches)

Row 8: 7 sc, dec, dec, dec, dec, dec, 8 sc. (20 stitches)

Row 9: 5 sc, dec, dec, dec, dec, dec, 5 sc. (15 stitches)

Rows 10-50: Sc in each stitch around. (15 stitches)

Tie off. Stuff with poly-fil to row 25, leaving the rest of the leg empty and flattened. You can also make the legs shorter or longer by adding or subtracting rows, and you can change how full you stuff them as well.

Sew legs to bottom of body, and sew arms onto each side. When laying flat, the end of the arm should be about at the end of the body. At this point, you can attach a button onto his body if you want to, using thread or yarn.

And now you have your finished monster.

IMG_0206

IMG_0215

Gunther is sitting on a shelf in my bedroom, and I absolutely love him. He’s definitely one of my favorite things that I’ve made. I also made Gunther a friend, Gus, using Loops and Threads Woolike yarn, which is a size 1, so Gus ended up really small.

IMG_0218

Next week, I’ll be posting Gunther’s accessories, so stay tuned. *Update: His accessories have been posted! You can find them here. I’m working on a few more monsters, with different accessories. You can make separate monsters, or you can just make one monster with all of the different accessories so he can play dress up.

I hope you enjoy this pattern! If there are any mistakes, or something is unclear, please feel free to leave me a comment and let me know. Or message me on Facebook. If you create any monsters of your own, be sure to post a photo on my Facebook page so I can see. I love seeing all of the things people are creating, and I’d love to see the different variations that people make of these. And don’t forget to check out Camp Happy Heart Fibre Arts on Facebook to see all of the other wonderful creations she’s made.