Monthly Archives: January 2018

Decorating Mannequin Heads

If you make hats, then you probably know that the best way to display them is on mannequin heads. Whether you sell items at craft fairs, in a shop, or online, a simple foam mannequin head will help show your hats off.

IMG_0580

IMG_0584

Styrofoam mannequin heads are fairly inexpensive, but they’re also pretty boring. The other problem I have with them is, the white brightness of them can mess up a photograph, causing either your hat to end up too dark, or the mannequin head to be too bright and lose any features. If you want to spruce up those mannequin heads, it’s pretty easy to decoupage them.

IMG_0595

All you need is some scrapbook paper, Mod Podge (I prefer the matte finish), a paintbrush, and a container of water. Choose scrapbook paper with some simple designs, preferably in colors that won’t overpower your hats. I like choosing a few coordinating papers to mix things up a bit. I should also note that I tried this with a thicker scrapbook paper, and it didn’t work as well. The regular, thinner scrapbook paper works better for getting all of those curves.

Tear the scrapbook paper into pieces. You could also use scissors and cut the paper, but I think it looks better torn into random pieces.

IMG_0606

Make sure you have small pieces, especially for around the eyes, nose and mouth.

IMG_0607

Put pieces of the paper into the container of water. You don’t have to leave them in very long, although leaving them in longer will make them more flexible.

IMG_0618

Dip your paintbrush into the Mod Podge and spread it on the mannequin head where you’re going to put your pieces. Lay the pieces on and use your fingers to smooth out any curves or creases. Go over the piece with more Mod Podge.

IMG_0625

Continue doing this to cover the whole head. The hardest part is around the eyes, nose and mouth, but just use small pieces and be sure to smooth each of them out to form into the creases of the head.

IMG_0723

Once your mannequin head is completely covered, set it some place to dry. You can add another coat of Mod Podge over the top to seal it, or even use a spray sealer if you want to.

IMG_0722

I really like the way the hats look on decorated mannequin heads. It will make your product stand out from others, and it turns your mannequin head into a work of art.

IMG_0727

IMG_0729

IMG_0735

Try different colors of papers to go with different hats that you have.

IMG_0714

IMG_0716

I really like the way neutral tones work with most hats.

IMG_0754

IMG_0756

I also have to add, one of the biggest problem I’ve had with styrofoam mannequin heads is that they tip over pretty easily once you put a hat on them. Since they have a hole in the bottom of the head, my boyfriend made me some wooden bases using round plaques and wooden dowels.

IMG_0588

IMG_0586

They were pretty easy to make, too. He just measured and cut the dowels, then screwed them into the round plaque. He’s going to stain them for me too. I love them. They add a nice tough to my photographs and help keep the heads from falling over when I’m trying to take pictures.

I hope this post was helpful. If you decoupage any mannequin heads, go share a photo with me over on my Facebook. I’d love to see other colored ones, and different designs.


Kevin the Koala

IMG_0377

My middle daughter collects teddy bears, but she likes koalas the best. I decided I needed to make a koala for her.

I really like using Lion Brand Vanna’s Choice yarn for stuffies. It holds up well to being stuffed, and it’s a decent price. Plus there are so many color choices, which makes it easy to find what I’m looking for. Unfortunately, I couldn’t find the right color for my koala with the Vanna yarn, so I started looking at other brands. I found the perfect color in the Big Twist yarn, which is a Joann brand yarn. When finished, Kevin is about 8 inches tall and he’s cute as can be.

If you want a pattern that you can save on your computer and easily print, this pattern is available in my Ravelry shop for only $2.00. I love printing patterns and saving them in a binder to keep track of the ones I’ve done and the ones I still plan to do.

Abbreviations:

ch: chain

sc: single crochet

sl st: slip stitch

inc: increase (2 single crochets in one loop)

dec: decrease (pull yarn through loop, pull yarn through second loop, yarn over and pull through all loops)

Materials needed (with affiliate links):

Big Twist yarn in chinchilla.

Lion Brand Vanna yarn in linen and black.

I (5.25mm) crochet hook 

15mm safety eyes

Yarn needle

Poly-fil 

This pattern is worked “in-the-round”, and stitches are worked through both loops unless otherwise noted. 

Head:

With chincilla, ch 3. Sl st to first ch to create circle. (Instead, you can perform the “magic circle” if you’d like.)

Row 1: ch 1, 10 sc inside of circle. (10 stitches)

Row 2: *Inc in first stitch, sc in next stitch, repeat from * around. (15 stitches)

Row 3: *Inc in first stitch, sc in next 2 stitches, repeat from * around. (20 stitches)

Row 4: *Inc in first stitch, sc in next 3 stitches, repeat from * around. (25 stitches)

Row 5: *Inc in first stitch, sc in next 4 stitches, repeat from * around. (30 stitches)

Row 6: *Inc in first stitch, sc in next 5 stitches, repeat from * around. (35 stitches)

Row 7: *Inc in first stitch, sc in next 6 stitches, repeat from * around. (40 stitches)

Row 8: *Inc in first stitch, sc in next 7 stitches, repeat from * around. (45 stitches)

Row 9: *Inc in first stitch, sc in next 8 stitches, repeat from * around. (50 stitches)

Row 10: *Inc in first stitch, sc in next 9 stitches, repeat from * around. (55 stitches)

Row 11: *Inc in first stitch, sc in next 10 stitches, repeat from * around. (60 stitches)

Rows 12-13: Sc in each stitch around. (60 stitches)

Row 14: *Dec in first 2 stitches, sc in next 10 stitches, repeat from * around. (55 stitches)

Row 15: *Dec in first 2 stitches, sc in next 9 stitches, repeat from * around. (50 stitches)

Row 16: *Dec in first 2 stitches, sc in next 8 stitches, repeat from * around. (45 stitches)

Row 17: *Dec in first 2 stitches, sc in next 7 stitches, repeat from * around. (40 stitches)

Row 18: *Dec in first 2 stitches, sc in next 6 stitches, repeat from * around. (35 stitches)

Row 19: *Dec in first 2 stitches, sc in next 5 stitches, repeat from * around. (30 stitches)

Row 20: *Dec in first 2 stitches, sc in next 4 stitches, repeat from * around. (25 stitches)

Row 21: *Dec in first 2 stitches, sc in next 3 stitches, repeat from * around. (20 stitches)

Tie off. Stuff with polyfil. Insert eyes between rows 11 and 12 with 13 stitches in between them. I like to wait to put the backs on the safety eyes until I have the nose sewn on, just in case I want to adjust their placement.

IMG_0297

Nose:

With black, ch 3. Sl st to first ch to create circle. (Instead, you can perform the “magic circle” if you’d like.)

Row 1: ch 1, 10 sc inside of circle. (10 stitches)

Row 2: Sc in first 3 stitches, inc in next 4 stitches, sc in last 3 stitches. (14 stitches)

Row 3: Sc in each stitch around. (14 stitches)

Tie off. Position on face in between eyes and sew on. You can use straight pins to hold it in place if you’d like.

IMG_0300

Before closing, stuff some polyfil into the nose.

IMG_0303

Ears:

With chincilla, ch 3. Sl st to first ch to create circle. (Instead, you can perform the “magic circle” if you’d like.)

Row 1: ch 1, 10 sc inside of circle. (10 stitches)

Row 2: *Inc in first stitch, sc in next stitch, repeat from * around. (15 stitches)

Row 3: *Inc in first stitch, sc in next 2 stitches, repeat from * around. (20 stitches)

Row 4: *Inc in first stitch, sc in next 3 stitches, repeat from * around. (25 stitches)

Rows 5-7: Sc in each stitch around. (25 stitches)

Tie off. Fold flat. The ears will have a slight curve to them.

IMG_0306

Lay ears on face so that they almost touch the eyes. You can use straight pins to hold them in place if you’d like.

IMG_0310

Sew on, following the curve of the ear.

IMG_0314

Cut pieces of linen yarn and attach them close to the ear to create the hair.

IMG_0316

Trim them to the size you want.

IMG_0318

Pull each strand apart to make them fuzzier.

IMG_0320

IMG_0325

Body:

With chincilla, ch 3. Sl st to first ch to create circle. (Instead, you can perform the “magic circle” if you’d like.)

Row 1: ch 1, 10 sc inside of circle. (10 stitches)

Row 2: *Inc in first stitch, sc in next stitch, repeat from * around. (15 stitches)

Row 3: *Inc in first stitch, sc in next 2 stitches, repeat from * around. (20 stitches)

Row 4: *Inc in first stitch, sc in next 3 stitches, repeat from * around. (25 stitches)

Rows 5-13: Sc in each stitch around. (25 stitches)

Row 14: *Dec in first 2 stitches, sc in next 3 stitches, repeat from * around. (20 stitches)

Tie off. Stuff tight with polyfil.

Arms:

With linen, ch 3. Sl st to first ch to create circle. (Instead, you can perform the “magic circle” if you’d like.)

Row 1: ch 1, 10 sc inside of circle. (10 stitches)

Row 2: *Inc in first stitch, sc in next stitch, repeat from * around. (15 stitches)

Switch to chinchilla.

Row 3: *Dec in first 2 stitches, sc in next stitch, repeat from * around. (10 stitches)

Rows 4-13: Sc in each stitch around. (10 stitches)

Tie off. Stuff halfway with polyfil.

Legs:

With linen, ch 3. Sl st to first ch to create circle. (Instead, you can perform the “magic circle” if you’d like.)

Row 1: ch 1, 10 sc inside of circle. (10 stitches)

Row 2: *Inc in first stitch, sc in next stitch, repeat from * around. (15 stitches)

Row 3: *Inc in first stitch, sc in next 2 stitches, repeat from * around. (20 stitches)

Switch to chinchilla.

Row 4: *Dec in first 2 stitches, sc in next 2 stitches, repeat from * around. (15 stitches)

Rows 5-10: Sc in each stitch around. (15 stitches)

Tie off. Stuff tight with polyfil.

Tail:

With chinchilla, ch 3. Sl st to first ch to create circle. (Instead, you can perform the “magic circle” if you’d like.)

Row 1: ch 1, 10 sc inside of circle. (10 stitches)

Row 2: Sc in each stitch around. (10 stitches)

Tie off.

IMG_0321

Sew body onto head. Sew legs onto body, making sure to keep them even. You want them slightly towards the front, but mostly facing the sides. Using straight pins to put them in place will help you to get them even.

IMG_0327

Sew arms on. Sew tail on back, making sure to position it low enough that it will help balance the koala. Stuff some polyfil into the tail before closing off. You can also add more linen yarn to the tail to make it fluffier.

IMG_0387

When the koala sits, his tail and legs should keep him balanced.

IMG_0379

Using your black yarn, sew on a mouth, eyebrows and “claws” on his feet. You can do other things with him too, like add felt under his eyes. I made another one using a smaller hook, so he’s just slightly smaller than Kevin.

IMG_0388

I like both of them, but as you can see adding the felt gave him a different look and expression.

I hope you enjoy this pattern! You’re welcome to sell items that you make using my patterns, as long as you don’t post the pattern anywhere else, and link back to my page if you’d like to. If there are any mistakes, or something is unclear, please feel free to leave me a comment and let me know. Or message me on Facebook. If you create any koalas of your own, be sure to post a photo on my Facebook page so I can see. I love seeing all of the things people are creating, and I’d love to see the different variations that people make of these.

What Do I Do With All of This Scrap Yarn?

If you’re a crocheter, or a knitter, then you know that a lot of the time you finish your project and you still have yarn left. What do you do with it? If you’re like me, you throw it in a bin or bag and move on to the next, fresh new skein of yarn. Eventually, though, those scraps of yarn start to build up, and it’s tough to get yourself to just throw it away. You paid good money for that yarn, and you’re just sure you’ll end up needing it the minute it’s in the trash.

I recently had a conversation with a friend about what to do with all of that scrap yarn. There are really a lot of possibilities. I found a few ideas that I love, and I thought I’d share them with you.

Donate Your Yarn

destash-scrap-yarn-1

If you have a bunch of scrap yarn that is cluttering up your house, and you know you’ll probably never get around to doing anything with it, consider donating it. Call up a local daycare, preschool or elementary school and see if they have a use for it. Call some senior centers or nursing homes. There are a lot of crafts out there that only require a bit of yarn, and some of these places may be able to put your scraps to good use. Plus, it can be tough for them to budget in art and craft supplies, so they may be thrilled to receive your donation. This post on Craftsy talks a bit about donating your yarn, but also gives a neat idea for organizing and storing your scraps.

bird2

You could also donate it to the birds. I thought this was a neat idea, because it would help birds make strong, warm nests. Plus, it makes them more colorful. If your scraps of yarn are too small to really do anything with them, then this could be a neat alternative to throwing them away. I’m not sure how safe it is for birds, so maybe do a bit of research on type of yarn first.

Make Some Words

6a00e54fbad09988340153918d110a970b-700wi

If you have kids, this could be a fun project for them to use up those scraps of yarn. Just grab some pipe cleaners next time you’re at the craft store.

yarn-monogram-letters-hero-580x870

With a glue gun, some scrap yarn, and a few embellishments, you can make a pretty letter to hang on your wall.

ZoeLetters2

Or you can be a little bit more elaborate and make a whole name to hang on your wall.

161

You could also grab some nails and turn a boring fence into a great place to hang out, and a pretty background for photographs.

Make Some Art

Picnik collage #2

This art project would be really cute hanging in a nursery, and if you have enough colors you could even do a more detailed design. This is done with rolls of yarn, but you could easily do it with pom-poms too.

january-centerpiece

You can turn your scraps of yarn into a pretty centerpiece for your table by gluing it to styrofoam balls.

Wrap Some Presents

PomPoms1

You can use that extra yarn to wrap around gifts for an extra little touch. Attach a pom-pom or two, and it will look even better.

Make Some Bookmarks

download

Bookmarks made out of yarn are such a cute idea. You could really crochet pretty much anything to use as a bookmark, but I particularly liked these Harry Potter themed scarf bookmarks.

yarn-ball-pom-pom-bookmark-2

These pom-pom bookmarks don’t require any crocheting at all. It’s a project your kids could actually do with their scrap yarn, and would make cute gifts for their teachers.

Make Some Hat Ornaments

hat13-

I thought these cute hats were a great alternative to making pom-poms. They’re easy enough for kids to do, and they’d make great decorations to hang around your house all winter long. You could even make a couple of them and add them to the top of your packages during the holidays. I make hats and scarves for everybody in the family for Christmas. I think these would be cute on top of those presents.

Make an Afghan

6a00e551101c548834013482846e8d970c-500wi

There are a lot of afghan patterns out there that are designed for using up scraps of yarn, but almost any pattern will work really, as long as you don’t mind sudden color changes and no real color scheme. A granny stitch blanket works well for this because it shows off each color quite well.

Easy-Ripple-Afghan

Ripple afghans also look nice with scraps of yarn because the ripples make the colors all stand out quite well.

hexis2

You could also make hexagons with your scrap yarn and sew them together when you have enough for a blanket. I think this is a neat idea if you have a bin or something to throw them in. Just grab that leftover yarn when it starts to get overwhelming and crochet up some hexagons.

Make Some Pom-poms

img_9352

Making pom-poms is my favorite thing to do with scrap yarn. I always like attaching them to hats that I make, but there are so many different things you can do with pom-poms. Go check out my pom-pom post to see a few of my favorite ideas.

I hope this post was helpful. What do you do with your scrap yarn? Have you found other ideas that aren’t listed here? Go drop by my Facebook page and tell me about it, or post photos of things you’ve made with scrap yarn.


V-Pop Hat and Scarf Set

IMG_0417

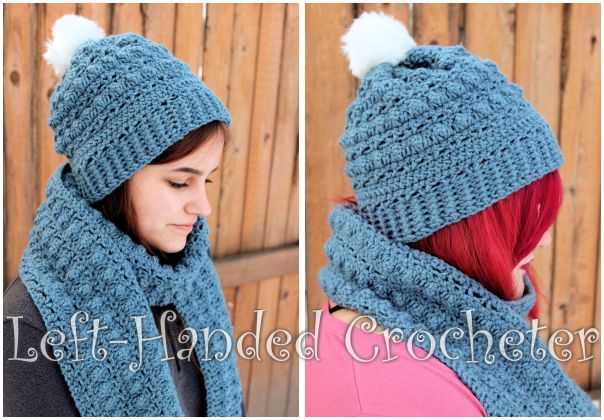
This is one of the coldest, and craziest, winters I’ve ever seen. With snow down in Florida, the Carolinas, and Texas, and the “Bomb Cyclone” on the east coast, I figure everybody needs lots of ways to bundle up. I love making hat and scarf sets, so I’ve been spending my time designing some new patterns.

IMG_0423

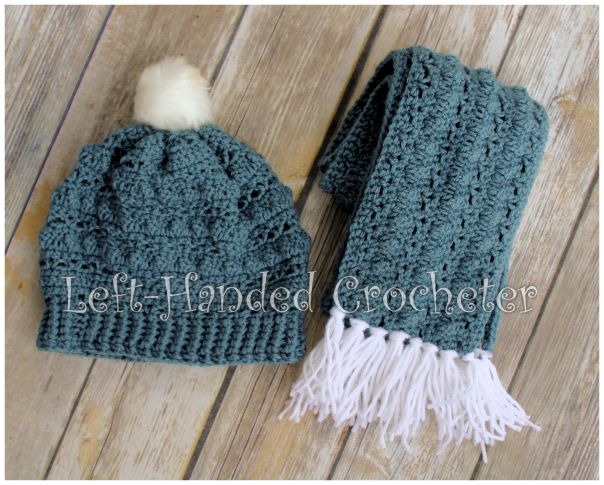
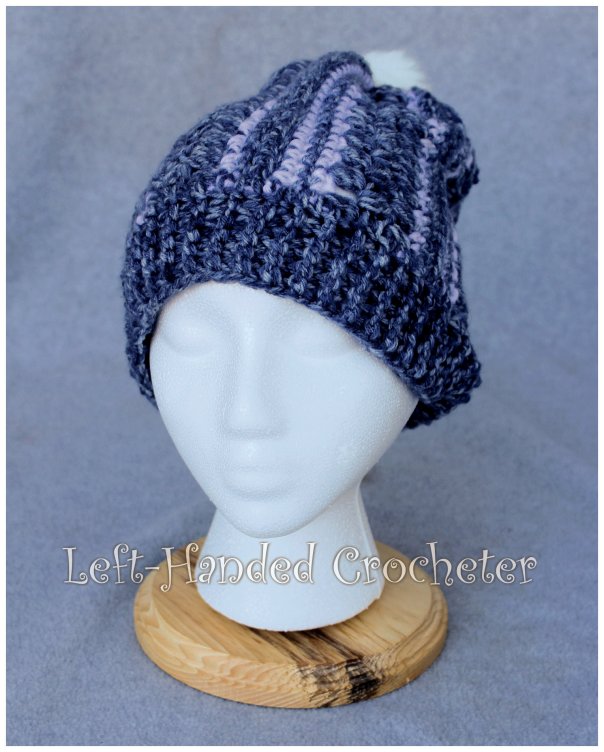
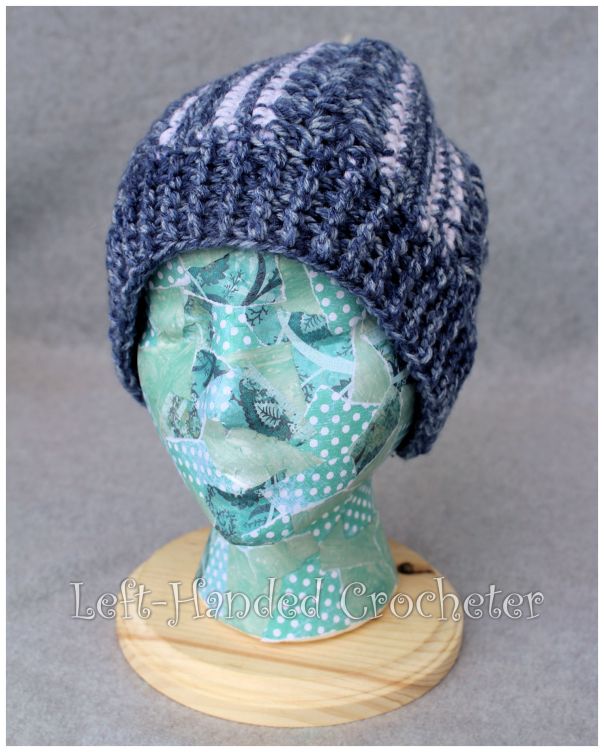
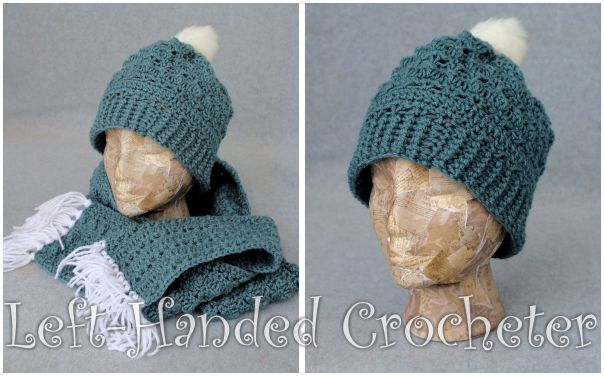
When it comes to hat and scarves, I like textures and patterns. I wanted something that would be textured, but would also have a pretty pattern to it. I combined the popcorn stitch and the v-stitch to come up with this V-Pop hat and scarf set.

IMG_0446

This pattern is made as a “one size fits most” design, but you could really adjust it to fit other sizes if you want to by changing the numbers in your starting chain. As long as you stick to a multiple of 3, the pattern should still come out just fine.

Collage2

I like hats that are slightly slouchy, but my middle daughter loves her hats to slouch more. You could add a few more v-stitch rows at the end to make this hat more slouchy if you prefer it that way. It’s a fairly versatile pattern that can be made with any yarn, as long as you adjust for the thickness. And really, just look at those textures.

Collage3

This pattern is free here on my blog, but if you want a pattern that you can save on your computer and easily print, this pattern is available in my Ravelry shop for only $2.00.  I love printing patterns and saving them in a binder to keep track of the ones I’ve done and the ones I still plan to do.

Abbreviations:

ch: chain

sc: single crochet

sl st: slip stitch

hdc: half double crochet

fphdc: front post half double crochet

bphdc: back post half double crochet

dc: double crochet

Materials needed (with affiliate links):

Lion Brand Vanna’s Choice yarn. I did this hat in Dusty Blue. You can use any worsted weight yarn.

J (6mm) crochet hook

Yarn needle

Special stitch:

This pattern uses a 3 dc popcorn stitch. To make a popcorn stitch, work 3 dc’s into the same space.

IMG_0232

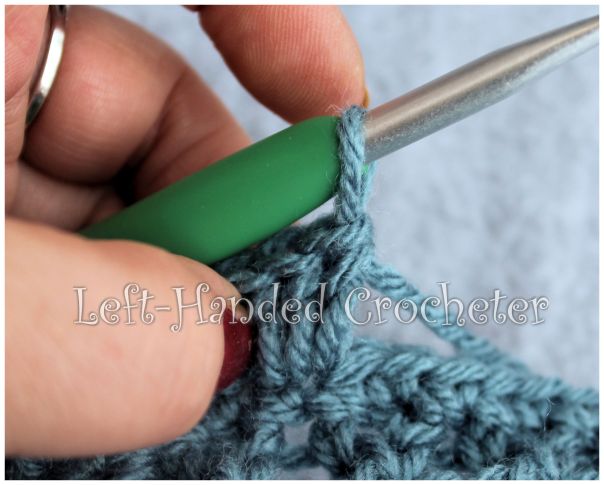
Remove your hook, insert it into the first dc of the 3.

IMG_0234

Grab the loop and pull it through.

IMG_0238

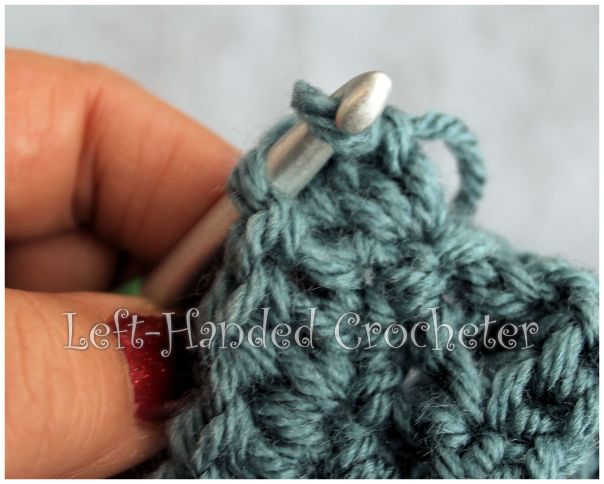
By going through the back, this will make the popcorn stitch “pop” out on the opposite side, which makes that the front of your hat.

IMG_0240

You can also insert the hook from the front to the back, which will make your popcorn “pop” out on the side facing you instead. It’s really your choice, just remember to be consistent so you have a distinct inside and outside for your hat.

Hat:

Ch. 75. (You can change the size of the hat here by changing the starting chain. Just stick to a multiple of 3 and the pattern will still work.) Sl st to first ch to form a ring.

Row 1: Ch 2, hdc in each ch around, sl st into ch 2. (75 stitches)

Rows 2-5: Ch 2, fphdc, bphdc around, sl st into ch 2. (75 stitches)

Row 6: Ch 4 (this is your first dc plus a ch 1), dc in same space you slip stitched into. *Skip 2, in next stitch dc, ch 1, dc. Repeat from * around. Sl st into the 3rd ch of your ch 4. (25 v-stitches)

Row 7: Ch 1, sc around, sl st to first sc. Be sure to sc into each dc and each ch 1 space. (75 stitches)

Row 8: Ch 2, hdc around, sl st to first hdc. (75 stitches)

Row 9: Ch 1, sc around, sl st to first sc. (75 stitches)

Row 10: Ch 4 (this is your first dc plus a ch 1), dc in same space you slip stitched into. *Skip 2. In next stitch dc, ch 1, dc to make your “V.”  Repeat from * around. Sl st into the 3rd ch of your ch 4. (25 v-stitches)

Row 11: Ch 1, sc around, sl st to first sc. (75 stitches)

Row 12: Ch 3, *dc in first 2 stitches, work popcorn stitch into next stitch. Repeat from * around. Sl st into ch 3. (75 stitches, counting each popcorn stitch as 1 stitch)

Row 13: Ch 1, sc around, sl st to first sc. (75 stitches)

Row 14: Ch 4 (this is your first dc plus a ch 1), dc in same space you slip stitched into. *Skip 2. In next stitch dc, ch 1, dc to make your “V.”  Repeat from * around. Sl st into the 3rd ch of your ch 4. (25 v-stitches)

Row 15: Ch 1, sc around, sl st to first sc. (75 stitches)

Row 16: Ch 3, *dc in first 2 stitches, work popcorn stitch into next stitch. Repeat from * around. Sl st into ch 3. (75 stitches, counting each popcorn stitch as 1 stitch)

Row 17: Ch 1, sc around, sl st to first sc. (75 stitches)

Row 18: Ch 4 (this is your first dc plus a ch 1), dc in same space you slip stitched into. *Skip 2. In next stitch dc, ch 1, dc to make your “V.”  Repeat from * around. Sl st into the 3rd ch of your ch 4. (25 v-stitches)

Row 19: Ch 1, sc around, sl st to first sc. (75 stitches)

Row 20: Ch 3, *dc in first 2 stitches, work popcorn stitch into next stitch. Repeat from * around. Sl st into ch 3. (75 stitches, counting each popcorn stitch as 1 stitch)

Row 21: Ch 1, sc around, sl st to first sc. (75 stitches)

Row 22: Ch 4 (this is your first dc plus a ch 1), dc in same space you slip stitched into. *Skip 2. In next stitch dc, ch 1, dc to make your “V.”  Repeat from * around. Sl st into the 3rd ch of your ch 4. (25 v-stitches)

Row 23: Ch 1, sc around, sl st to first sc. (75 stitches)

Row 24: Ch 2, hdc around, sl st to first hdc. (75 stitches)

Row 25: Ch 1, sc around, sl st to first sc. (75 stitches)

Row 26: Ch 4 (this is your first dc plus a ch 1), dc in same space you slip stitched into. *Skip 2. In next stitch dc, ch 1, dc to make your “V.”  Repeat from * around. Sl st into the 3rd ch of your ch 4. (25 v-stitches)

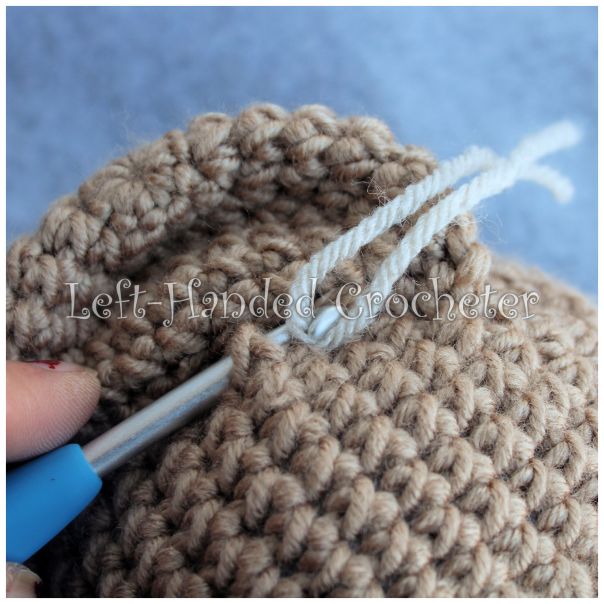
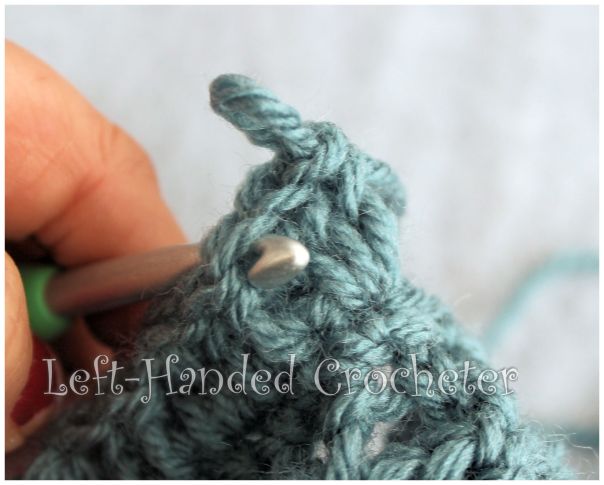
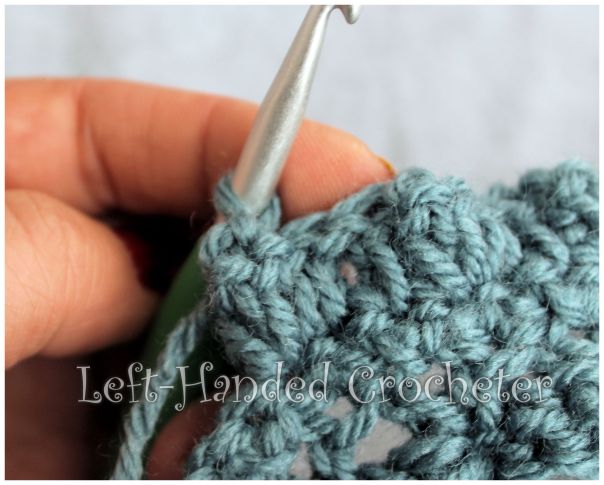
You can add a few more v-stitch rows to give it more slouch, or tie off after row 26, leaving a long tail to sew the end together. Using your yarn needle, weave the tail in and out of each v-stitch:

IMG_0214

IMG_0219

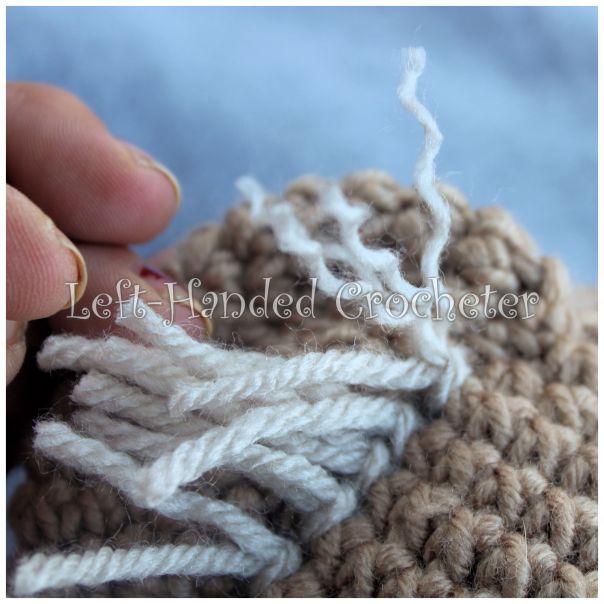
When you get back to the beginning, pull the yarn tight to close up the top. You can put a few stitches into the top to close it tighter if you’d like to. Tie the yarn to one of the stitches to finish it.

IMG_0225

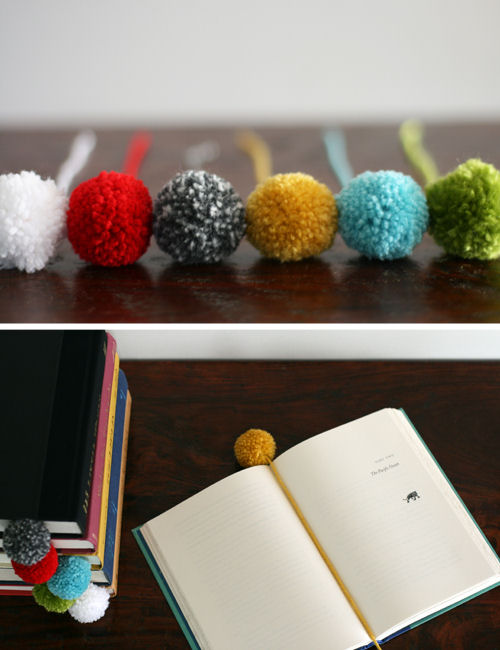
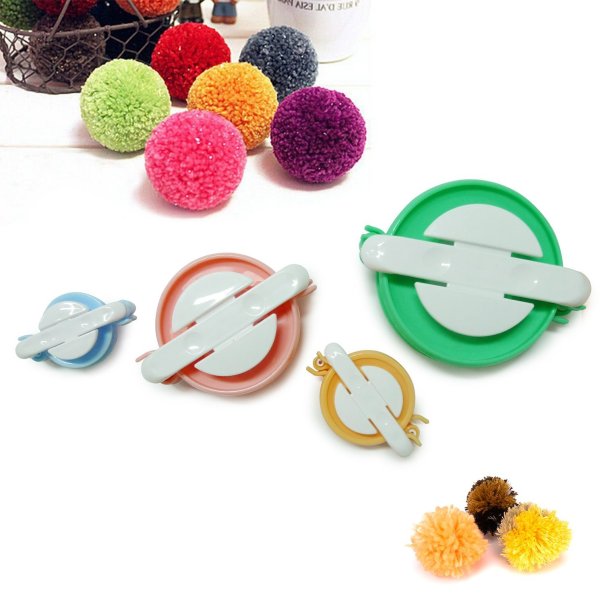
Attach a fur or yarn pom-pom to the top.

IMG_0226

Scarf:

Ch. 228. My finished scarf measures about 5 and 1/2 feet long, so if you want it longer or shorter you can adjust that by changing the count on your starting chain. Just keep it in multiples of 3 + 3.

For example, if I wanted it to be a bit longer, I could start with a ch of 243. 80 x 3 = 240 + 3 = 243. Just make sure you use a multiple of 3, then add 3 to it.

Row 1: Sc in 2nd ch from hook and in each ch across, turn. (227 stitches)

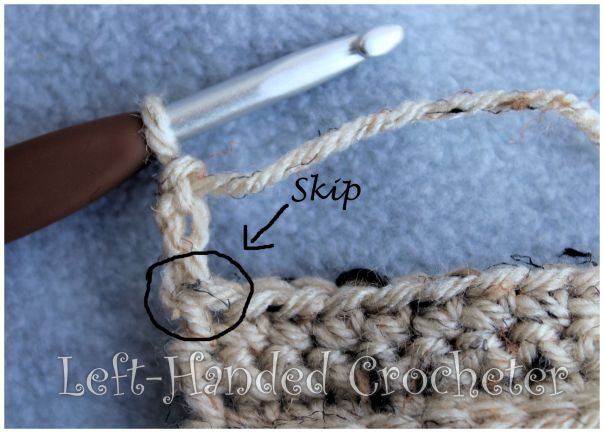
Row 2: Ch 3. (Counts as first dc here and throughout.) Skip next stitch. In next stitch, dc, ch 1, dc to make your V-stitch. *Skip 2. Work V-stitch into next stitch. Repeat from * across until you get to the last 2 stitches. Skip next stitch, dc in last stitch, turn. (75 v-stitches)

*NOTE* When a pattern says that your ch counts as the first stitch, that almost always means that you skip the stitch directly under that chain. In Row 2, where it says “skip next stitch” that means you also skip the stitch in front of it.

IMG_0342a

Row 3: Ch 1, sc around, turn. Be sure to sc into each dc and each ch 1 space. (227 stitches)

Row 4: Ch 3. (Counts as first dc here and throughout.) Dc in next stitch, work popcorn stitch into next stitch. *Dc in next 2 stitches, work popcorn stitch into next stitch. Repeat from * across. Dc in last 2 stitches, turn. (227 stitches, counting each popcorn stitch as 1 stitch)

Row 5: Ch 1, sc around, turn. (227 stitches)

Row 6: Ch 3. Skip next stitch. In next stitch, dc, ch 1, dc to make your V-stitch. *Skip 2. Work V-stitch into next stitch. Repeat from * across until you get to the last 2 stitches. Skip next stitch, dc in last stitch, turn. (75 v-stitches)

Row 7: Ch 1, sc around, turn. (227 stitches)

Row 8: Ch 3. Dc in next stitch, work popcorn stitch into next stitch. *Dc in next 2 stitches, work popcorn stitch into next stitch. Repeat from * across. Dc in last 2 stitches, turn. (227 stitches, counting each popcorn stitch as 1 stitch)

Row 9: Ch 1, sc around, turn. (227 stitches)

Row 10: Ch 3. Skip next stitch. In next stitch, dc, ch 1, dc to make your V-stitch. *Skip 2. Work V-stitch into next stitch. Repeat from * across until you get to the last 2 stitches. Skip next stitch, dc in last stitch, turn. (75 v-stitches)

Row 11: Ch 1, sc around, turn. (227 stitches)

Row 12: Ch 3. Dc in next stitch, work popcorn stitch into next stitch. *Dc in next 2 stitches, work popcorn stitch into next stitch. Repeat from * across. Dc in last 2 stitches, turn. (227 stitches, counting each popcorn stitch as 1 stitch)

Row 13: Ch 1, sc around, turn. (227 stitches)

Row 14: Ch 3. Skip next stitch. In next stitch, dc, ch 1, dc to make your V-stitch. *Skip 2. Work V-stitch into next stitch. Repeat from * across until you get to the last 2 stitches. Skip next stitch, dc in last stitch, turn. (75 v-stitches)

Row 15: Ch 1, sc around, turn. (227 stitches)

Tie off. Weave in ends. Attach fringe at each end of scarf.

Collage5

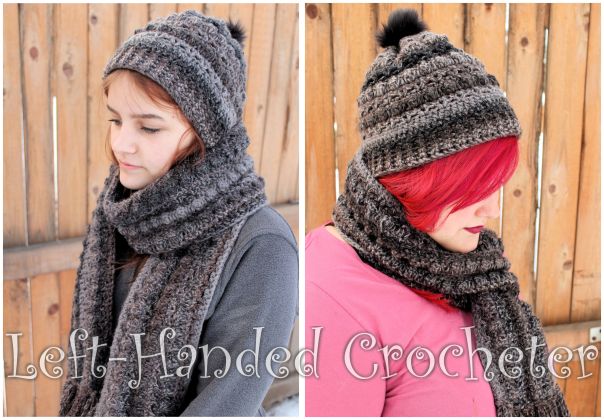
I also made this set using Loops and Threads Barcelona in Onyx, which is a size 5 bulky yarn. I used a J hook and followed the same pattern, and it only came out a little bit bigger.

Collage6

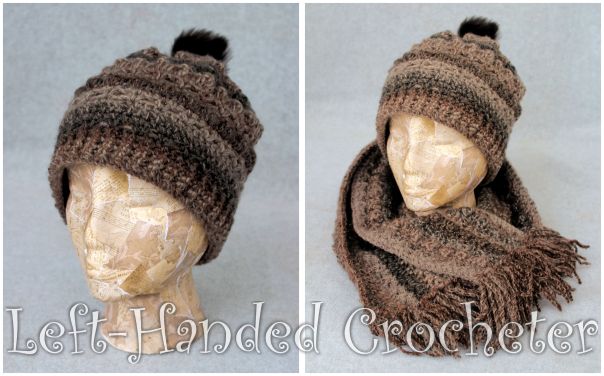
I love the Barcelona yarn because the colors on them are beautiful, and the color changes really show off this pattern more.

Collage4

Eventually, I’ll try it in some other yarns to see how it works with different colors and textures. I hope you love this set as much as I do. If there are any mistakes in this pattern, or something is unclear, please feel free to leave me a comment and let me know. Or message me on Facebook. If you create any of these, be sure to post a photo on my Facebook page so I can see.


Pom Pom Party

I must admit, I love pom poms. I love making hats and putting pom poms on them, but I’m always wanting to do more with them. I decided this was a good time to do a post about all the things you can do with pom poms.

But first, let’s talk about making pom poms. The greatest thing about them, I think, is that anybody can make them. You don’t need to know how to crochet or knit to learn how to make pom poms. And there are so many different ways to make them too.

71LapytUnNL._SL1500_

You can buy yourself some pom pom makers like these. They come in 4 different sizes for all of your pom pom needs. Is it possible to have pom pom needs? I think it is.

Personally, I own pom pom makers in many different sizes. But I’ve actually never used them. I don’t even know where they are. When I want to make a pom pom, I just look for something round. A soda bottle, a paint bottle, or…..my Yoda kaleidoscope.

img_9341

It seems I use Yoda more than anything else when I’m making pom poms. It’s the perfect size, really. I wrap my yarn around it, then I pull it off of the kaleidoscope.

I put a piece of yarn underneath it and tie it tight around the middle.

Then I cut each side. Making sure not to cut the piece that I tied around it, I then fluff and trim the pom pom until it looks the way I want it to.

img_9352

I use that long piece to attach it to hats.

There are lots of other ways you can make pom poms, and most of them don’t require you to purchase anything. This video on youtube shows 4 different ways of making pom poms, and you can do all 4 with items you have around your house.

Do you have a project that requires a lot of pom poms? There are a few different, inventive, ways to make pom poms in bulk, but I think my favorite is using a chair. This video gives a quick tutorial on how to do it, but I’m actually planning on having my boyfriend make me a tool to do this using wooden dowels and a 2×4. It would be much easier for me, and he likes to build me things.

If you want to make a lot of small pom poms, this video shows how to do it using a loom. I never would have thought to do this, but I have a few looms here (that I’ve never actually used) so I might have to give this one a try.

The great thing about pom poms is that it’s a creative way to use up those scraps of yarn you have laying around. You can wrap different colors in one pom pom to make rainbow ones, or to create a theme. Grab that extra yarn, make a bunch of pom poms, and throw them in a bin. Then next time you have an idea for a pom pom project, you already have them made and ready to go.

Now that you know how to make pom poms, let’s look at some neat ideas for things you can do with them.

8668e65174557a1db1eff946f479f20f

The first thing I think of when I start talking about pom poms is making a pom pom rug. Me and my daughter had plans to each make one of these years ago. We bought the supplies, but then never got around to doing it. One of these days I swear I will. Go check out the instructions, including a video, for the one above on this site. And if you make one before I do, make sure you show me a picture. There are so many different types of rugs you can make.

IMG_1980

This website shows how they made this adorable cloud pom pom rug. I love the idea of making shaped rugs using pom poms. You could cut your base into any shape really, but I think a heart would be really cute. Imagine sitting in a nice, comfy chair with some yarn in your lap, a hook in your hand, and your toes sunk into a fluffy pom pom rug. Seriously, I will make one of these eventually to go in front of my chair.

2665879P78

Pom pom wreaths are also very popular, and I love the way they look. This one from Joann’s uses a foam wreath form and hot glue, and I love the random fur pom poms that they threw in there. Now imagine this in pastels for a nice, spring wreath. You could also buy the wire wreath forms and tie the pom poms on instead of hot gluing them.

pom pom pillow-16

How about a pom pom pillow? This tutorial uses a simple pillow case and hot glue. I think something like this would look cute in a nursery.

DSC_1631

Pom pom garland is pretty easy to make, and would look great hung around the house at Christmas time. Don’t limit yourself, though. Make some in other colors and hang it around as everyday decor. This site shows a few different ways of making pom poms, but they also show how to turn them into pretty garland.

DIY-POM-POM-Yarn-Letters-6

Imagine how cute it would be to create your child’s name using wooden letters and pom poms. I found this idea on this site, and I really love it. I might have to incorporate this into the decor in my craft space when I finally get it decorated.

Pom-Pom-Tree-closeup

Ok, ok, I know that Christmas is over, but I feel like this tree could be used as decor all year long, depending on the colors you use. I love the bells they added in there, and the star at the top is cute. If you leave the star off, or put something else on top (a bird, maybe?) then it would make a nice spring decoration. Go check out this site to see how they did it.

DSC_0020-550x419

Speaking of pom poms as everyday decor, check out how simple and elegant they look just glued to some sticks and put in a nice vase. I found this idea on this site, and I really love it. It would be a fun thing to make with the kids because you could go for a hike first to find the branches you want to use, then come home and make some pom poms and glue them on.

There are a lot of other things you could make with pom poms with your kids. These fluffy snowmen would be fun, or some little chicks to set around the house at Easter time. Or how about some Sesame Street characters? You could even add a keychain or zipper pull to the string that you use to tie the pom pom.

If you want some other ideas for things to do with pom poms, Adventures in Pompom Land and Pompom Crafts are 2 great books for under $10 each that you can purchase over on Amazon.

I hope you enjoyed this post! I really had to force myself to get off of Pinterest. There are so many neat ideas for things to do with pom poms, and I think I could have kept on browsing all day. Do you have any things you’ve made with pom poms? Have you seen some cool ideas that you want to try. Head on over to my Facebook page and tell me about it, or post a picture or link. I’m going to have a tub full of pom poms here soon that I’ll need ideas for.


Crochet Cactus Pillow

My 13-year-old daughter is obsessed with cacti. She wants to buy every cactus she sees, and she wants everything she sees with a cactus print on it. For Christmas, I decided I wanted to make her a cactus pillow.

IMG_0361

I found an adorable cactus-shaped pillow pattern created by Whistle and Ivy for Darice. She designed it using chunky yarn, but I wanted to use the same yarn for both of the pillows, so my shaped one is smaller than hers, but perfect size to go with the graph pillow that I designed.

IMG_0366

I wanted a big enough pillow for her to use on her bed, and this whole set was perfect for her. She has anxiety problems, especially when she’s not at home, so when she went and stayed at her friend’s house last week the little shaped pillow was perfect size for her to tuck in her backpack. She said the little hairs on it helped her anxiety because tightening them helped with her need to fidget. So, two birds, one stone.

Want to make your own cactus graph pillow? Here’s what I used for mine.

Materials needed (with affiliate links):

18 x 18 inch pillow form

Loops and Threads Impeccable yarn in soft rose, fern, deep forest and soft fern.

J (6mm) crochet hook

For the back of the pillow, I wanted stripes. I really loved the way the pink and the greens looked together. My daughter actually saw me working on the back and said it reminded her of a watermelon. She had no idea I was working on something for her.

IMG_0373

I did the back of it first, in order to figure out how big it needed to be so I could create the graph for the front.

IMG_0374

I tend to crochet rather tight stitches. I used a J hook, but if you crochet loose stitches you may need to use an I hook to get the right gauge.

Gauge: 7 (hdc) stitches and 5 rows = 2 inches square

I did 60 hdc’s across, and did 52 rows to get it the size I needed to cover the pillow. The pattern I used was 4 rows of soft rose, 2 rows of deep forest, 4 rows of fern, 2 rows of soft fern, then repeated it ending with 4 rows of soft rose. You can do this pillow in any colors that you choose, and do whatever pattern you want on the back, as long as you do 60 hdc’s across and 52 rows, and make sure your gauge is the same as mine by adjusting the hook size you’re using.

This is the graph I created for the front of the pillow:

Cactus2

I really liked the way the pink looked with the green, and I liked the bright colors. But you could do this in any colors you want. I think it would look great in more muted colors.

IMG_0371

Once I finished both sides, I did a sc around both to sew them together and inserted the pillow form before I closed up the top. Then I added fringe around the outside, and added some little “thorns” to the cactus.

I hope you liked my cactus pillow. If you use this graph to make any cactus pillows of your own, be sure to share a photo with me on Facebook.