Category Archives: Uncategorized

My Crochet Project Bible review

IMG_7992

Last month, I ordered some things from Stationary Geek, and I was very pleased when my package arrived. My favorite part of it is this Crochet Project Bible. It’s a perfect place to keep track of all of the different projects I’m working on. Inside of the book, it has a conversions cheat sheet that is very useful. The next 2 pages will help you figure out typical sizes for hats, scarves, blankets, and throws, and will also help you figure out the abbreviations on most patterns. There’s even space inside to write up notes or doodles that you don’t want to lose.

IMG_7994

IMG_7997

IMG_7998

The rest of the book is filled with pages to keep track of up to 50 projects. I often start projects, then set them aside to work on something more pressing. When I go back, I sometimes forget exactly what yarn I was using, or what hook I started the project with. If you’re making something from a book or website, you can even write down where the pattern is so you can go back and find it later. While this is very useful for projects that you’ve set aside, it’s also useful if it’s a project that you might want to make again.

IMG_8000

I love the graph because it allows me to draw up any graphgans I’m working on, but it could also be used like regular lined-paper to write out a pattern. I’ve already got a couple of projects written in my bible.

IMG_8006

They also have a knitting bible you can purchase, or just a general craft project bible, which I may have to purchase in the future. Also, one of my favorite things on their site are these honest gift tags:

IMG_8017

They have these for crocheters, knitters, a combination of the two, or for sewing projects. I love these tags so much, I almost don’t want to give them away. Want to order some of these products or check out what else they have? Go visit their website and be sure to add them on Facebook to keep track of any new products they come out with.

IMG_8024

And don’t forget to follow me on Facebook as well!

Giraffe Blanket

026

All of my kids have an animal they collect. My oldest daughter collects elephants. She’s having a baby boy at the end of August, so she decided to collect giraffes for him, to go with her elephants. I found this cute giraffe made out of perler beads designed by Anja Takacs. She designs so many cute patterns that work well for graphgans, and this one was just too adorable to pass up. Check out her blog to see more of her lovely creations.

I had a hard time figuring out what type of yarn I wanted to use, but in the end I went with Caron Simply soft. It had the softness that I wanted, although it is a bit heavy for a bobble blanket. The colors I used were bone, sunshine, persimmon, chocolate, black and white. I haven’t tackled C2C blankets yet, but I think this would actually work much better as a C2C because it wouldn’t be quite as heavy. I used my modified bobble stitch to make this one, which just means I did 3 dcs instead of 4. The blanket is big enough for him to use it for a long time, and I love how it turned out.

IMG_7989

IMG_7976

I did a simple single crochet edging, then added some scallops to give it a fancier look.

IMG_7983

I would absolutely love to see how this looks as a C2C blanket, so if you use this graph, or any of her other awesome graphs, go post a photo to my Facebook page and show me how it turned out.

Elephant Graph Blanket

IMG_7700

At the end of August, my daughter is going to be having a baby boy. She’s chosen the name Dax for him, which I love. Since my daughter collects elephants, she decided to collect giraffes for Dax. I decided to work up a cute elephant blanket for him to go along with the big giraffe one that I made, which I’ll be posting later. Originally, I was going to do these elephants in grey with a yellow background, but when I was looking at the baby yarn I just couldn’t resist these blues. I used Loops and Threads Snuggly Wuggly yarn in soft yellow, pale blue and cobalt. I love how this blanket looks, and I love even more how it feels. Because I love it so much, I thought I’d share the graph with everybody so you can all make it too. Here’s the graph I worked up and used for this blanket:

BlanketLayout5

I did each elephant square using my modified version of the bobble stitch (it’s just a little less bobbley so it’s not quite as thick or stiff), but I think this would look really cute as a c2c blanket as well. After I did the 4 elephant squares, I used this alphabet that I created to design his name for the top:

Alphabet1

I just used a single crochet to sew each piece together with the cobalt yarn.

IMG_7704

Then I used all of the colors to create a trim. There are so many options for trims, but I just did a single crochet around the whole piece with the different colors, then created a scalloped edging in yellow.

IMG_7707

This blanket will be perfect as fall will be approaching soon after he’s born. I can’t wait to wrap him up in it!

IMG_7687

Using an H hook and baby yarn, this blanket ends up being approximately 27 inches across by 32 inches long. I would absolutely love to see it done in some other colors, so if you use this graph, go post a photo to my Facebook page and show me how it turned out.

Crocheted Wedding Bouquet

IMG_6723a

Me and my boyfriend, Wren, have been together for 13 years. While neither of us has any desire to get married (been there, done that for both of us), we’ve decided to have a commitment ceremony on our 15th anniversary. That’s still 2 years away, but I want to make most of the stuff we’ll be using in the ceremony, so I decided I would start with my bouquet. I searched the internet for ideas, and found a lot of useful ones, and while mine is far from perfect, I’m pretty proud of the end result. Here’s how I did it:

First, I went shopping. This is by far the funnest part of any project, and since I work at Michael’s, I’m there all the time anyway. I picked up these styrofoam pieces from the floral section to use as my base.IMG_6660a

Then I went to the yarn section (my favorite part of the store) and chose some coordinating colors for my flowers.

IMG_6662a

I bought some pins in the wedding aisle, then went to the ribbon aisle to match up some ribbon with the colors I chose for my yarn.

IMG_6664

IMG_6668a

If you search on the internet, there are tons of patterns for flowers. I tried a lot of them before choosing a couple of simple ones that I liked, and then I made a whole lot of flowers.

IMG_6677a

I decided to crochet over my foam bases for two reasons. The first one, because if the flowers didn’t cover completely, I didn’t want foam to show through. The second one was because I wanted to hot glue my flowers to the base but I wasn’t sure how the hot glue would effect the foam. I actually love how the pieces turned out once I had crocheted over them.

IMG_6679a

Because my round foam was hollow inside, I cut a piece of cardboard to fit and seal up the hole. I was going to write up a pattern for this, but it would only work with the exact same size pieces of foam. So I just played with it until I got it right. Next, I used the pins to place all of the flowers on.

IMG_6683a

Once I had the whole thing covered, I moved them around until I had them exactly where I wanted them. Then I pulled them off one at a time and hot glued each of them on. I wanted to keep the pearl pins in the smallest flowers, so after I hot glued them, I stuck those pins back in. Then I attached my handle to my base.

IMG_6698

IMG_6703a

Crocheting around the bases also made it easier to attach the handle. I simply used a yarn needle and yarn and sewed it on. To give it added stability, I use some of my pins and pushed them through the handle and into the cardboard. Next, it was time to attach the ribbon. This was the hardest part for me. Hot glue is messy, and once it’s on you can’t readjust. If I were to do this again (which I probably will be for my bridesmaid’s bouquets), I would probably use a different glue for the ribbon. Maybe fabric glue.

IMG_6714a

Even with the little mess-ups that I had on the ribbon, I was thrilled with the way it turned out. It was fun to make, and I think it will be a beautiful bouquet for me to carry in a ceremony where I’ll be crocheting most of the stuff we’ll be using.

IMG_6716a

IMG_6721a

IMG_6733a

Over the next 2 years, I expect I’ll be posting a lot more photos of things I plan to make. Follow me on Facebook to see them as I post. Thanks for checking out my bouquet! If you’ve made a bouquet before, I’d love to see it. Drop me a comment with a link, or post a photo on my Facebook page.

Duck, duck….duck

IMG_7230

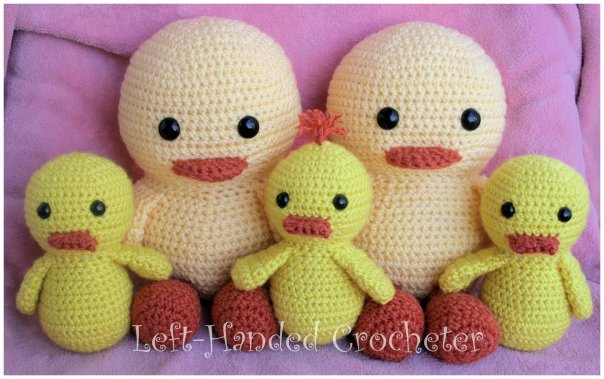
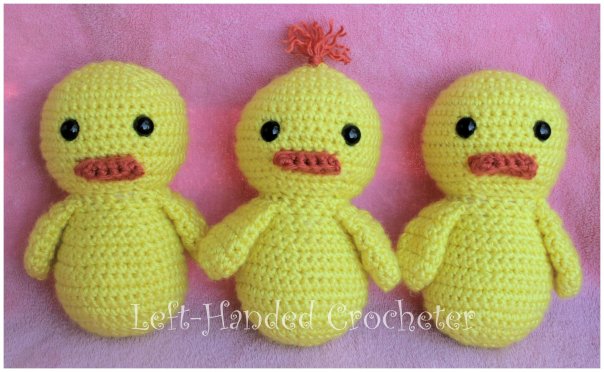
I thought these little ducks would be cute if you make one of them white and turn it into a goose. I made them all yellow because my grandson is currently obsessed with ducks. My sister-in-law loves them too, so I had to make a couple for her.

Abbreviations:

ch: chain

sc: single crochet

sl st: slip stitch

inc: increase (2 single crochets in one loop)

dec: decrease (pull yarn through loop, pull yarn through second loop, yarn over and pull through all loops)

Materials needed for small duck (with affiliate links):

3.5 MM (E) crochet hook

Caron Simply Soft yarn in Lemonade and Pumpkin

12mm safety eyes

Yarn needle

Poly-fil

Head:

ch 3. Sl st to first ch to create circle. (Instead, you can perform the “magic circle” if you’d like.)

Row 1: ch 1, 10 sc inside of circle. Sl st to first sc, ch 1, turn.

Row 2: Inc, 1 sc , repeat around. Sl st to first sc, ch 1, turn.

Row 3: Inc, 2 sc, repeat around. Sl st to first sc, ch 1, turn.

Row 4: Inc, 3 sc, repeat around. Sl st to first sc, ch 1, turn.

Row 5: Inc, 4 sc, repeat around. Sl st to first sc, ch 1, turn.

Row 6: Inc, 5 sc, repeat around. Sl st to first sc, ch 1, turn.

Row 7: Inc, 6 sc, repeat around. Sl st to first sc, ch 1, turn.

Rows 8-13: Sc around. Sl st to first sc, ch 1, turn.

Row 14: Dec, 6 sc, repeat around. Sl st to first sc, ch 1, turn.

Row 15: Dec, 5 sc, repeat around. Sl st to first sc, ch 1, turn.

Row 16: Dec, 4 sc, repeat around. Sl st to first sc, ch 1, turn.

Row 17: Dec, 3 sc, repeat around. Sl st to first sc, ch 1, turn.

Tie Off.

Body:

ch 3. Sl st to first ch to create circle. (Instead, you can perform the “magic circle” if you’d like.)

Row 1: ch 1, 10 sc inside of circle. Sl st to first sc, ch 1, turn.

Row 2: Inc, 1 sc , repeat around. Sl st to first sc, ch 1, turn.

Row 3: Inc, 2 sc, repeat around. Sl st to first sc, ch 1, turn.

Row 4: Inc, 3 sc, repeat around. Sl st to first sc, ch 1, turn.

Row 5: Inc, 4 sc, repeat around. Sl st to first sc, ch 1, turn.

Row 6: Inc, 5 sc, repeat around. Sl st to first sc, ch 1, turn.

Row 7: Inc, 6 sc, repeat around. Sl st to first sc, ch 1, turn.

Rows 8-10: Sc around. Sl st to first sc, ch 1, turn.

Row 11: Dec, 6 sc, repeat around. Sl st to first sc, ch 1, turn.

Row 12: Sc around. Sl st to first sc, ch 1, turn.

Row 13: Dec, 5 sc, repeat around. Sl st to first sc, ch 1, turn.

Row 14: Sc around. Sl st to first sc, ch 1, turn.

Row 15: Dec, 4 sc, repeat around. Sl st to first sc, ch 1, turn.

Row 16: Sc around. Sl st to first sc, ch 1, turn.

Row 17: Dec, 3 sc, repeat around. Sl st to first sc, ch 1, turn.

Row 18: Sc around. Sl st to first sc, ch 1, turn.

Tie Off.

Beak:

Leaving a long tail for sewing, ch 7

Row 1: Sc across, ch 1, turn.

Row 2: Dec, 2 sc, dec, ch 1, turn.

Row 3: In front loops only, sc across, ch 1, turn.

Row 4: Inc, 2 sc, inc.

Tie off. Fold in half and sew sides together.

Stuff head and body, attach safety eyes to head and sew beak on. Sew head onto body.

Wings:

ch 3. Sl st to first ch to create circle. (Instead, you can perform the “magic circle” if you’d like.)

Row 1: ch 1, 5 sc inside of circle. Sl st to first sc, ch 1, turn.

Row 2: Inc around, sl st to first sc, ch 1, turn.

Row 3: Inc, 1 sc , repeat around. Sl st to first sc, ch 1, turn.

Rows 4-7: Sc around. Sl st to first sc, ch 1, turn.

Row 8: Dec, 3 sc, repeat around. Sl st to first sc, ch 1, turn.

Rows 9-10: Sc around. Sl st to first sc, ch 1, turn.

Tie off. Do not stuff wings. Press flat and sew open ends to body.

IMG_7216

Materials needed for large duck (with affiliate links):

5.25 MM (I) crochet hook

Red Heart yarn in Lemon and Carrot

20mm safety eyes

Yarn needle

Poly-fil

Head:

ch 3. Sl st to first ch to create circle. (Instead, you can perform the “magic circle” if you’d like.)

Row 1: ch 1, 10 sc inside of circle. Sl st to first sc, ch 1, turn.

Row 2: Inc, 1 sc , repeat around. Sl st to first sc, ch 1, turn.

Row 3: Inc, 2 sc, repeat around. Sl st to first sc, ch 1, turn.

Row 4: Inc, 3 sc, repeat around. Sl st to first sc, ch 1, turn.

Row 5: Inc, 4 sc, repeat around. Sl st to first sc, ch 1, turn.

Row 6: Inc, 5 sc, repeat around. Sl st to first sc, ch 1, turn.

Row 7: Inc, 6 sc, repeat around. Sl st to first sc, ch 1, turn.

Row 8: Inc, 7 sc, repeat around. Sl st to first sc, ch 1, turn.

Row 9: Inc, 8 sc, repeat around. Sl st to first sc, ch 1, turn.

Row 10: Inc, 9 sc, repeat around. Sl st to first sc, ch 1, turn.

Row 11: Inc, 10 sc, repeat around. Sl st to first sc, ch 1, turn.

Rows 12-21: Sc around. Sl st to first sc, ch 1, turn.

Row 22: Dec, 10 sc, repeat around. Sl st to first sc, ch 1, turn.

Row 23: Dec, 9 sc, repeat around. Sl st to first sc, ch 1, turn.

Row 24: Dec, 8 sc, repeat around. Sl st to first sc, ch 1, turn.

Row 25: Dec, 7 sc, repeat around. Sl st to first sc, ch 1, turn.

Row 26: Dec, 6 sc, repeat around. Sl st to first sc, ch 1, turn.

Tie off. Stuff head and insert safety eyes.

Body:

ch 3. Sl st to first ch to create circle. (Instead, you can perform the “magic circle” if you’d like.)

Row 1: ch 1, 10 sc inside of circle. Sl st to first sc, ch 1, turn.

Row 2: Inc, 1 sc , repeat around. Sl st to first sc, ch 1, turn.

Row 3: Inc, 2 sc, repeat around. Sl st to first sc, ch 1, turn.

Row 4: Inc, 3 sc, repeat around. Sl st to first sc, ch 1, turn.

Row 5: Inc, 4 sc, repeat around. Sl st to first sc, ch 1, turn.

Row 6: Inc, 5 sc, repeat around. Sl st to first sc, ch 1, turn.

Row 7: Inc, 6 sc, repeat around. Sl st to first sc, ch 1, turn.

Row 8: Inc, 7 sc, repeat around. Sl st to first sc, ch 1, turn.

Row 9: Inc, 8 sc, repeat around. Sl st to first sc, ch 1, turn.

Row 10: Inc, 9 sc, repeat around. Sl st to first sc, ch 1, turn.

Row 11: Inc, 10 sc, repeat around. Sl st to first sc, ch 1, turn.

Rows 12-17: Sc around. Sl st to first sc, ch 1, turn.

Row 18: Dec, 10 sc, repeat around. Sl st to first sc, ch 1, turn.

Row 19: Sc around. Sl st to first sc, ch 1, turn.

Row 20: Dec, 9 sc, repeat around. Sl st to first sc, ch 1, turn.

Row 21: Sc around. Sl st to first sc, ch 1, turn.

Row 22: Dec, 8 sc, repeat around. Sl st to first sc, ch 1, turn.

Row 23: Dec, 7 sc, repeat around. Sl st to first sc, ch 1, turn.

Row 24: Dec, 6 sc, repeat around. Sl st to first sc, ch 1, turn.

Tie off. Stuff body. Sew head onto body.

Beak:

ch 3. Sl st to first ch to create circle. (Instead, you can perform the “magic circle” if you’d like.)

Row 1: ch 1, 10 sc inside of circle. Sl st to first sc, ch 1, turn.

Row 2: Inc, 1 sc , repeat around. Sl st to first sc, ch 1, turn.

Row 3: Sc around, sl st to first sc, ch 1, turn.

Fold circle in half. Sc around curved top. Tie off, leaving a tail to sew beak onto head.

Wings:

ch 3. Sl st to first ch to create circle. (Instead, you can perform the “magic circle” if you’d like.)

Row 1: ch 1, 5 sc inside of circle. Sl st to first sc, ch 1, turn.

Row 2: Inc around, sl st to first sc, ch 1, turn.

Row 3: Inc, 1 sc , repeat around. Sl st to first sc, ch 1, turn.

Rows 4-9: Sc around. Sl st to first sc, ch 1, turn.

Row 10: Dec, 3 sc, repeat around. Sl st to first sc, ch 1, turn.

Rows 11-12: Sc around. Sl st to first sc, ch 1, turn.

Tie off. Do not stuff wings. Press flat and sew open ends to body.

Feet:

ch 3. Sl st to first ch to create circle. (Instead, you can perform the “magic circle” if you’d like.)

Row 1: ch 1, 10 sc inside of circle. Sl st to first sc, ch 1, turn.

Row 2: Inc, 1 sc , repeat around. Sl st to first sc, ch 1, turn.

Row 3: Inc, 2 sc, repeat around. Sl st to first sc, ch 1, turn.

Row 4: Inc, 3 sc, repeat around. Sl st to first sc, ch 1, turn.

Row 5: Dec, 3 sc, repeat around. Sl st to first sc, ch 1, turn.

Rows 6-8: Sc around. Sl st to first sc, ch 1, turn.

Row 9: 5 sc, dec 5 times, 5 sc, sl st to first sc, ch 1, turn.

Row 10: Sc around. Sl st to first sc, ch 1, turn.

Row 11: Dec, 1 sc, repeat around. Sl st to first sc, ch 1, turn.

Rows 12-13: Sc around. Sl st to first sc, ch 1, turn.

Tie off. Stuff feet, but not legs. Press legs flat and sew open side onto body.

IMG_7228

When sewing parts on, be sure it lines up right before attaching. And remember, if you sew something on crooked, it’s easy enough to just pull it back apart and re-do it.

If there are any mistakes in this pattern, or something is unclear, please feel free to leave me a comment and let me know. Or message me on Facebook. If you create any ducks or geese, be sure to post a photo on my Facebook page so I can see.

You may sell items that you make with my patterns, but please don’t post my patterns anywhere without linking back to my page.

Bunnies, bunnies, bunnies

IMG_6644a

Easter has been on my mind, so I made myself a harem of bunnies. They’re cute and cuddly and they work up pretty quickly. This pattern could also be used to make other animals simply by changing the ears and nose on it. For example, some cute, round ears and a safety nose would turn these into a cute teddy bear. I thought the bunnies were cute, and I had fun thinking of different colors to make them in.

Abbreviations:

ch: chain

sc: single crochet

sl st: slip stitch

inc: increase (2 single crochets in one loop)

dec: decrease (pull yarn through loop, pull yarn through second loop, yarn over and pull through all loops)

Materials needed (with affiliate links):

5.25 MM (I) crochet hook

Red Heart yarn

12mm safety eyes

Black embroidery thread

Yarn needle

Poly-fil

Body:

ch 3. Sl st to first ch to create circle. (Instead, you can perform the “magic circle” if you’d like.)

Row 1: ch 1, 10 sc inside of circle. Sl st to first sc, ch 1, turn.

Row 2: Inc, 1 sc , repeat around. Sl st to first sc, ch 1, turn.

Row 3: Inc, 2 sc, repeat around. Sl st to first sc, ch 1, turn.

Row 4: Inc, 3 sc, repeat around. Sl st to first sc, ch 1, turn.

Rows 5-10: Sc around. Sl st to first sc, ch 1, turn.

Row 11: Dec, 3 sc, repeat around. Sl st to first sc, ch 1, turn.

Rows 12-13: Sc around, sl st to first sc, ch 1, turn.

Tie off.

Head:

ch 3. Sl st to first ch to create circle. (Or do magic circle.)

Row 1: ch 1, 10 sc inside of circle. Sl st to first sc, ch 1, turn.

Row 2: Inc, 1 sc, repeat around. Sl st to first sc, ch 1, turn.

Row 3: Inc, 2 sc, repeat around. Sl st to first sc, ch 1, turn.

Row 4: Inc, 3 sc, repeat around. Sl st to first sc, ch 1, turn.

Row 5: Inc, 4 sc, repeat around. Sl st to first sc, ch 1, turn.

Row 6: Inc, 5 sc, repeat around. Sl st to first sc, ch 1, turn.

Rows 7-11: Sc around, sl st to first sc, ch 1, turn.

Row 12: Dec, 5 sc, repeat around. Sl st to first sc, ch 1, turn.

Row 13: Dec, 4 sc, repeat around. Sl st to first sc, ch 1, turn.

Row 14: Dec, 3 sc, repeat around. Sl st to first sc.

Tie off.

Leg:

ch 3. Sl st to first ch to create circle. (Or do magic circle.)

Row 1: ch 1, 10 sc inside of circle. Sl st to first sc, ch 1, turn.

Row 2: Inc, 1 sc, repeat around. Sl st to first sc, ch 1, turn.

Row 3: Inc, 2 sc, repeat around. Sl st to first sc, ch 1, turn.

Row 4: Dec, 2 sc, repeat around. Sl st to first sc, ch 1, turn.

Row 5: Sc around, sl st to first sc, ch 1, turn.

Row 6: 4 sc, dec, dec, dec, dec, 3 sc, sl st to first sc, ch 1, turn.

Rows 7-9: Sc around, sl st to first sc, ch 1, turn.

Tie off.

Arm:

ch 3. Sl st to first ch to create circle. (Or do magic circle.)

Row 1: 8 sc in loop. Sl st to first sc, ch 1, turn.

Rows 2-6: Sc around, sl st to first sc, ch 1, turn.

Tie off.

Tail:

ch 3. Sl st to first ch to create circle. (Or do magic circle.)

Row 1: 6 sc in loop, sl st to first sc, ch 1, turn.

Rows 2-3: Sc around, sl st to first sc, ch 1, turn.

Tie off.

Ear:

ch 3. Sl st to first ch to create circle. (Or do magic circle.)

Row 1: 5 sc in loop, sl st to first sc, ch 1, turn.

Row 2: Inc around, sl st to first sc, ch 1, turn.

Row 3: Inc, 1 sc, repeat around. Sl st to first sc, ch 1, turn.

Rows 4-8: Sc around, sl st to first sc, ch 1, turn.

Row 9: Dec, 3 sc, repeat around. Sl st to first sc, ch 1, turn.

Rows 10-11: Sc around, sl st to first sc, ch 1, turn.

Row 12: Dec, 2 sc, repeat around. Sl st to first sc, ch 1, turn.

Rows 13-15: Sc around, sl st to first sc, ch 1, turn.

Tie off.

017

Stuff everything except the ears and tail. Using your yarn needle, sew arms, legs and tail onto body. Sew ears onto head, then put eyes on. Using embroidery thread and needle, sew on nose. Sew head to body.

When sewing parts on, be sure it lines up right before attaching. And remember, if you sew something on crooked, it’s easy enough to just pull it back apart and re-do it.

IMG_6648a

If there are any mistakes in this pattern, or something is unclear, please feel free to leave me a comment and let me know. Or message me on Facebook. If you create any other animals using this pattern, or you make your own harem of bunnies, be sure to post a photo on my Facebook page so I can see.

You may sell items that you make with my patterns, but please don’t post my patterns anywhere without linking back to my page.

Chick Easter Basket

IMG_6624a

I decided that I needed to make an Easter basket for my Moonpie’s first Easter this year. I was trying to decide between a bunny and a chick, but the chick just seemed like more fun to me. So here is my chick Easter basket. This pattern is worked in both loops and should work for left or right handed crocheters.

Abbreviations:

ch: chain

sc: single crochet

sl st: slip stitch

inc: increase (2 single crochets in one loop)

dec: decrease (pull yarn through loop, pull yarn through second loop, yarn over and pull through all loops)

Materials needed (with affiliate links):

5.25 MM (I) crochet hook

Red Heart yarns in pale yellow, carrot and black

Yarn needle

Basket:

Using 2 strands of yellow yarn at once ch 3. Sl st to first ch to create circle. (Instead, you can perform the “magic circle” if you’d like.)

Row 1: ch 1, 10 sc inside of circle. Sl st to first sc, ch 1, turn.

Row 2: Inc, 1 sc, repeat around. Sl st to first sc, ch 1, turn.

Row 3: Inc, 2 sc, repeat around. Sl st to first sc, ch 1, turn.

Row 4: Inc, 3 sc, repeat around. Sl st to first sc, ch 1, turn.

Row 5: Inc, 4 sc, repeat around. Sl st to first sc, ch 1, turn.

Row 6: Inc, 5 sc, repeat around. Sl st to first sc, ch 1, turn.

Row 7: Inc, 6 sc, repeat around. Sl st to first sc, ch 1, turn.

Row 8: Inc, 7 sc, repeat around. Sl st to first sc, ch 1, turn.

Row 9: Inc, 8 sc, repeat around. Sl st to first sc, ch 1, turn.

Row 10:  Inc, 9 sc, repeat around. Sl st to first sc, ch 1, turn.

Row 11:  Inc, 10 sc, repeat around. Sl st to first sc, ch 1, turn.

Row 12: Dec, 10 sc, repeat around. Sl st to first sc, ch 1, turn.

*At this point your basket should curve up. You can flip it inside out if you like the way it looks better. You decide which is the outside and which is the inside.*

Row 13-23: Sc around, sl st to first sc, ch 1, turn.

Tie off.

Handle:

Using 2 strands of yellow yarn at once, ch. 46.

Row 1: sc in second ch from hook and in each ch across, ch 1, turn.

Row 2-5: sc across, ch 1, turn.

Tie off.

Wings:

Using yellow yarn ch 3. Sl st to first ch to create circle. (Or do magic circle.)

Row 1: 6 sc in loop. Sl st to first sc, ch 1, turn.

Row 2: Inc, 2 sc, repeat around. Sl st to first sc, ch 1, turn.

Row 3: Sc around. Sl st to first sc, ch 1, turn.

Row 4: Inc, 3 sc, repeat around. Sl st to first sc, ch 1, turn.

Row 5: Inc, 4 sc, repeat around. Sl st to first sc, ch 1, turn.

Row 6: Inc, 5 sc, repeat around. Sl st to first sc, ch 1, turn.

Row 7-8: Sc around. Sl st to first sc, ch 1, turn.

Tie off.

Eyes:

Using black yarn ch 3. Sl st to first ch to create circle. (Or do magic circle.)

10 sc in loop, sl st to first sc.

Tie off.

Using yarn needle, sew handle onto basket. Sew wings on underneath handle. You can either sew the eyes on, or hot glue them like I did. Using your needle and the orange yarn, sew on the beak.

IMG_6629

If there are any mistakes in this pattern, or something is unclear, please feel free to leave me a comment and let me know. Or message me on Facebook. Happy Easter!

You may sell items that you make with my patterns, but please don’t post my patterns anywhere without linking back to my page.