All posts by jadedjennifer

About jadedjennifer

I am me. I promise.

Sleepy Elf

IMG_2014

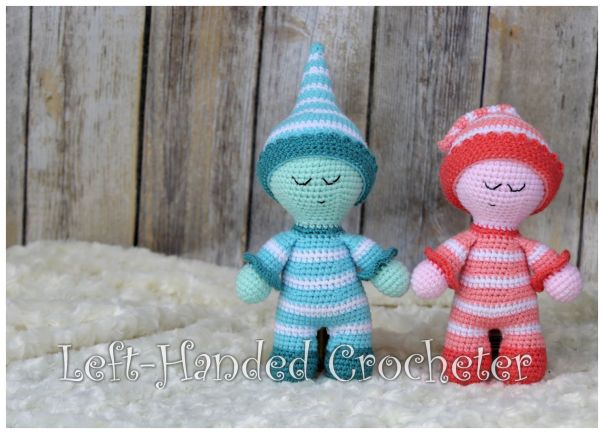
These sleepy elves are ready for your little one to cuddle with while they drift off to sleep. Made with sport weight baby yarn, the finished size is approximately 10 inches tall.

If you want a pattern that you can save on your computer and easily print, this pattern is available in my Ravelry shop for only $2.00. I love printing patterns and saving them in a binder to keep track of the ones I’ve done and the ones I still plan to do.

Abbreviations:

ch: chain

sc: single crochet

inc: increase (2 single crochets in one loop)

dec: decrease (pull yarn through loop, pull yarn through second loop, yarn over and pull through all loops)

Materials needed (with affiliate links):

E (3.5mm) crochet hook

Baby yarn, or any size 3 yarn, preferably in shades of the same color. For example, white, light pink, medium pink and dark pink.

15mm safety eyes

Black embroidery thread

Yarn needle

Poly-fil

Rattle inserts (optional)

I purchased these rattle inserts from Amazon last year, and I decided they were perfect for inside of the sleepy elf.


I put one inside of each of their bodies, but you could also insert them in their heads if you want. Or even put one in both so that they’re extra “rattley.” If you use a rattle in them, be sure to insert it into the middle of the stuffing so there are no hard spots in it.

This pattern is worked “in-the-round”, and stitches are worked through both loops unless otherwise noted. 

Head:

With light colored yarn, ch 3. Sl st to first ch to create circle. (Instead, you can perform the “magic circle” if you’d like.)

Row 1: ch 1, 5 sc inside of circle. (5 stitches)

Row 2: Inc in each stitch around. (10 stitches)

Row 3: *Inc in first stitch, sc in next stitch, repeat from * around. (15 stitches)

Row 4: *Inc in first stitch, sc in next 2 stitches, repeat from * around. (20 stitches)

Row 5: *Inc in first stitch, sc in next 3 stitches, repeat from * around. (25 stitches)

Row 6: *Inc in first stitch, sc in next 4 stitches, repeat from * around. (30 stitches)

Row 7: *Inc in first stitch, sc in next 5 stitches, repeat from * around. (35 stitches)

Row 8: *Inc in first stitch, sc in next 6 stitches, repeat from * around. (40 stitches)

Row 9: *Inc in first stitch, sc in next 7 stitches, repeat from * around. (45 stitches)

Row 10: *Inc in first stitch, sc in next 8 stitches, repeat from * around. (50 stitches)

Rows 11-18: Sc in each stitch around. (50 stitches)

Row 19: *Dec in first 2 stitches, sc in next 8 stitches, repeat from * around. (45 stitches)

Row 20: *Dec in first 2 stitches, sc in next 7 stitches, repeat from * around. (40 stitches)

Row 21: *Dec in first 2 stitches, sc in next 6 stitches, repeat from * around. (35 stitches)

Row 22: *Dec in first 2 stitches, sc in next 5 stitches, repeat from * around. (30 stitches)

Row 23: *Dec in first 2 stitches, sc in next 4 stitches, repeat from * around. (25 stitches)

Row 24: *Dec in first 2 stitches, sc in next 3 stitches, repeat from * around. (20 stitches)

Tie off. Stuff tight with poly-fil.

Hat:

With medium color, ch 3. Sl st to first ch to create circle. (Instead, you can perform the “magic circle” if you’d like.)

Row 1: ch 1, 4 sc inside of circle. (4 stitches)

Row 2: Sc in each stitch around. (4 stitches)

Row 3: *Inc in first stitch, sc in next stitch, repeat from * around. (6 stitches)

Switch to white.

Row 4: Sc in each stitch around. (6 stitches)

Row 5: *Inc in first stitch, sc in next 2 stitches, repeat from * around. (8 stitches)

Switch to medium color.

Row 6: Sc in each stitch around. (8 stitches)

Row 7: *Inc in first stitch, sc in next 3 stitches, repeat from * around. (10 stitches)

Row 8: Sc in each stitch around. (10 stitches)

Switch to white.

Row 9: *Inc in first stitch, sc in next 4 stitches, repeat from * around. (12 stitches)

Row 10: Sc in each stitch around. (12 stitches)

Switch to medium color.

Row 11: *Inc in first stitch, sc in next 5 stitches, repeat from * around. (14 stitches)

Row 12: Sc in each stitch around. (14 stitches)

Row 13: *Inc in first stitch, sc in next 6 stitches, repeat from * around. (16 stitches)

Switch to white.

Row 14: Sc in each stitch around. (16 stitches)

Row 15: *Inc in first stitch, sc in next 7 stitches, repeat from * around. (18 stitches)

Switch to medium color.

Row 16: Sc in each stitch around. (18 stitches)

Row 17: *Inc in first stitch, sc in next 8 stitches, repeat from * around. (20 stitches)

Row 18: Sc in each stitch around. (20 stitches)

Switch to white.

Row 19: *Inc in first stitch, sc in next 3 stitches, repeat from * around. (25 stitches)

Row 20: Sc in each stitch around. (25 stitches)

Switch to medium color.

Row 21: *Inc in first stitch, sc in next 4 stitches, repeat from * around. (30 stitches)

Row 22: Sc in each stitch around. (30 stitches)

Row 23: *Inc in first stitch, sc in next 5 stitches, repeat from * around. (35 stitches)

Switch to white.

Row 24: *Inc in first stitch, sc in next 6 stitches, repeat from * around. (40 stitches)

Row 25: *Inc in first stitch, sc in next 7 stitches, repeat from * around. (45 stitches)

Switch to medium color.

Row 26: *Inc in first stitch, sc in next 8 stitches, repeat from * around. (50 stitches)

Rows 27-28: Sc in each stitch around. (50 stitches)

Switch to white.

Rows 29-30: Sc in each stitch around. (50 stitches)

Switch to medium color.

Rows 31-33: Sc in each stitch around. (50 stitches)

Switch to white.

Rows 34-35: Sc in each stitch around. (50 stitches)

Switch to medium color.

Row 36: Sc in each stitch around. (50 stitches)

*Side note: You can make the hat longer by adding a few more rows before doing the brim.*

Switch to darker color.

Row 37: Working in back loops only, sc in each stitch around. (50 stitches)

Rows 38-39: Sc in each stitch around. (50 stitches)

Row 40: Sc in first stitch, *in next stitch sc, ch 4, sc, sc in next stitch. Continue from * around.

Tie off. You can stuff the hat with poly-fil so it will stand up straight, or you can fold the top down and attach it to the hat. Pull the hat onto the elf’s head. Be sure the hat is where you want it, then sew it in place. Sew eyes and mouth on with embroidery floss.


Legs:

With dark colored yarn, ch 3. Sl st to first ch to create circle. (Instead, you can perform the “magic circle” if you’d like.)

Row 1: ch 1, 5 sc inside of circle. (5 stitches)

Row 2: Inc in each stitch around. (10 stitches)

Row 3: *Inc in first stitch, sc in next stitch, repeat from * around. (15 stitches)

Row 4: *Inc in first stitch, sc in next 2 stitches, repeat from * around. (20 stitches)

Row 5: *Inc in first stitch, sc in next 3 stitches, repeat from * around. (25 stitches)

Row 6: *Inc in first stitch, sc in next 4 stitches, repeat from * around. (30 stitches)

Row 7: *Dec in first 2 stitches, sc in next 4 stitches, repeat from * around. (25 stitches)

Rows 8-9: Sc in each stitch around. (25 stitches)

Row 10: *Dec in first 2 stitches, sc in next 3 stitches, repeat from * around. (20 stitches)

Switch to medium color.

Row 11: In front loops only, sc in each stitch around. (20 stitches)

Row 12: Sc in each stitch around. (20 stitches)

Row 13: Dec in first 2 stitches, sc in next 8 stitches, dec in next 2 stitches, sc in last 8 stitches. (18 stitches)

Switch to white.

Row 14: Sc in each stitch around. (18 stitches)

Stuff tight with poly-fil. Tie off first one. With second leg, don’t tie off. Continue on with body.

Body:

With yarn still attached to second leg, ch 2.

Row 1: Attach to first leg, sc around leg, sc in each ch of ch 2, sc around other leg, sc in each ch on other side of ch 2. (40 stitches)


Switch to medium color.

Rows 2-4: Sc in each stitch around. (40 stitches)

Switch to white.

Rows 5-6: Sc in each stitch around. (40 stitches)

Switch to medium color.

Rows 7-8: Sc in each stitch around. (40 stitches)

Row 9: *Dec in first 2 stitches, sc in next 6 stitches, repeat from * around. (35 stitches)

Switch to white.

Rows 10-11: Sc in each stitch around. (35 stitches)

Switch to medium color.

Row 12: Sc in each stitch around. (35 stitches)

Row 13: *Dec in first 2 stitches, sc in next 5 stitches, repeat from * around. (30 stitches)

Row 14: Sc in each stitch around. (30 stitches)

Switch to white.

Rows 15-16: Sc in each stitch around. (30 stitches)

Switch to medium color.

Row 17: Sc in each stitch around. (30 stitches)

Row 18: *Dec in first 2 stitches, sc in next 4 stitches, repeat from * around. (25 stitches)

Row 19: Sc in each stitch around. (25 stitches)

Switch to darker color.

Row 20: Sc in each stitch around. (25 stitches)

Row 21: *Dec in first 2 stitches, sc in next 3 stitches, repeat from * around. (20 stitches)

Switch to lighter color.

Row 22: Sc in each stitch around. (20 stitches)

Tie off. Stuff body tight with poly-fil. I like to stuff it extra full to make it more firm, especially since the stuffing will break down over time. Sew head onto body. Stop before you close the last few stitches and stuff extra poly-fil in to firm up the neck.

Arms:

With light colored yarn, ch 3. Sl st to first ch to create circle. (Instead, you can perform the “magic circle” if you’d like.)

Row 1: ch 1, 5 sc inside of circle. (5 stitches)

Row 2: Inc in each stitch around. (10 stitches)

Row 3: *Inc in first stitch, sc in next stitch, repeat from * around. (15 stitches)

Row 4: *Inc in first stitch, sc in next 2 stitches, repeat from * around. (20 stitches)


Rows 5-6: Sc in each stitch around. (20 stitches)

Row 7: *Dec in first 2 stitches, sc in next 2 stitches, repeat from * around. (15 stitches)

Switch to darker color.

Row 8: Sc in each stitch around. (15 stitches)

Switch to medium color.

Rows 9-11: Sc in each stitch around. (15 stitches)

Switch to white.


Rows 12-13: Sc in each stitch around. (15 stitches)

Switch to medium color.

Row 14: Sc in each stitch around. (15 stitches)

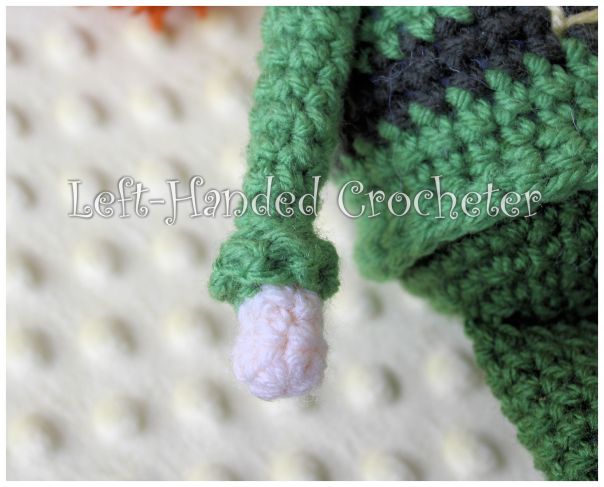
Row 15: *Dec in first 2 stitches, sc in next stitch, repeat from * around. (10 stitches)

Row 16: Sc in each stitch around. (10 stitches)

Tie off. Stuff about halfway with poly-fil. If you want, you can attach darker colored yarn with a slip stitch at row 8, sc around the sleeve, then work 3 sc’s into each stitch around to create a ruffly cuff.

IMG_2043a

Sew arms onto sides of body.

And there you have your finished elf.

IMG_2040


Collage4

I hope you enjoy this pattern! You’re welcome to sell items that you make using my patterns, as long as you don’t post the pattern anywhere else, and link back to my page if you’d like to. If there are any mistakes, or something is unclear, please feel free to leave me a comment and let me know. Or message me on Facebook. If you create any elves of your own, be sure to post a photo on my Facebook page so I can see. I love seeing all of the things people are creating, and I’d love to see the different variations that people make of these.


Trixie the Bunny Girl

IMG_1834

Trixie is all dressed up and she’s hopping your way to help you find some eggs. This finished doll stands approximately 14 inches tall, perfect size for cuddling. She’s made with Bernat Pipsqueak yarn, but you could make her with all worsted weight yarn if you prefer.

If you want a pattern that you can save on your computer and easily print, this pattern is available in my Ravelry shop for only $2.00. I love printing patterns and saving them in a binder to keep track of the ones I’ve done and the ones I still plan to do.

Abbreviations:

ch: chain

sc: single crochet

sl st: slip stitch

dc: double crochet

hdc: half double crochet

trc: triple crochet

inc: increase (2 single crochets in one loop)

dec: decrease (pull yarn through loop, pull yarn through second loop, yarn over and pull through all loops)

Materials needed (with affiliate links):

Lion Brand Vanna’s Choice yarn in beige and pinkBernat Pipsqueak yarn in white. (You can substitute the Pipsqueak yarn for Vanna’s Choice white if you don’t want to work with the fuzzy yarn.)

I (5.25mm) crochet hook

15mm safety eyes

Yarn needle

Poly-fil 

Pipe Cleaners (optional)

This pattern is worked “in-the-round”, and stitches are worked through both loops unless otherwise noted. 

Head:

With beige, ch 3. Sl st to first ch to create circle. (Instead, you can perform the “magic circle” if you’d like.)

Row 1: ch 1, 10 sc inside of circle. (10 stitches)

Row 2: *Inc in first stitch, sc in next stitch, repeat from * around. (15 stitches)

Row 3: *Inc in first stitch, sc in next 2 stitches, repeat from * around. (20 stitches)

Row 4: *Inc in first stitch, sc in next 3 stitches, repeat from * around. (25 stitches)

Row 5: *Inc in first stitch, sc in next 4 stitches, repeat from * around. (30 stitches)

Row 6: *Inc in first stitch, sc in next 5 stitches, repeat from * around. (35 stitches)

Row 7: *Inc in first stitch, sc in next 6 stitches, repeat from * around. (40 stitches)

Row 8: *Inc in first stitch, sc in next 7 stitches, repeat from * around. (45 stitches)

Row 9: *Inc in first stitch, sc in next 8 stitches, repeat from * around. (50 stitches)

Rows 10-15: Sc in each stitch around. (50 stitches)

Row 16: *Dec in first 2 stitches, sc in next 8 stitches, repeat from * around. (45 stitches)

Row 17: *Dec in first 2 stitches, sc in next 7 stitches, repeat from * around. (40 stitches)

Row 18: *Dec in first 2 stitches, sc in next 6 stitches, repeat from * around. (35 stitches)

Row 19: *Dec in first 2 stitches, sc in next 5 stitches, repeat from * around. (30 stitches)

Row 20: *Dec in first 2 stitches, sc in next 4 stitches, repeat from * around. (25 stitches)

Row 21: *Dec in first 2 stitches, sc in next 3 stitches, repeat from * around. (20 stitches)

Tie off. Stuff with poly-fil.

Hat:

With Pipsqueak white, ch 3. Sl st to first ch to create circle. (Instead, you can perform the “magic circle” if you’d like.)

Row 1: ch 1, 10 sc inside of circle. (10 stitches)

Row 2: *Inc in first stitch, sc in next stitch, repeat from * around. (15 stitches)

Row 3: *Inc in first stitch, sc in next 2 stitches, repeat from * around. (20 stitches)

Row 4: *Inc in first stitch, sc in next 3 stitches, repeat from * around. (25 stitches)

Row 5: *Inc in first stitch, sc in next 4 stitches, repeat from * around. (30 stitches)

Row 6: *Inc in first stitch, sc in next 5 stitches, repeat from * around. (35 stitches)

Row 7: *Inc in first stitch, sc in next 6 stitches, repeat from * around. (40 stitches)

Row 8: *Inc in first stitch, sc in next 7 stitches, repeat from * around. (45 stitches)

Row 9: *Inc in first stitch, sc in next 8 stitches, repeat from * around. (50 stitches)

Rows 10-16: Sc in each stitch around. (50 stitches)

Switch to pink yarn.

Row 17: Sc in each stitch around. (50 stitches)

Tie off.

Ears:

With Pipsqueak white, ch 3. Sl st to first ch to create circle. (Instead, you can perform the “magic circle” if you’d like.)

Row 1: ch 1, 5 sc inside of circle. (5 stitches)

Row 2: Inc in each stitch around. (10 stitches)

Row 3: *Inc in first stitch, sc in next stitch, repeat from * around. (15 stitches)

Rows 4-6: Sc in each stitch around. (15 stitches)

Row 7: *Dec in first 2 stitches, sc in next stitch, repeat from * around. (10 stitches)

Rows 8-12: Sc in each stitch around. (10 stitches)

Tie off. Make two. Lay flat and sew onto hat. I applied blush to the middle of each ear to make it pink, then I used a piece of yarn to tie one ear down to make it bent.

IMG_1866

Pull hat onto head and get it where you want it. Figure out the placement of her eyes, but don’t put the backs on yet. Sew hat onto head, then attach hair underneath hat so that it falls over the loops.

IMG_1855

Once you have the hat and hair on, make sure the eye placement is where you want it, and attach the backs. You can sew on a nose and/or mouth if you want to, but I always choose to leave those off because it makes her expression more neutral. You can also use a bit of blush on her cheeks to give her face some color.

IMG_1858

Body:

With Pipsqueak white, ch 3. Sl st to first ch to create circle. (Instead, you can perform the “magic circle” if you’d like.)

Row 1: ch 1, 10 sc inside of circle. (10 stitches)

Row 2: *Inc in first stitch, sc in next stitch, repeat from * around. (15 stitches)

Row 3: *Inc in first stitch, sc in next 2 stitches, repeat from * around. (20 stitches)

Row 4: *Inc in first stitch, sc in next 3 stitches, repeat from * around. (25 stitches)

Row 5: *Inc in first stitch, sc in next 4 stitches, repeat from * around. (30 stitches)

Row 6: *Inc in first stitch, sc in next 5 stitches, repeat from * around. (35 stitches)

Row 7: *Dec in first 2 stitches, sc in next 5 stitches, repeat from * around. (30 stitches)

Rows 8-11: Sc in each stitch around. (30 stitches)

Row 12: *Dec in first 2 stitches, sc in next 4 stitches, repeat from * around. (25 stitches)

Rows 13-14: Sc in each stitch around. (25 stitches)

Row 15: *Dec in first 2 stitches, sc in next 3 stitches, repeat from * around. (20 stitches)

Switch to pink.

Row 16: Sc in each stitch around. (20 stitches)

Switch to beige.

Row 17: Sc in each stitch around. (20 stitches)

Tie off. Stuff with poly-fil. Sew head onto body. Stop before you close the opening and put more poly-fil in to secure her neck.

Make a pom-pom with the Pipsqueak white and attach to her butt.

IMG_1854

Arms:

With beige, ch 3. Sl st to first ch to create circle. (Instead, you can perform the “magic circle” if you’d like.)

Row 1: ch 1, 6 sc inside of circle. (6 stitches)

Rows 2-3: Sc in each stitch around. (6 stitches)

Switch to pink.

Row 4: Sc in each stitch around. (6 stitches)

Switch to Pipsqueak white.

Rows 5-14: Sc in each stitch around. (6 stitches)

Tie off. Make two. Do not stuff. You can insert pipe cleaners in the arms if you want them to be poseable. Sew onto body.

Legs:

With Pipsqueak white, ch 3. Sl st to first ch to create circle. (Instead, you can perform the “magic circle” if you’d like.)

Row 1: ch 1, 10 sc inside of circle. (10 stitches)

Rows 2-13: Sc in each stitch around. (10 stitches)

Tie off. Make two. Stuff with poly-fil. Sew onto body.

And there you have your finished doll. The Pipsqueak yarn is a pain to work with because you can’t see your stitches, but on the plus side it also hides any mistakes you might make. And she’s just so soft and cuddly with the Pipsqueak yarn.


I hope you enjoy this pattern! You’re welcome to sell items that you make using my patterns, as long as you don’t post the pattern anywhere else, and link back to my page if you’d like to. If there are any mistakes, or something is unclear, please feel free to leave me a comment and let me know. Or message me on Facebook. If you create any dolls of your own, be sure to post a photo on my Facebook page so I can see. I love seeing all of the things people are creating, and I’d love to see the different variations that people make of these.

Floppy Bunny

IMG_1796


This floppy, cuddly bunny would be perfect for inside of an Easter basket. The finished size is approximately 14 inches tall.

If you want a pattern that you can save on your computer and easily print, this pattern is available in my Ravelry shop for only $2.00. I love printing patterns and saving them in a binder to keep track of the ones I’ve done and the ones I still plan to do.

Abbreviations:

ch: chain

sc: single crochet

sl st: slip stitch

inc: increase (2 single crochets in one loop)

dec: decrease (pull yarn through loop, pull yarn through second loop, yarn over and pull through all loops)

Materials needed (with affiliate links):

Lion Brand Homespun yarn (I used approximately 1.5 skeins for each bunny, but I tend to crochet very tight. 2 skeins should be plenty to make yourself a bunny.)

I (5.25mm) crochet hook 

18mm safety eyes

Yarn needle

Poly-fil 

Embroidery thread

This pattern is worked “in-the-round”, and stitches are worked through both loops unless otherwise noted. 

Head:

Ch 3. Sl st to first ch to create circle. (Instead, you can perform the “magic circle” if you’d like.)

Row 1: ch 1, 5 sc inside of circle. (5 stitches)

Row 2: Inc in each stitch around. (10 stitches)

Row 3: *Inc in first stitch, sc in next stitch, repeat from * around. (15 stitches)

Row 4: *Inc in first stitch, sc in next 2 stitches, repeat from * around. (20 stitches)

Row 5: Sc in each stitch around. (20 stitches)

Row 6: *Inc in first stitch, sc in next 3 stitches, repeat from * around. (25 stitches)

Rows 7-8: Sc in each stitch around. (25 stitches)

Row 9: Sc in first 10 stitches, inc in next 5 stitches, sc in next 10 stitches. (30 stitches) Insert a stitch marker after the last increase to show where to insert the eyes later.

Row 10: *Inc in first stitch, sc in next 5 stitches, repeat from * around. (35 stitches)

Row 11: *Inc in first stitch, sc in next 6 stitches, repeat from * around. (40 stitches)

Row 12: Sc in each stitch around. (40 stitches)

Row 13: *Inc in first stitch, sc in next 7 stitches, repeat from * around. (45 stitches)

Rows 14-18: Sc in each stitch around. (45 stitches)

Row 19: *Dec in first 2 stitches, sc in next 7 stitches, repeat from * around. (40 stitches)

Row 20: *Dec in first 2 stitches, sc in next 6 stitches, repeat from * around. (35 stitches)

Row 21: Sc in each stitch around. (35 stitches)

Stop at this point and stuff with poly-fil. Insert safety eyes between rows 8 and 9 with 9 stitches in between. Sew nose on with embroidery thread or yarn.

Row 22: *Dec in first 2 stitches, sc in next 5 stitches, repeat from * around. (30 stitches)

Row 23: *Dec in first 2 stitches, sc in next 4 stitches, repeat from * around. (25 stitches)

Row 24: Sc in each stitch around. (25 stitches)

Row 25: *Dec in first 2 stitches, sc in next 3 stitches, repeat from * around. (20 stitches)

Row 26: *Dec in first 2 stitches, sc in next 2 stitches, repeat from * around. (15 stitches)

Row 27: *Dec in first 2 stitches, sc in next stitch, repeat from * around. (10 stitches)

Row 28: Dec around. (5 stitches)

Sew end shut. Tie off.

Ears:

Ch 3. Sl st to first ch to create circle. (Instead, you can perform the “magic circle” if you’d like.)

Row 1: ch 1, 5 sc inside of circle. (5 stitches)

Row 2: Inc in each stitch around. (10 stitches)

Row 3: *Inc in first stitch, sc in next stitch, repeat from * around. (15 stitches)

Row 4: *Inc in first stitch, sc in next 2 stitches, repeat from * around. (20 stitches)

Row 5: *Inc in first stitch, sc in next 3 stitches, repeat from * around. (25 stitches)

Row 6: *Inc in first stitch, sc in next 4 stitches, repeat from * around. (30 stitches)

Rows 7-11: Sc in each stitch around. (30 stitches)

Row 12: *Dec in first 2 stitches, sc in next 4 stitches, repeat from * around. (25 stitches)

Rows 13-14: Sc in each stitch around. (25 stitches)

Row 15: *Dec in first 2 stitches, sc in next 3 stitches, repeat from * around. (20 stitches)

Rows 16-18: Sc in each stitch around. (20 stitches)

Row 19: *Dec in first 2 stitches, sc in next 2 stitches, repeat from * around. (15 stitches)

Rows 20-29: Sc in each stitch around. (15 stitches)

Tie off. Do not stuff. Lay flat and sew to head.

Body:

Ch 3. Sl st to first ch to create circle. (Instead, you can perform the “magic circle” if you’d like.)

Row 1: ch 1, 5 sc inside of circle. (5 stitches)

Row 2: Inc in each stitch around. (10 stitches)

Row 3: *Inc in first stitch, sc in next stitch, repeat from * around. (15 stitches)

Row 4: *Inc in first stitch, sc in next 2 stitches, repeat from * around. (20 stitches)

Row 5: *Inc in first stitch, sc in next 3 stitches, repeat from * around. (25 stitches)

Row 6: *Inc in first stitch, sc in next 4 stitches, repeat from * around. (30 stitches)

Row 7: *Inc in first stitch, sc in next 5 stitches, repeat from * around. (35 stitches)

Row 8: *Inc in first stitch, sc in next 6 stitches, repeat from * around. (40 stitches)

Row 9: *Dec in first 2 stitches, sc in next 6 stitches, repeat from * around. (35 stitches)

Row 10: Sc in each stitch around. (35 stitches)

Row 11: *Dec in first 2 stitches, sc in next 5 stitches, repeat from * around. (30 stitches)

Rows 12-13: Sc in each stitch around. (30 stitches)

Row 14: *Dec in first 2 stitches, sc in next 4 stitches, repeat from * around. (25 stitches)

Rows 15-16: Sc in each stitch around. (25 stitches)

Row 17: *Dec in first 2 stitches, sc in next 3 stitches, repeat from * around. (20 stitches)

Row 18: Sc in each stitch around. (20 stitches)

Tie off. Stuff with poly-fil. Sew onto head.

Legs:

Ch 3. Sl st to first ch to create circle. (Instead, you can perform the “magic circle” if you’d like.)

Row 1: ch 1, 5 sc inside of circle. (5 stitches)

Row 2: Inc in each stitch around. (10 stitches)

Row 3: *Inc in first stitch, sc in next stitch, repeat from * around. (15 stitches)

Row 4: *Inc in first stitch, sc in next 2 stitches, repeat from * around. (20 stitches)

Row 5: *Inc in first stitch, sc in next 3 stitches, repeat from * around. (25 stitches)

Rows 6-10: Sc in each stitch around. (25 stitches)

Row 11: *Dec in first 2 stitches, sc in next 3 stitches, repeat from * around. (20 stitches)

Rows 12-13: Sc in each stitch around. (20 stitches)

Row 14: *Dec in first 2 stitches, sc in next 2 stitches, repeat from * around. (15 stitches)

Rows 15-24: Sc in each stitch around. (15 stitches)

Tie off. Stuff halfway with poly-fil. Sew onto bottom of body.

Arms:

Ch 3. Sl st to first ch to create circle. (Instead, you can perform the “magic circle” if you’d like.)

Row 1: ch 1, 5 sc inside of circle. (5 stitches)

Row 2: Inc in each stitch around. (10 stitches)

Row 3: *Inc in first stitch, sc in next stitch, repeat from * around. (15 stitches)

Row 4: *Inc in first stitch, sc in next 2 stitches, repeat from * around. (20 stitches)

Rows 5-8: Sc in each stitch around. (20 stitches)

Row 9: *Dec in first 2 stitches, sc in next 2 stitches, repeat from * around. (15 stitches)

Rows 10-13: Sc in each stitch around. (15 stitches)

Row 14: *Dec in first 2 stitches, sc in next stitch, repeat from * around. (10 stitches)

Rows 15-18: Sc in each stitch around. (10 stitches)

Tie off. Stuff halfway with poly-fil. Sew onto sides of body.

Tail:

Ch 3. Sl st to first ch to create circle. (Instead, you can perform the “magic circle” if you’d like.)

Row 1: ch 1, 5 sc inside of circle. (5 stitches)

Row 2: Inc in each stitch around. (10 stitches)

Row 3: Sc in each stitch around. (10 stitches)

Tie off. Sew onto butt.


This pattern can also be made with other types of yarn. Using a worsted weight yarn will make it smaller, like this one.


For the worsted weight bunny I used Vanna’s Choice yarn in oatmeal, an H (5mm) crochet hook and 15mm safety eyes. You can also make them using fluffy yarn.

IMG_1817

For this bunny I used Bernat Pipsqueak yarn in white, an H (5mm) crochet hook and 18mm safety eyes. He ended up a little bit bigger than the ones I made using the Homespun yarn.

I hope you enjoy this pattern! You’re welcome to sell items that you make using my patterns, as long as you don’t post the pattern anywhere else, and link back to my page if you’d like to. If there are any mistakes, or something is unclear, please feel free to leave me a comment and let me know. Or message me on Facebook. If you create any bunnies of your own, be sure to post a photo on my Facebook page so I can see. I love seeing all of the things people are creating, and I’d love to see the different variations that people make of these.

Llama Llama

IMG_1634

My grandson has been obsessed with the cartoon Llama Llama on Netflix. I decided I should make him his own llama llama to cuddle with at bedtime. This finished pattern measures approximately 17 inches from the top of his ears to the tip of his toes.

If you want a pattern that you can save on your computer and easily print, this pattern is available in my Ravelry shop for only $2.00. I love printing patterns and saving them in a binder to keep track of the ones I’ve done and the ones I still plan to do.

Abbreviations:

ch: chain

sc: single crochet

sl st: slip stitch

inc: increase (2 single crochets in one loop)

dec: decrease (pull yarn through loop, pull yarn through second loop, yarn over and pull through all loops)

Materials needed (with affiliate links):

Any worsted weight yarn will work, but I used Vanna’s Choice in beige and honey. For the grey alpaca,  used Vanna’s Choice in silver heather and silver grey.

I (5.25mm) crochet hook 

18mm safety eyes

Yarn needle

Poly-fil 

Black embroidery thread

This pattern is worked “in-the-round”, and stitches are worked through both loops unless otherwise noted. 

Head:

With light colored yarn, ch 3. Sl st to first ch to create circle. (Instead, you can perform the “magic circle” if you’d like.)

Row 1: ch 1, 5 sc inside of circle. (5 stitches)

Row 2: Inc in each stitch around. (10 stitches)

Row 3: *Inc in first stitch, sc in next stitch, repeat from * around. (15 stitches)

Row 4: *Inc in first stitch, sc in next 2 stitches, repeat from * around. (20 stitches)

Row 5: Sc in each stitch around. (20 stitches)

Row 6: *Inc in first stitch, sc in next 3 stitches, repeat from * around. (25 stitches)

Rows 7-9: Sc in each stitch around. (25 stitches)

Row 10: *Inc in first stitch, sc in next 4 stitches, repeat from * around. (30 stitches)

Row 11: *Inc in first stitch, sc in next 5 stitches, repeat from * around. (35 stitches)

Row 12: Sc in first 15 stitches, inc in next 5 stitches, sc in next 15 stitches. (40 stitches)

Switch to darker color.

Row 13: Sc in each stitch around. (40 stitches)

Row 14: *Inc in first stitch, sc in next 7 stitches, repeat from * around. (45 stitches)

Row 15: Sc in each stitch around. (45 stitches)

Row 16: *Inc in first stitch, sc in next 8 stitches, repeat from * around. (50 stitches)

Rows 17-22: Sc in each stitch around. (50 stitches)

Row 23: *Dec in first 2 stitches, sc in next 8 stitches, repeat from * around. (45 stitches)

Row 24: *Dec in first 2 stitches, sc in next 7 stitches, repeat from * around. (40 stitches)

Row 25: Sc in each stitch around. (40 stitches)

Row 26: *Dec in first 2 stitches, sc in next 6 stitches, repeat from * around. (35 stitches)

Row 27: *Dec in first 2 stitches, sc in next 5 stitches, repeat from * around. (30 stitches)

Row 28: Sc in each stitch around. (30 stitches)

Stop at this point and stuff with poly-fil. Insert safety eyes between rows 12 and 13 with 12 stitches in between them. Sew nose on with embroidery thread. Continue stuffing head as you work.

Row 29: *Dec in first 2 stitches, sc in next 4 stitches, repeat from * around. (25 stitches)

Row 30: *Dec in first 2 stitches, sc in next 3 stitches, repeat from * around. (20 stitches)

Row 31: *Dec in first 2 stitches, sc in next 2 stitches, repeat from * around. (15 stitches)

Row 32: *Dec in first 2 stitches, sc in next stitch, repeat from * around. (10 stitches)

Row 33: Dec around. (5 stitches)

Sew end shut. Tie off.

Ears:

With darker colored yarn, ch 3. Sl st to first ch to create circle. (Instead, you can perform the “magic circle” if you’d like.)

Row 1: ch 1, 5 sc inside of circle. (5 stitches)

Row 2: Sc in each stitch around. (5 stitches)

Row 3: Inc in each stitch around. (10 stitches)

Row 4: Sc in each stitch around. (10 stitches)

Row 5: *Inc in first stitch, sc in next stitch, repeat from * around. (15 stitches)

Rows 6-10: Sc in each stitch around. (15 stitches)

Tie off. Make two. Lay flat and fold in half to sew onto head.

Body:

With darker colored yarn, ch 3. Sl st to first ch to create circle. (Instead, you can perform the “magic circle” if you’d like.)

Row 1: ch 1, 5 sc inside of circle. (5 stitches)

Row 2: Inc in each stitch around. (10 stitches)

Row 3: *Inc in first stitch, sc in next stitch, repeat from * around. (15 stitches)

Row 4: *Inc in first stitch, sc in next 2 stitches, repeat from * around. (20 stitches)

Row 5: *Inc in first stitch, sc in next 3 stitches, repeat from * around. (25 stitches)

Row 6: *Inc in first stitch, sc in next 4 stitches, repeat from * around. (30 stitches)

Row 7: *Inc in first stitch, sc in next 5 stitches, repeat from * around. (35 stitches)

Row 8: *Inc in first stitch, sc in next 6 stitches, repeat from * around. (40 stitches)

Row 9: *Inc in first stitch, sc in next 7 stitches, repeat from * around. (45 stitches)

Row 10: *Inc in first stitch, sc in next 8 stitches, repeat from * around. (50 stitches)

Row 11: *Dec in first 2 stitches, sc in next 8 stitches, repeat from * around. (45 stitches)

Rows 12-16: Sc in each stitch around. (45 stitches)

Row 17: *Dec in first 2 stitches, sc in next 7 stitches, repeat from * around. (40 stitches)

Row 18: *Dec in first 2 stitches, sc in next 6 stitches, repeat from * around. (35 stitches)

Rows 19-20: Sc in each stitch around. (35 stitches)

Row 21: *Dec in first 2 stitches, sc in next 5 stitches, repeat from * around. (30 stitches)

Rows 22-23: Sc in each stitch around. (30 stitches)

Row 24: *Dec in first 2 stitches, sc in next 4 stitches, repeat from * around. (25 stitches)

Rows 25-29: Sc in each stitch around. (25 stitches)

Tie off. Stuff with poly-fil. Sew head onto body.

Legs and Arms:

With light colored yarn, ch 3. Sl st to first ch to create circle. (Instead, you can perform the “magic circle” if you’d like.)

Row 1: ch 1, 5 sc inside of circle. (5 stitches)

Row 2: Inc in each stitch around. (10 stitches)

Row 3: *Inc in first stitch, sc in next stitch, repeat from * around. (15 stitches)

Row 4: *Inc in first stitch, sc in next 2 stitches, repeat from * around. (20 stitches)

Row 5: In front loops only, *dec in first 2 stitches, sc in next 2 stitches, repeat from * around. (15 stitches)

Rows 6-7: Sc in each stitch around. (15 stitches)

Switch to darker color.

Row 8: *Inc in first stitch, sc in next 2 stitches, repeat from * around. (20 stitches)

Rows 9-24: Sc in each stitch around. (20 stitches)

Row 25: *Dec in first 2 stitches, sc in next 2 stitches, repeat from * around. (15 stitches)

Rows 26-28: Sc in each stitch around. (15 stitches)

Tie off. Stuff legs about 3/4 of the way with poly-fil. Stuff arms about halfway with poly-fil. Sew onto body.

Tail:

With white yarn, ch 3. Sl st to first ch to create circle. (Instead, you can perform the “magic circle” if you’d like.)

Row 1: ch 1, 5 sc inside of circle. (5 stitches)

Row 2: Sc in each stitch around. (5 stitches)

Row 3: Inc in each stitch around. (10 stitches)

Rows 4-5: Sc in each stitch around. (10 stitches)

Tie off. Do not stuff. Lay flat and sew onto butt.


If you want to fluff up the yarn like I did, you’ll need a dog or cat brush to brush it out. I like the cat ones because they’re smaller so you can get smaller areas better. You want to make sure it has wire bristles.

IMG_1447-51

Only brush the darker yarn to give it some fluff.


Just work the brush in different directions around the yarn. If you choose to do this, I recommend doing this to each piece before you sew it together. I also added a few strands of yarn to the top of their heads and brushed it out a bit to fluff it up.

IMG_1635

I hope you enjoy this pattern! You’re welcome to sell items that you make using my patterns, as long as you don’t post the pattern anywhere else, and link back to my page if you’d like to. If there are any mistakes, or something is unclear, please feel free to leave me a comment and let me know. Or message me on Facebook. If you create any llamas of your own, be sure to post a photo on my Facebook page so I can see. I love seeing all of the things people are creating, and I’d love to see the different variations that people make of these.


9 Free Easter Crochet Patterns

Easter is coming, so be sure you have time to make those Easter crafts. There are so many cute (and free!) Easter patterns out there, but I scraped together 9 of my favorites.

Collage3

  1. Crochet Easter eggs are so pretty, and they last a lot longer than real eggs. There are a lot of variations you can do with these too.
  2. How about some Easter egg coasters? These would look cute on your coffee table when everybody comes over for Easter dinner.
  3. I’m not a big fan of Peeps, but these marshmallow bunnies are so cute and will last a lot longer.
  4. This pattern is for a rooster, but done in white it looks like a cute little chick for Easter.
  5. I love these carrot drawstring bags. They’d be perfect filled with candy, and you can even find the pattern for the little bunnies that will fit inside.
  6. These little mini baskets would be great to fill with just a couple of pieces of candy. They’re perfect if you’ve got a lot of little ones coming over for the holiday.
  7. This sheep drawstring bag would really be good any time, but it’s an especially cute idea to fill with candy for Easter.
  8. Ready for something a bit more challenging? This bunny pattern is pretty complex, but the end result is so worth it. I love the chubby cheeks!
  9. Crochet up your own Easter baskets with this chick basket pattern. And don’t miss the bunny basket pattern or the sheep basket pattern.

Don’t miss these free patterns that I’ve posted on here as well.

Little Chick Basket

Bunnies, bunnies, bunnies

Chicks and Ducks

I hope you enjoy these free patterns. Have you found any cute free Easter patterns? Go share them with me on my Facebook page!

Shaymus the Leprechaun

IMG_1266

Shaymus the Leprechaun is ready for you to find him at the end of the rainbow. This finished doll is approximately 14 inches tall from the top of his hat to the bottom of his feet, and would make a great decoration for St. Patrick’s Day.

If you want a pattern that you can save on your computer and easily print, this pattern is available in my Ravelry shop for only $2.00. I love printing patterns and saving them in a binder to keep track of the ones I’ve done and the ones I still plan to do.

IMG_1261

Abbreviations:

ch: chain

sc: single crochet

sl st: slip stitch

inc: increase (2 single crochets in one loop)

dec: decrease (pull yarn through loop, pull yarn through second loop, yarn over and pull through all loops)

Materials needed (with affiliate links):

Lion Brand Vanna’s Choice yarn in fern, kelly green, lemon, fisherman and rust. Loops and Threads Impeccable yarn in deep forest.

I (5.25mm) crochet hook

15mm safety eyes

Yarn needle

Poly-fil 

Pipe Cleaners (optional)

This pattern is worked “in-the-round”, and stitches are worked through both loops unless otherwise noted. 

Head:

With fisherman, ch 3. Sl st to first ch to create circle. (Instead, you can perform the “magic circle” if you’d like.)

Row 1: ch 1, 10 sc inside of circle. (10 stitches)

Row 2: *Inc in first stitch, sc in next stitch, repeat from * around. (15 stitches)

Row 3: *Inc in first stitch, sc in next 2 stitches, repeat from * around. (20 stitches)

Row 4: *Inc in first stitch, sc in next 3 stitches, repeat from * around. (25 stitches)

Row 5: *Inc in first stitch, sc in next 4 stitches, repeat from * around. (30 stitches)

Row 6: *Inc in first stitch, sc in next 5 stitches, repeat from * around. (35 stitches)

Row 7: *Inc in first stitch, sc in next 6 stitches, repeat from * around. (40 stitches)

Row 8: *Inc in first stitch, sc in next 7 stitches, repeat from * around. (45 stitches)

Row 9: *Inc in first stitch, sc in next 8 stitches, repeat from * around. (50 stitches)

Rows 10-15: Sc in each stitch around. (50 stitches)

Row 16: *Dec in first 2 stitches, sc in next 8 stitches, repeat from * around. (45 stitches)

Row 17: *Dec in first 2 stitches, sc in next 7 stitches, repeat from * around. (40 stitches)

Row 18: *Dec in first 2 stitches, sc in next 6 stitches, repeat from * around. (35 stitches)

Row 19: *Dec in first 2 stitches, sc in next 5 stitches, repeat from * around. (30 stitches)

Row 20: *Dec in first 2 stitches, sc in next 4 stitches, repeat from * around. (25 stitches)

Row 21: *Dec in first 2 stitches, sc in next 3 stitches, repeat from * around. (20 stitches)

Tie off. Stuff with poly-fil.

Hat:

With kelly green, ch 3. Sl st to first ch to create circle. (Instead, you can perform the “magic circle” if you’d like.)

Row 1: ch 1, 10 sc inside of circle. (10 stitches)

Row 2: *Inc in first stitch, sc in next stitch, repeat from * around. (15 stitches)

Row 3: *Inc in first stitch, sc in next 2 stitches, repeat from * around. (20 stitches)

Row 4: *Inc in first stitch, sc in next 3 stitches, repeat from * around. (25 stitches)

Row 5: *Inc in first stitch, sc in next 4 stitches, repeat from * around. (30 stitches)

Row 6: *Inc in first stitch, sc in next 5 stitches, repeat from * around. (35 stitches)

Row 7: *Inc in first stitch, sc in next 6 stitches, repeat from * around. (40 stitches)

Row 8: *Inc in first stitch, sc in next 7 stitches, repeat from * around. (45 stitches)

Row 9: *Inc in first stitch, sc in next 8 stitches, repeat from * around. (50 stitches)

Row 10: *Inc in first stitch, sc in next 9 stitches, repeat from * around. (55 stitches)

Row 11: In front loops only, sc in each stitch around. (55 stitches)

Row 12: *Dec in first 2 stitches, sc in next 9 stitches, repeat from * around. (50 stitches)

Row 13: *Dec in first 2 stitches, sc in next 8 stitches, repeat from * around. (45 stitches)

Rows 14-21: Sc in each stitch around. (45 stitches)

Switch to deep forest.

Rows 22-24: Sc in each stitch around. (45 stitches)

Switch to kelly green.

Rows 25-26: Sc in each stitch around. (45 stitches)

Row 27: In back loops only, sc in each stitch around. (45 stitches)

Row 28: *Inc in first stitch, sc in next 2 stitches, repeat from * around. (60 stitches)

Row 29: Sc in each stitch around. (60 stitches)

Tie off. Use lemon yarn to sew buckle onto hat. Pull hat onto head and get it where you want it. Figure out the placement of his eyes, but don’t put the backs on yet. Sew hat onto head, then attach hair underneath hat so that it falls over the loops.

IMG_1286

Once you have the hat and hair on, make sure the eye placement is where you want it, and attach the backs. You can sew on a nose and/or mouth if you want to,  but I always choose to leave those off because it makes their expression more neutral. You can also use a bit of blush on their cheeks to give the face some color.

IMG_1297

Body:

With kelly green, ch 3. Sl st to first ch to create circle. (Instead, you can perform the “magic circle” if you’d like.)

Row 1: ch 1, 10 sc inside of circle. (10 stitches)

Row 2: *Inc in first stitch, sc in next stitch, repeat from * around. (15 stitches)

Row 3: *Inc in first stitch, sc in next 2 stitches, repeat from * around. (20 stitches)

Row 4: *Inc in first stitch, sc in next 3 stitches, repeat from * around. (25 stitches)

Row 5: *Inc in first stitch, sc in next 4 stitches, repeat from * around. (30 stitches)

Row 6: *Inc in first stitch, sc in next 5 stitches, repeat from * around. (35 stitches)

Row 7: *Dec in first 2 stitches, sc in next 5 stitches, repeat from * around. (30 stitches)

Switch to fern.

Rows 8-9: Sc in each stitch around. (30 stitches)

Switch to deep forest.

Rows 10-11: Sc in each stitch around. (30 stitches)

Switch to fern.

Row 12: Sc in each stitch around. (30 stitches)

Row 13: *Dec in first 2 stitches, sc in next 4 stitches, repeat from * around. (25 stitches)

Rows 14-16: Sc in each stitch around. (25 stitches)

Row 16: *Dec in first 2 stitches, sc in next 3 stitches, repeat from * around. (20 stitches)

Switch to fisherman.

Row 16: Sc in each stitch around. (20 stitches)

Tie off. Stuff with poly-fil. Use lemon yarn to sew a buckle onto his belt. You can leave it as is, or you can attach fern on the bottom of his shirt and sc around twice to create the bottom cuff of his shirt. Sew head onto body.

IMG_1290

Arms:

With fisherman, ch 3. Sl st to first ch to create circle. (Instead, you can perform the “magic circle” if you’d like.)

Row 1: ch 1, 6 sc inside of circle. (6 stitches)

Rows 2-3: Sc in each stitch around. (6 stitches)

Switch to fern.

Rows 4-15: Sc in each stitch around. (6 stitches)

Tie off. Do not stuff. You can insert pipe cleaners in the arms if you want them to be poseable. You can leave it as is, or you can attach fern on the bottom of his sleeve and sc around once to separate the sleeve. Sew onto body.

IMG_1293

Legs:

With deep forest, ch 3. Sl st to first ch to create circle. (Instead, you can perform the “magic circle” if you’d like.)

Row 1: ch 1, 10 sc inside of circle. (10 stitches)

Rows 2-8: Sc in each stitch around. (10 stitches)

Switch to kelly green.

Rows 9-15: Sc in each stitch around. (10 stitches)

Tie off. Stuff with poly-fil. You can leave it as is, or you can attach deep forest on the top of his boots and sc around twice to create the cuff of his boot. Sew onto body.

IMG_1294

And there you have your finished leprechaun.

IMG_1282

IMG_1299

I hope you enjoy this pattern! You’re welcome to sell items that you make using my patterns, as long as you don’t post the pattern anywhere else, and link back to my page if you’d like to. If there are any mistakes, or something is unclear, please feel free to leave me a comment and let me know. Or message me on Facebook. If you create any dolls of your own, be sure to post a photo on my Facebook page so I can see. I love seeing all of the things people are creating, and I’d love to see the different variations that people make of these.

Sir Sprinkles the Unicorn Hat

IMG_1769

A few days ago, I released my pattern for Sir Sprinkles the Giant Unicorn over on Ravelry. Now, you can make a matching hat to go with Sir Sprinkles.

I made these for my niece’s birthday, since she loves unicorns and was having a unicorn  birthday party. Check out the mobile I also made for her bedroom!

If you want a pattern that you can save on your computer and easily print, this pattern is available in my Ravelry shop for only $2.00. I love printing patterns and saving them in a binder to keep track of the ones I’ve done and the ones I still plan to do.

IMG_1775

This hat was made for a 7-year-old, but it fit my 13-year-old just fine. This pattern is written as a “one-size-fits-most” hat, but I also include instructions to make it smaller or bigger.

Abbreviations:

ch: chain

sc: single crochet

sl st: slip stitch

inc: increase (2 single crochets in one loop)

dec: decrease (pull yarn through loop, pull yarn through second loop, yarn over and pull through all loops)

Materials needed (with affiliate links):

Any worsted weight yarn will work, but I used Caron One Pound in white, Lion Brand Pound of Love in pastel blue, and various Vanna’s Choice yarns for the mane and tail.

J (6mm) crochet hook

I (5.25mm) crochet hook 

Yarn needle

This pattern is worked “in-the-round”, and stitches are worked through both loops unless otherwise noted. 

Hat:

With white yarn and J hook, ch 3. Sl st to first ch to create circle. (Instead, you can perform the “magic circle” if you’d like.)

Row 1: ch 1, 5 sc inside of circle. (5 stitches)

Row 2: Inc in each stitch around. (10 stitches)

Row 3: *Inc in first stitch, sc in next stitch, repeat from * around. (15 stitches)

Row 4: *Inc in first stitch, sc in next 2 stitches, repeat from * around. (20 stitches)

Row 5: *Inc in first stitch, sc in next 3 stitches, repeat from * around. (25 stitches)

Row 6: *Inc in first stitch, sc in next 4 stitches, repeat from * around. (30 stitches)

Row 7: *Inc in first stitch, sc in next 5 stitches, repeat from * around. (35 stitches)

Row 8: *Inc in first stitch, sc in next 6 stitches, repeat from * around. (40 stitches)

Row 9: *Inc in first stitch, sc in next 7 stitches, repeat from * around. (45 stitches)

Row 10: *Inc in first stitch, sc in next 8 stitches, repeat from * around. (50 stitches)

(To make the hat fit a smaller head, skip row 11 and go straight to row 12.)

Row 11: *Inc in first stitch, sc in next 9 stitches, repeat from * around. (55 stitches)

(To make the hat fit a larger head, add an extra increase row here: *Inc in first stitch, sc in next 10 stitches, repeat from * around.)

Rows 12-30: Sc in each stitch around. (55 stitches)

(You can make the hat smaller or larger by reducing or increasing the number of rows that you do.)

Tie off.

Ear Flaps:

Attach white yarn with a slip stitch to make the first ear flap.

IMG_1529

Row 1: Sc in 10 stitches, ch 1, turn. (10 stitches)

Row 2: Sc in each stitch across, ch 1, turn. (10 stitches)

Row 3: Dec in first 2 stitches, sc in next 6 stitches, dec in last 2 stitches, ch 1, turn. (8 stitches)

Row 4: Sc in each stitch across, ch 1, turn. (8 stitches)

Row 5: Dec in first 2 stitches, sc in next 4 stitches, dec in last 2 stitches, ch 1, turn. (6 stitches)

Row 6: Sc in each stitch across, ch 1, turn. (6 stitches)

Row 7: Dec in first 2 stitches, sc in next 2 stitches, dec in last 2 stitches, ch 1, turn. (4 stitches)

Row 8: Sc in each stitch across, ch 1, turn. (4 stitches)

Row 9: Dec in first 2 stitches, dec in last 2 stitches, ch 1, turn. (2 stitches)

Row 10: Sc in each stitch across, ch 1, turn. (2 stitches)

Tie off.

IMG_1534

Attach second ear flap 17 stitches apart from first ear flap. (15 stitches apart for a smaller hat, 20 stitches apart for a bigger hat.) Repeat pattern.

IMG_1548

Attach blue yarn with a slip stitch and crochet around the bottom of the hat.

IMG_1560

For the braids, cut your yarn about 40 inches long. I used 9 strands for each side, 3 strands of each color.

IMG_1562

Using your crochet hook and fingers, loop the strands through each ear flap and pull them through, then tie it in a knot.

Separate your strands and braid them, then tie a knot at the bottom. I like to mix the colors, using all of them in each section. You could separate them by color if you want, though, and it would also look nice.

Now you’re ready to attach the unicorn pieces.

Horn:

With blue yarn and I hook, ch 3. Sl st to first ch to create circle. (Instead, you can perform the “magic circle” if you’d like.)

Row 1: ch 1, 4 sc inside of circle. (4 stitches)

Row 2: Sc in each stitch around. (4 stitches)

Row 3: *Inc in first stitch, sc in next stitch, repeat from * around. (6 stitches)

Row 4: Sc in each stitch around. (6 stitches)

Row 5: *Inc in first stitch, sc in next 2 stitches, repeat from * around. (8 stitches)

Row 6: Sc in each stitch around. (8 stitches)

Row 7: *Inc in first stitch, sc in next 3 stitches, repeat from * around. (10 stitches)

Row 8: Sc in each stitch around. (10 stitches)

Row 9: *Inc in first stitch, sc in next 4 stitches, repeat from * around. (12 stitches)

Row 10: Sc in each stitch around. (12 stitches)

Stop at this point and stuff with poly-fil. Continue to stuff as you work.

Row 11: *Inc in first stitch, sc in next 5 stitches, repeat from * around. (14 stitches)

Row 12: Sc in each stitch around. (14 stitches)

Row 13: *Inc in first stitch, sc in next 6 stitches, repeat from * around. (16 stitches)

Rows 14-16: Sc in each stitch around. (16 stitches)

Tie off. Sew onto top of hat, a bit toward the front.

Ears:

With white yarn and I hook, ch 3. Sl st to first ch to create circle. (Instead, you can perform the “magic circle” if you’d like.)

Row 1: ch 1, 4 sc inside of circle. (4 stitches)

Row 2: *Inc in first stitch, sc in next stitch, repeat from * around. (6 stitches)

Row 3: *Inc in first stitch, sc in next 2 stitches, repeat from * around. (8 stitches)

Row 4: *Inc in first stitch, sc in next 3 stitches, repeat from * around. (10 stitches)

Row 5: *Inc in first stitch, sc in next 4 stitches, repeat from * around. (12 stitches)

Row 6: *Inc in first stitch, sc in next 5 stitches, repeat from * around. (14 stitches)

Row 7: *Inc in first stitch, sc in next 6 stitches, repeat from * around. (16 stitches)

Rows 8-10: Sc in each stitch around. (16 stitches)

Row 11: *Dec in first 2 stitches, sc in next 2 stitches, repeat from * around. (12 stitches)

Tie off. Make two. Fold flat and sew onto top of hat.

Hair:

With I hook, chain 30 or 40. I did different lengths so they wouldn’t all sit even. Work 2 or 3 sc’s into each chain. Be sure to leave a long tail at the beginning and end of each curl to attach it to the hat.

IMG_1591

You can make this hat with lots of curls or with hardly any. The choice is yours.


I hope you enjoy this pattern! You’re welcome to sell items that you make using my patterns, as long as you don’t post the pattern anywhere else, and link back to my page if you’d like to. If there are any mistakes, or something is unclear, please feel free to leave me a comment and let me know. Or message me on Facebook. If you create any hats of your own, be sure to post a photo on my Facebook page so I can see. I love seeing all of the things people are creating, and I’d love to see the different variations that people make of these.

Unicorn Decor Ideas

In honor of Unicorn Week, I decided to do a post to help you turn any room into a unicorn paradise. As a little girl, I was absolutely obsessed with unicorns. I would have loved a room decorated to look like a fairytale. With a little DIY, you could turn your daughter’s room (or yours!) into a room fit for a princess.

I spent some time on Pinterest today looking at things that I would totally make for my bedroom if I could go back and decorate it when I was a kid. Ok, ok, maybe I’m still considering decorating my adult bedroom this way. There’s nothing wrong with that, right? So check out these cool ideas I found!

Collage1a

  1. How about an ombre wall? I think this would look so pretty in multiple pastel colors, like a rainbow on your walls. Behr Paint shows you exactly how to do it.
  2. I love the idea of these pom-poms in the corner of a room. I think I’d make mine out of yarn, though, since I have so much of it here already. Sami Says Ag has this great post with a lot of pictures of her daughter Sami’s new pastel bedroom. You have to go check it out!
  3. This unicorn wreath is absolutely beautiful. Imagine decorating it with pom-poms to match the ones you made for the corner? Brit+Co gives step-by-step instructions on how to make it.
  4. I love this unicorn rug. It looks so soft and cozy. Hello Giggles has a video that shows you how to make your own.
  5. Want to decorate the wall with your child’s name? Why not turn the letters into unicorns? If you don’t want to make your own, Liam Sloane Design makes and sells them on Etsy.
  6. This gorgeous unicorn is actually a hair bow holder. I saw a few people who made their own on Pinterest, or you could purchase this beautiful one already made for you from The Faraway Tree GB on Etsy.
  7. You can’t have a princess room without a pretty canopy to hang out under. Whether it’s over a bed, or in a corner with pillows under it for a reading spot, Adventures in Pinteresting tells you how to make it with a hula hoop, fabric and lights.
  8. I’ve always loved dream catchers, but this unicorn dream catcher is beautiful. I may need to make some for my bedroom. Hello, Wonderful tells you how to make your own.

I hope this gave you some ideas. Don’t forget to check out my post about making unicorn ornaments, and see how I made this mobile for my niece.

Collage2

And if you want a giant unicorn to set on the bed in your unicorn bedroom, go check out my pattern for Sir Sprinkles the Giant Unicorn. It’s only $3.00 on Ravelry.

Collage

Have you seen any other cool unicorn decor ideas? Leave me a comment here or on Facebook and tell me about it!

Unicorn Ornaments

IMG_1671

Over a year ago, I bought a bunch of these plastic ornaments with the intention of doing something with them. They sat here in a bag, along with a lot of other craft things that I buy and never do anything with, until I found them a couple of weeks ago. I decided it was time to do something with them.

Since my niece was about to have a unicorn birthday party, and I’ve always been a big fan of unicorns, it made sense for me to turn these ornaments into something for her. I went to Pinterest to get an idea of what I needed to do.

There are a lot of different tutorials that will help you make ornaments like these. I read through a few different ones, but in the end I found this tutorial from Hello, Wonderful was the most useful. Go check out that page to get a more step-by-step tutorial on how to make your own ornaments. Here are the ones I made.

IMG_1704

The biggest thing for me was how to get the glitter to stick inside of the ornaments. I was surprised at the product that was recommended from a few different sites.

IMG_1753

Pledge Floor Care seems to work the best, although I really have no idea why. Just squirt it in the top of the ornaments, shake it around to completely cover the inside, then dump out any excess. Pour your glitter in, shake it around to cover, and pour out any extra glitter. It sticks in there perfectly, and they turned out so pretty. I used extra fine glitter for my ornament.

IMG_1707

I always have polymer clay around here, which I used to make the horns. I picked up some little ribbon roses to hot glue on the top, and made ears out of felt. Then I used a sharpie to draw on the eyes.

IMG_1676

IMG_1709

IMG_1698

I was pretty happy with how my unicorn turned out. I had 2 of these bigger ornaments, so I decided to turn the other one into a narwhal for my boyfriend.

IMG_1691a

I used a courser glitter for his, and made felt flippers instead of ears. Then I just cut some pieces off of a flower arrangement I have here and glued them on his head to look like seaweed.

IMG_1695

IMG_1691

Once I had these finished, I decided to set to work making the ones for my niece. I had a box of 6 of the smaller ornaments, so I was thinking I’d turn them each into a unicorn that she could hang around her bedroom. Then I remembered an owl mobile that I made for another niece years ago, and I knew I still had some metal hoops around here somewhere.

IMG_1751

I picked up some split rings to use to hang the mobile, then grabbed some ribbon and yarn. My niece’s favorite colors are pink and purple, so I used those colors to create her unicorn mobile.

Collage2

I like it so much that I may have to make another one to hang in my bedroom. These were a fun project that really didn’t take much time to make. Next Christmas, I’ll definitely be stocking up on these ornaments to make some other things now that I know how to get the glitter to stick. I’m thinking some cute snowmen would be fun. What else would you make with ornaments like this? If you have other ideas, leave me a comment here or go post about it on my Facebook page.

Crochet Unicorn Roundup

I’ve declared this week Unicorn Week in honor of my release of my pattern for Sir Sprinkles the Giant Unicorn over on Ravelry.

Collage

In keeping with that tradition, I searched far and wide (ok, ok, I actually just searched Pinterest) and found these 10 free unicorn patterns for you. Go check them out!

Collagea

  1. I love this unicorn rag doll by Spin a Yarn Crochet.
  2. This unicorn ornament by 5 Little Monsters would be cute any time of the year.
  3. How cute is this unicorn headband by The Knotty Redhead?
  4. This plush unicorn by The Cookie Snob is so adorable.
  5. What little girl wouldn’t love this unicorn scarf by Semi Sweet Crafter?
  6. This plush unicorn by 1 Dog Woof looks so very cuddly.
  7. This horse pattern on Amigurami Today can easily be turned into a unicorn.
  8. This unicorn applique by Kerri’s Crochet looks so happy and cute.
  9. How about some unicorn slippers? Yarnutopia has you covered.
  10. 3am Grace Designs has made a beautiful unicorn cuddler.

When you’re done checking out those patterns, don’t forget to add these ones to your to-do list:

IMG_1785

Stanley the Unicorn is available free on my blog, or you can purchase a printable pattern on Ravelry for only $2.00.

IMG_1769

Crochet up a Sir Sprinkles the Unicorn hat to go with your giant Sir Sprinkles. The hat pattern will be free on my blog in a few days, or you can purchase the printable pattern for only $2.00 on Ravelry. And don’t forget about Sir Sprinkles the Giant Unicorn. His pattern is only available on Ravelry, and it’s only $3.00.

I have a soft spot for unicorns, and probably always will. I will definitely be trying a few of these patterns soon. Have you found any neat unicorn patterns lately? Leave me a comment and tell me about them, or go post a link on my Facebook page so I can check them out.